Search icon CANCEL
Subscription
0
Cart icon
Your Cart (0 item)
Close icon
You have no products in your basket yet
Save more on your purchases! discount-offer-chevron-icon
Savings automatically calculated. No voucher code required.
Arrow left icon
Explore Products
Best Sellers
New Releases
Books
Videos
Audiobooks
Learning Hub
Newsletter Hub
Free Learning
Arrow right icon
timer SALE ENDS IN
0 Days
:
00 Hours
:
00 Minutes
:
00 Seconds
Arrow up icon
GO TO TOP
Hands-On Agile Software Development with JIRA

You're reading from   Hands-On Agile Software Development with JIRA Design and manage software projects using the Agile methodology

Arrow left icon
Product type Paperback
Published in Jul 2018
Publisher
ISBN-13 9781789532135
Length 158 pages
Edition 1st Edition
Tools
Concepts
Arrow right icon
Author (1):
Arrow left icon
David Harned David Harned
Author Profile Icon David Harned
David Harned
Arrow right icon
View More author details
Toc

Project management

In this section, we'll discuss managing projects in JIRA.

The steps for managing projects in JIRA are as follows:

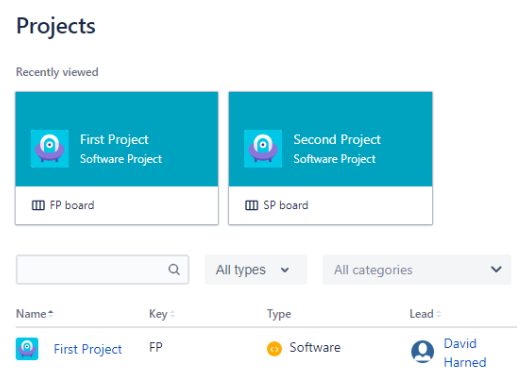
  1. Select Projects in the left-hand menu. You will see a First Project and a Second Project:
  1. Select the First Project. This will bring you to the Backlog view of the project. The backlog is where we will store all of the stories, bugs, and different work item issue types that we want inside of this project:
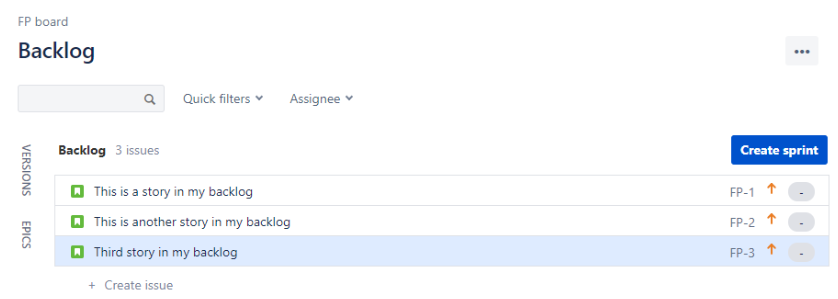
Backlog view of the project

In the Backlog view, you'll see some options. First, there is a search option. To start a search, we just start to type in the box, and the backlog will filter itself to match what is typed. There are also some drop-down options, named Quick filters and Assignee. These allow us to filter the contents of the backlog, to quickly refine it to whatever we choose.

In the left-hand column, you will also see the following options:

    • Active sprints: We can select this and get the board view for the current sprint.
    • Reports: These are all of the reports that we can look at for this project.
    • Releases: This is where we batch up a large amount of value into a version and release it; this lets us look at all of the details of each release, including what's in it and where we are in the process of building it.
    • Issues and filters: This lets us write queries to search for work items, and then save them as filters.
    • Components: These are groups of work items that we can customize and use to manage the work items.

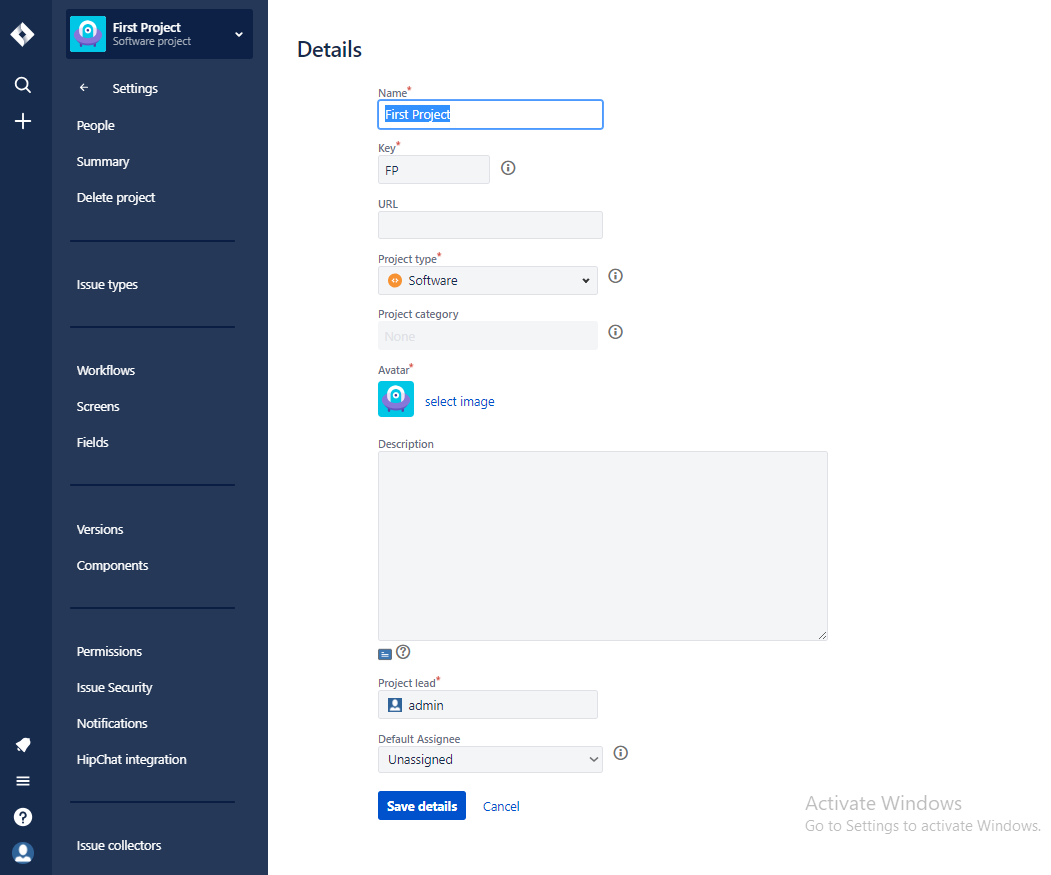
  1. Go down to Project settings. This will take you to the following screen:
Project Settings

As you can see, we have our project Name, a unique Key, a URL, and the Project type; we're going to stick with the Software type, so that we can use agile processes, like Scrum. We can categorize this project, we can select an Avatar image, and we can write a Description. We can also decide who the Project lead will be on this project (admin), and we can decide whether a new item created in the backlog will get assigned to the Project lead (Default Assignee), which in this case, would be the admin; or, we can even leave it Unassigned.

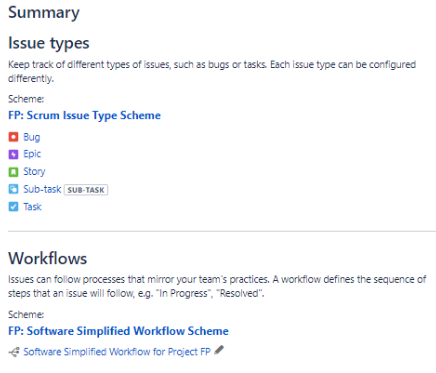
There are a lot of options on the left-hand side of this Project settings page, but we're going to take a look at the Summary view, because the summary is going to give us a look at all of those different options in one view. Issue types and Workflows are shown in the following screenshot:
Summary of Project Settings

Summary of project settings

Before we dive deeper into all of the project settings, let's take a high-level look. First, let's take a look at Workflows so that we can understand how workflows operate. We'll go into more detail in the next section, but what you really need to understand is that this will control the way that the issues move from To Do, to In Progress, to Done, and that we can customize the way that they work:

Workflows configuration

If we take a look at the Screens for this project, we can see that we're using a Scrum Issue Type Screen Scheme. The Screens allow us to select the attributes that appear on the different issue types, such as the story points, assignee, and acceptance criteria:

Screens configuration

Now, look at the Fields. This allows you to control the fields that are available:

Fields configuration

You can also do things like set up and create components. Components are similar to the concept of a tag, which allows us to search or filter work items.

If you'd like to try to create one, you can click on Components on the left-hand side, and call this component Test:

Creating a component

You can also do things such as setting permissions for software projects, as shown in the following screenshot:

Permission schemes are editable

You can even set a scheme for Notifications, as follows:

Default Notification scheme

As you can see, when an issue is created, we will notify—All Watchers, the Current Assignee, and the Reporter. We can also customize this. If you're one of those people that receive way too many emails already, you might want to slim this down a little bit, so that you will only be notified about the most important actions.

That concludes our quick look at projects and their settings in JIRA. Now, let's go into some more detail.

You have been reading a chapter from
Hands-On Agile Software Development with JIRA
Published in: Jul 2018
Publisher:
ISBN-13: 9781789532135
Register for a free Packt account to unlock a world of extra content!
A free Packt account unlocks extra newsletters, articles, discounted offers, and much more. Start advancing your knowledge today.
Unlock this book and the full library FREE for 7 days
Get unlimited access to 7000+ expert-authored eBooks and videos courses covering every tech area you can think of
Renews at $19.99/month. Cancel anytime
Banner background image