Starting groovyConsole to execute Groovy snippets
The Groovy distribution has another option for developers who are more familiar with a graphical interface and want to try out code snippets. The tool in question is groovyConsole, which is very similar to groovysh (see the Using groovysh to try out Groovy commands recipe) except that it provides a GUI with syntax highlighting and basic code editor features.
In this recipe, we are going to cover basic GroovyConsole usage scenarios.
How to do it...
Open your shell and let's dive in:
To start GroovyConsole, you just need to fire the
groovyConsolecommand in your command line:
The GroovyConsole screen is divided into two logical parts. The top area is meant for script editing, and the bottom area displays the script execution output when a script is launched.
By pressing Ctrl + R (CMD + R on a Mac) or going to the Script menu and selecting Run, the script in the edit area will be executed:

Press Ctrl + W (CMD + W on a Mac) to clean the output in the lower pane.
The bottom panel displays an output similar to the
groovyshshell; that is, first the executed script is printed after the groovy> marker followed by the printed output and a result value, if any:
In the previous script, we set the value of the internal test property (this property is being stored within an instance of the
groovy.lang.Scriptclass that is used to execute all the code in the console). If you change that code to reuse the previous field value (for example,+=), you will actually notice that the value changes every time the code gets executed:
Similar to
groovysh, if you define a variable using thedefkeyword, then you can't reuse the previous value. Thedefkeyword is used to define locally scoped variables and in this case, it's bound only to single execution of the script:
Let's go through the editor features of the GroovyConsole application. The File menu offers standard functions to start over by clicking on the New File menu item, to open a new GroovyConsole window, to open a previously saved Groovy script, to save or print contents of the editor, and to close the application as shown in the following screenshot:

The Edit menu provides functionality available in any modern text editor such as copy, paste, and basic search functionality, as shown in the following screenshot:

The View menu has some interesting features for manipulating what is displayed in the bottom output area, as shown in the following screenshot:

It is possible to increase or decrease the font size and configure the way the output panel displays information. For instance, you can disable the script output or clear the output screen at each run.
The History menu allows you to revive previous script versions that you have executed during your session with GroovyConsole, as shown in the following screenshot:

Since GroovyConsole is all about executing a script, the Script menu presents the most valuable options, as shown in the following screenshot:

You can run or abort your script execution, force script compilation, and add additional libraries to the class path. Also, you can Clear Script Context, which will lead to clearing all the script's accumulated properties (for example, test).
Another useful feature is that you can select a part of your script in the editor and execute only that part by clicking on Run Selection in the Script menu, as shown in the following screenshot:

There's more...
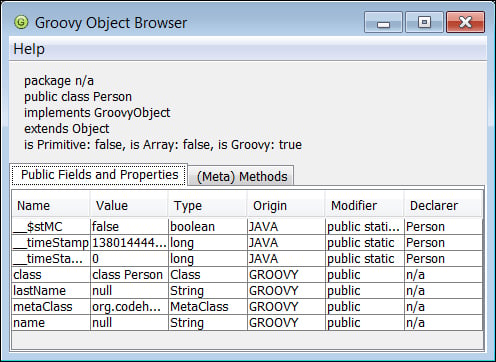
The GroovyConsole tool comes with a handy Object Browser that graphically shows the fields and methods available for a given class.
Press Ctrl + I (CMD + I on a Mac) to launch the browser and display the last evaluated expression. The following simple class would appear like in the following screenshot:
class Person {
  String name
  String lastName
}

p = new Person()
By pressing Ctrl + J (CMD + J on a Mac), we can display another view of the Object Browser, this time focused on the variables visible from within the script.


