Creating a droplet based on a preset
Apple is all about efficiency, and that is very clearly exemplified with the invention of droplets. In Compressor, we can make droplets out of any preset (built by Apple or ourselves). A droplet is a user-created, mini application that can be saved to any folder on our computer. Then, in Finder, all you have to do is drop a video file of your choice on top of the Droplet icon and voila! It will create a new video file based upon the compression settings of the droplet—Compressor never even opens!
Getting ready
We'll carry on from the last exercise, although you can start from scratch.
How to do it...
1. Open Compressor.
2. If you completed the previous exercise, find and highlight the JPEG Image Sequence 50% preset we created in the Settings tab within the settings window. If you did not complete the previous exercise, you may choose and highlight any one of the presets from the Settings tab.
Right-click on the setting and choose Save as Droplet...:

3. In the Save dialog box, you can name the droplet to whatever you like, although it usually makes sense to keep it the same as the setting name. Pick a location where to save the droplet. We'll save them in a folder called Compressor Droplets in our Movies folder:

4. Quit Compressor (by pressing Command + Q).
5. In Finder, navigate to where you saved your new droplet.
6. In a second Finder window (easily created by either double-clicking on Macintosh HD or by hitting Command + N), navigate to a folder that contains a video file you want to compress to the droplets' settings:

7. Drag-and-drop the video file on top of the droplet:

An application simply titled Droplet opens and a window appears. Here we can adjust a couple of last-minute options:

8. The default Destination is set to Source (meaning the location of the source media) but you can change this if you like.
Most interesting to note, however, is the + button which lets us add additional presets to our video. For example, if we wanted to, not only could we create our JPEG image sequence, we could hit the + button and tell the Droplet to upload a version to YouTube as well!

9. Click on Submit. When the additional menu pops up, click on Submit again (there's more info on this window in the previous recipe).
The compression process begins. The file appears almost immediately, but may take a while to fully finish compressing, depending on the preset. An image sequence generally does not take very long to create. Check out the There's more... section on how to observe the progress of the droplet.

There's more...
Checking progress of a droplet
Unfortunately, after clicking on Submit within a droplet, the window just disappears and you're left to guess how long the process will take. However, there is a slightly hidden application that let's you view the progress of the droplet.
Open Compressor and in the batch window, click on the button that says Share Monitor:

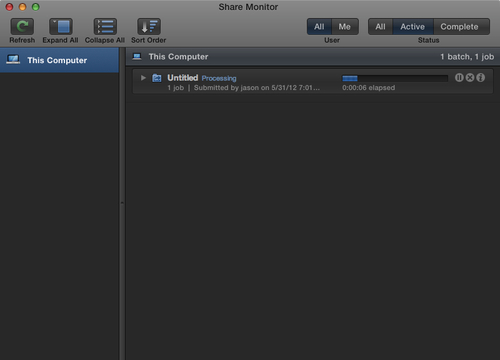
This small application displays a progress list of all batches sent off for compression whether it was from inside Compressor or from a droplet:

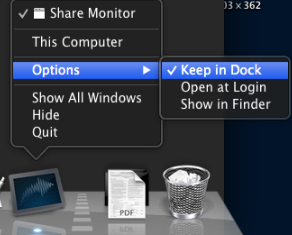
The application is normally hard to find because it is stored inside the Compressor application. The trick here is to add this application to your dock so you can access it easily at any time. After opening it once, right-click on the icon in the dock and choose Options | Keep in Dock. Now the application will always be in your dock for easy access!


