Playwright's advanced test automation capabilities
Just as we explored the advanced features of the Selenium and Cypress frameworks that frontend developers and SDETs can, and should, use in Chapter 9, Working with the Selenium Framework, and Chapter 10, Working with the Cypress Framework, respectively, we will carry out a similar overview of the most advanced features of Playwright.
Note
Measuring code coverage (https://playwright.dev/docs/api/class-coverage) is also considered a powerful capability within software test automation. However, since we've covered the abilities of code coverage with Istanbul and Babel in Chapter 8, Measuring Test Coverage of the Web Application, we will not repeat it here. Keep in mind that for Playwright, the code coverage with Istanbul is currently only supported on Chromium-based browsers.
Playwright Inspector
The Playwright framework provides a GUI tool that can facilitate test automation creation and debugging. The Inspector tool (https://playwright.dev/docs/inspector) allows users to view the DOM elements and debug the tests through breakpoints or test stops. It also allows the DevTools browser to be used for additional debugging and analysis of the web application under test.
To launch the Inspector tool in a PowerShell (https://code.visualstudio.com/docs/languages/powershell) command line, simply run the following command (note that on non-Microsoft machines, PowerShell must be installed separately):
$env:PWDEBUG=1
After running the preceding command, you will launch the Playwright test execution using the normal command:
npx playwright codegen wikipedia.org
The browser will launch with the Inspector tool running in a separate window, as you can see in the following screenshot. From the Inspector window, you can now record your test steps and perform a step over from an existing action to the next.
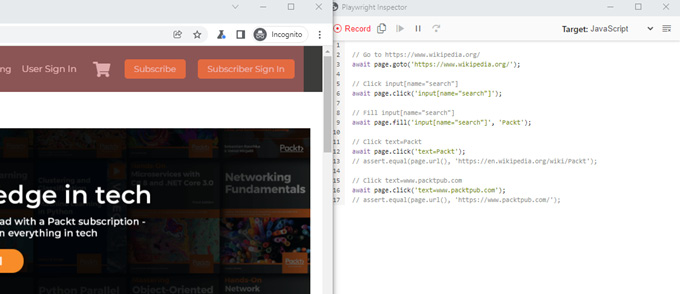
Figure 11.2 – Playwright Inspector tool running in parallel with the JavaScript test
Users of the Inspector tool can step through the test code line by line and see in real time the behavior of the web application under test. In the example below, we are looking at the Firefox browser in a simple login test scenario with a simple step into the input of the username.
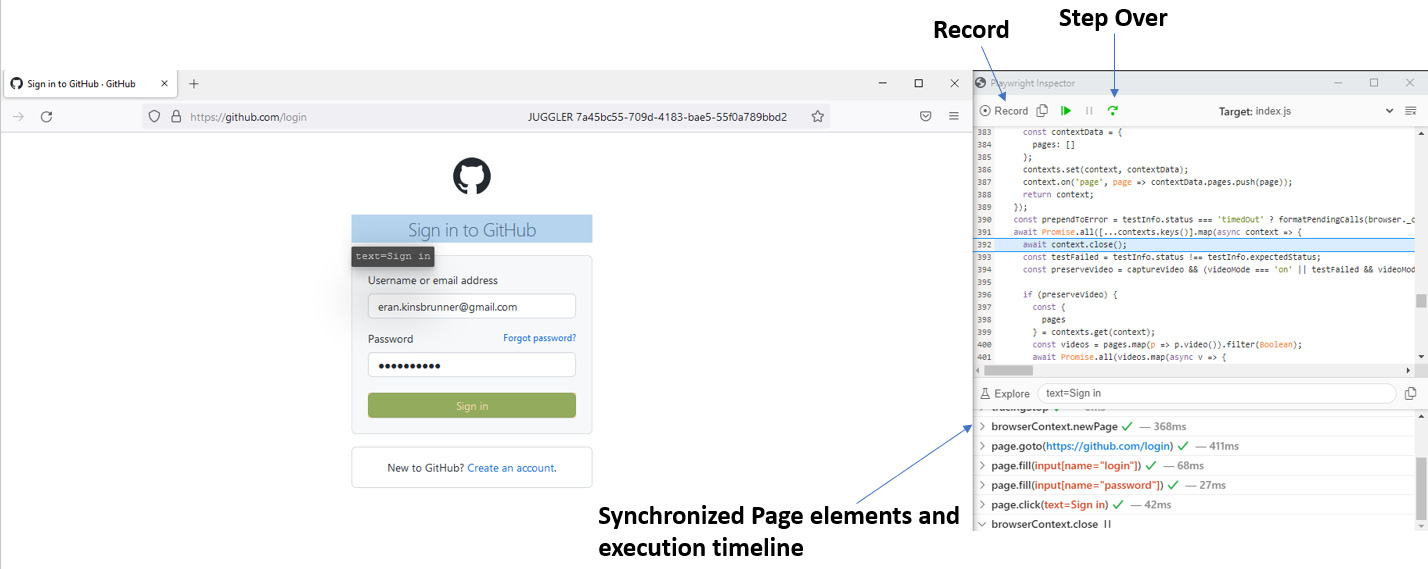
Figure 11.3 – Synchronized Page elements and execution timeline
The GUI has the step-over option, along with a Record button that allows the addition of more steps to an existing test scenario. In the bottom GUI of the Inspector, users can see the elements that the test is interacting with and view all their properties.
When a user clicks on the Explore button on the bottom part of the Inspector GUI, they will get the option to mouse hover the elements on the browser as well as launch and use the browser DevTools mentioned earlier.
When running the test with the Inspector tool enabled, you can launch the Test Generator (https://playwright.dev/docs/codegen) option by clicking on the Record button. Any action performed by the user when the Record button is ON will be converted into test code added to the existing script.
This tool is an awesome addition to the framework that can be leveraged as frontend developers are creating their test code and during debugging processes.
Emulating mobile devices
As opposed to the Cypress framework (which is not mobile-friendly at this stage), Playwright offers built-in mobile device emulation capabilities that can validate against the mobile device viewports and color schemes to show how a web application will look and behave. While it doesn't replace a real mobile device test, it does extend the test coverage capabilities within Playwright. Additional mobile-specific capabilities center on specifying the geolocation, time zones, and locales of the web application under test.
In the code snippet screenshot that follows, you can see how, by using Playwright, you can navigate to the Google website on an iPhone 13 Pro smartphone while setting a German locale (de-DE).
When running the following command, it will open in an iPhone 13 Pro viewport size:
const { webkit, devices } = require('@playwright/test');
const iPhone = devices['iPhone 13 Pro'];
(async () => {
  const browser =
    await webkit.launch({headless: false, slowMo: 300});
  const context = await browser.newContext({
    ...iPhone,
    locale: 'de-DE'
  });
  const page = await context.newPage();
  await page.goto('https://www.google.com/');
  // other actions...
  await page.screenshot({path: 'DE-Google.png'})
  await browser.close();
})();
The preceding code from your IDE terminal can be run by node and the path to the preceding JavaScript source file.
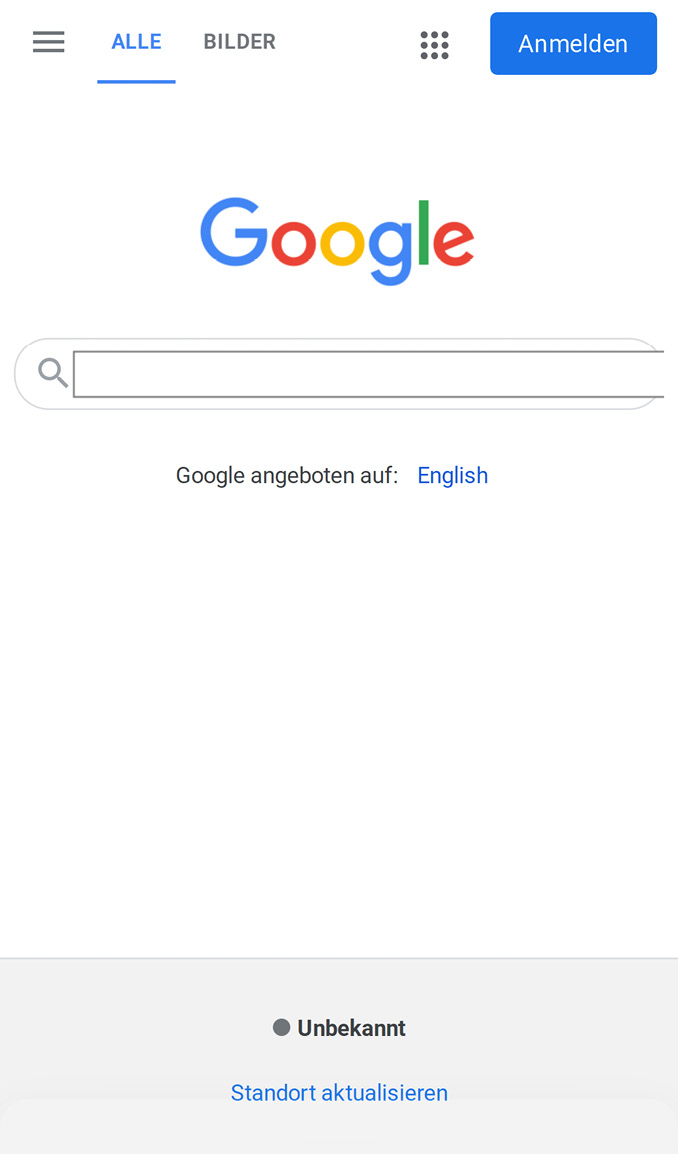
Figure 11.3 – Playwright code snippet that emulates the Google home page on an iPhone 13 Pro device in the German locale
As explained in this section, with Playwright, you can emulate many viewports and mobile devices and cover to some extent your web application responsiveness across these different layouts.
Playwright test annotations
In addition to the above capabilities, the Playwright framework also offers annotations (https://playwright.dev/docs/test-annotations) such as skipping tests, focusing, grouping tests, tagging, and conditionally skipping a group of tests. Such abilities can provide more control and governance within a test suite. A very cool and unique annotation within the Playwright framework is test.fixme(). This annotation marks a test that is constantly failing and lets Playwright ignore it; so, it does not appear as a failure case.
Let's see how we can use the fixme annotation in the earlier code sample of the GitHub login scenario:
const { test, expect } = require('@playwright/test');
test.fixme('basic test', async ({ page }) => {
await page.goto('https://github.com/login');
await page.fill('input[name="login"]', 'EMAIL ADDRESS');
await page.fill('input[name="password"]', 'PASSWORD');
await page.click('text=Sign in');
});
As you can see in the preceding code snippet, .fixme has been added at the beginning of the test and, upon running the test, you will see that it gets skipped.

Figure 11.4 – Playwright fixme annotation example – IDE terminal output
If you had three test cases in your test suite after adding the .fixme annotation, Playwright would only execute two tests and skip the third annotated one, marking it in yellow with the tag skipped, as shown in the preceding screenshot.
You can also enhance the preceding .fixme annotation by adding a condition, for example, ensuring that you only skip a specific browser if it is not supported by the web application (https://playwright.dev/docs/api/class-test#test-fixme-1).
Playwright API testing
Playwright, similar to the Cypress framework, supports API testing activities. We have clarified in Chapter 10, Working with the Cypress Framework, the importance of API testing within the test pyramid as well as the additional layer of coverage that such a testing type adds to the overall testing activities. With Playwright, frontend developers and SDETs can develop API testing (https://playwright.dev/docs/test-api-testing) for their web applications. As with Cypress, you can use the GET, POST, DELETE, and other API methods to send API requests and validate their responses. You can learn more about the common RESTful API methods supported by Playwright in the context of automating expected versus actual results of service API tests here: https://www.restapitutorial.com/lessons/httpmethods.html.
Developing API tests with Playwright can be done through the specified methods of request.get(), request.post(), request.delete(), and so on, or by means of a request context that you create through the following code.
When using a request context, the newly created context, const , is the one that drives all of the API methods through context.get(), context.post(), and so on:
const context = await request.newContext({
    baseURL: 'https://api.github.com',
});
Based on the context created above, which will trigger the HTTP requests, we can create a GitHub API POST test scenario:
await context.post('/user/repos', {
    headers: {
      'Accept': 'application/vnd.github.v3+json',
      // Add GitHub personal access token.
      'Authorization': 'token ${process.env.API_TOKEN}'    },
    data: {
      name: REPO
    }
  });
In the same way as we perform a POST command on the GitHub website, Playwright provides more code examples that cover all other API methods.
As an additional example in the context of GitHub source control capabilities, the following code snippet will create a new feature request on a repository that resides in GitHub. In the following code block, the test performs an API POST request to a specific user (${USER}) and repository (${REPO}) that are configurable as environment variables for the test, with a given title and body for this request:
test('should create a feature request', async ({ request })
  => {
  const newIssue = await request.post(
    '/repos/${USER}/${REPO}/issues', {
    data: {
      title: '[Feature] request 1',
      body: 'Feature description',
    }
  });
This code simply creates a new repository on GitHub via a user API token based on the baseURL that we provided in the preceding short code snippet.
Playwright assertions
Like many test automation frameworks, Playwright also comes with built-in assertion capabilities. Such assertions are used for test scenario validations across positive and negative use cases, as well as for test anchoring or synchronizations. To know that the test step reached its target web page and has the proper title or text, you can use the framework assertions such as expect() and assert.equal(), and also visual assertions using expect(await page.screenshot()).toMatchSnapshot('image name');.
To understand a bit more about assertions, we can use the code snippet provided by Playwright that simply navigates to the Playwright home page and validates the page title and text through the expect method.
We are using assertions on the page URLs to ensure that we have landed on the right pages within the test flow:
const { test, expect } = require('@playwright/test');
test('my test', async ({ page }) => {
  await page.goto('https://playwright.dev/');
  // Expect a title "to contain" a substring.
  await expect(page).toHaveTitle(/Playwright/);
  // Expect an attribute "to be strictly equal" to the
  // value.
  await expect(page.locator('text=Get Started')
    .first()).toHaveAttribute('href', '/docs/intro');
  // Expect an element "to be visible".
  await expect(page.locator('text=Learn more')
    .first()).toBeVisible();
  await page.click('text=Get Started');
  // Expect some text to be visible on the page.
  await expect(page.locator(
    'text=Introduction').first()).toBeVisible();
});
Instead of the URL assertions, we could have taken screenshots and validated against the saved visuals that we are on the right page, or used expect() with specific web page locators.
Playwright network mocking
We covered network mocking and network control abilities in Chapter 10, Working with the Cypress Framework, where we covered the use of cy.intercept(), cy.clock(), and more. Playwright also has built-in network testing abilities (https://playwright.dev/docs/test-configuration#network) that support network mocking, specifying proxy settings, ignoring HTTPS errors during test navigation, and more.
A simple example that Playwright provides its users with is to automatically abort any CSS requests within the test file by adding this command in the beforeEach() method that is inherited and used as part of the Mocha test runner (https://mochajs.org/) in Playwright. You can see more fundamental examples of the MochaJS framework and its supported features here: https://www.tabnine.com/code/javascript/functions/mocha/beforeEach:
await context.route(/.css/, route => route.abort());
In addition, using the network capabilities within the Playwright framework, you can add to your test network request monitoring or use the waitForResponse() method as a preliminary step before performing an action on your web page under test (this method also has the equivalent waitForRequest()):
page.waitForResponse('SOME RESPONSE')
page.click('ACTION')
Within the documentation and API reference (https://playwright.dev/docs/test-api-testing#configuration), you can see additional capabilities and code samples on top of the aforementioned ones.
Playwright POM (Page Object Model)
As described earlier in the book, modern test automation frameworks support the POM design pattern. Such a tool helps simplify the test development as well as the test maintenance by storing all web application page elements in a code-based class as a centralized hub for other tests to use. With Playwright, you can also create a POM (https://playwright.dev/docs/test-pom) to store and maintain all the web elements across all your test scenarios. In the above reference link that Playwright provides, you can see in a simple way how, by creating a JavaScript class that, in this example, is named playwright-dev-page.js (https://playwright.dev), which defines the home page elements, a test scenario separate class named example.spec.js simply utilizes these elements in much cleaner test code. This design pattern makes frontend web application developers' lives easier from the perspective of source code maintenance. In case some element locators change, you only need to change their properties in the main POM class, and all the dependent test classes will inherit these changes.
Playwright test reporting
In stark contrast to Cypress and Selenium, which provide nice test reports with flakiness filtering and more either through plugins such as Allure or their own dashboard, for Playwright, test reporting is not as advanced at the time this book is being developed. Several test reporters can be used out of the box (https://playwright.dev/docs/test-reporters); however, they are either console outputs with pass and fail results, or if you wish to utilize JUnit test reports, you can set this environment variable through the following Microsoft Windows PowerShell command:
$env:PLAYWRIGHT_JUNIT_OUTPUT_NAME="results.xml"
For non-Microsoft Windows operating systems, $env:PLAYWRIGHT should be replaced with env=PLAYWRIGHT.
And upon running the test with --reporter=junit, the output report of the execution will be saved in a results.xml file:
npx playwright test --reporter=junit

Figure 11.5 – Playwright test report output in a JUnit XML format
As the Playwright framework evolves, it would be expected that the test reporting features will also mature, either through built-in reporters or better integrations that can provide better and actionable test data to frontend developers.
Playwright test runners
Like the Selenium and Cypress frameworks, Playwright also integrates and can be easily used with many of the JavaScript test runners (https://playwright.dev/docs/test-runners), including Mocha, Jest, Jasmine, and AVA. Mocha (https://mochajs.org/#getting-started) is the most well-known and commonly used test runner along with Jest (https://jestjs.io/); however, Playwright offers its own test runner (https://playwright.dev/docs/intro) that gets installed within the initial installation steps that we covered earlier in the chapter. To use the built-in Playwright test runner, you have to specify the following at the beginning of your JavaScript file:
const { test, expect } = require('@playwright/test');
If you wish to use Jest and Jasmine in your test code, which allow you to use methods such as expect(), you will need to specify the following at the beginning of your source code file:
const {chromium} = require('playwright');
const expect = require('expect');
For Mocha to be used in your JavaScript code to enable capabilities such as before(), after(), beforeEach(), and more, you will need the following lines added at the beginning of your file:
const {chromium} = require('playwright');
const assert = require('assert');
To utilize the AVA (https://playwright.dev/docs/test-runners#ava) test runner within Playwright, you need to install the NODE package first, and then include it as a required capability in your JavaScript code:
npm install --save-dev ava
Const test = require(' ava').default
With the inclusion of AVA (https://github.com/avajs/ava), the test code will run by default, concurrently and quite quickly. The AVA test runner has some unique capabilities regarding code simplicity, test execution speed as a result of the aforementioned concurrency, reporting abilities, resolving the promise challenges (https://github.com/avajs/ava/blob/main/docs/01-writing-tests.md#promise-support), creating test assertions, and much more.
Playwright trace viewer
Playwright offers frontend developers a GUI tool (https://playwright.dev/docs/trace-viewer) that can help explore and visualize the test execution traces once the test run is complete. Users are offered an online viewer (https://trace.playwright.dev/) that can open the trace recorded files for further analysis.
You can also open the trace recorded files in your IDE terminal command-line tool by running this command:
npx playwright show-trace trace.zip
To record a trace during a test run, you will need to enable tracing in your Playwright config JavaScript file by adding the following option:
Use: {
     Trace: ' on',
},
You can either record a trace for each test execution or in the event of failure by setting the option to be on-first-retry instead of on.
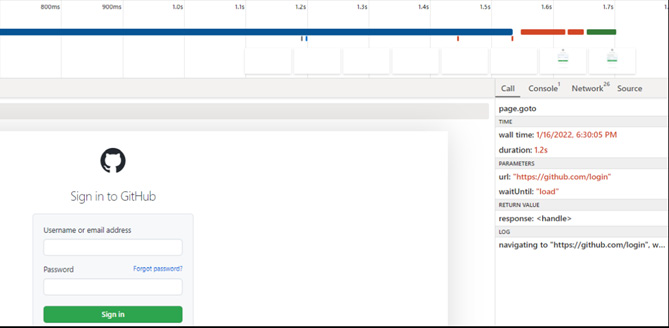
Figure 11.6 – Playwright trace viewer tool following test execution completion
As you can see in the preceding screenshot taken from the Playwright web-based trace viewer, users can examine each step within the test execution and gather timing, network analysis, and other insights. The trace.zip file that is created also includes screenshots, log files, network trace files with all requests and responses, snapshots taken before and after, and other useful artifacts for debugging and analyzing test runs.
Playwright advanced configurations
Within the Playwright framework, users can also enjoy a wide range of useful testing configuration capabilities (https://playwright.dev/docs/test-advanced).
Within the TestConfig object that comes with Playwright (https://playwright.dev/docs/api/class-testconfig), users can make very useful and productive changes to their test suites, test execution cadence, and much more. Being able to configure your browser under test conditions, your security options, including ignoreHTTPSErrors, viewports for different platforms screen resolutions, the base URL for your tests, the number of test retries, the number of workers for parallel execution, and other test environment variables, are key for testing at scale and testing efficiently. These are all supported through the TestConfig component.
Please refer to the framework configuration documentation section to review the wide range of configuration options (https://playwright.dev/docs/test-configuration).
If we configure the playwright.config.js file used previously and add specific test scenarios to run through the testMatch and testIgnore options, we can really orchestrate a single suite to run a subset of tests versus other tests with and without retries.
In the following screenshot of a JavaScript configuration file, we are specifying the Playwright execution to ignore tests that start with the word Playwright when running on the mobile Chrome platform (a Pixel 5 device in the following example).
The following configuration file includes five platform configurations that mix both mobile and desktop web configurations. The maximum number of test executions for 2 test specifications would be 10.
We are going to run each of our tests against a desktop Chrome browser, Firefox, Pixel 5, Edge, and iPhone 12 on Safari mobile. Note that for the mobile Chrome configuration with the Pixel 5 platform, we added the following line:
testIgnore: '/.*Playwright*.spec.ts/',
That line will ensure that for each test in my suite that starts with Playwright characters, the test runner will ignore them and not execute them. This means that if, in my suite, I have two test cases, I will only run them against the four remaining configurations instead of all five.
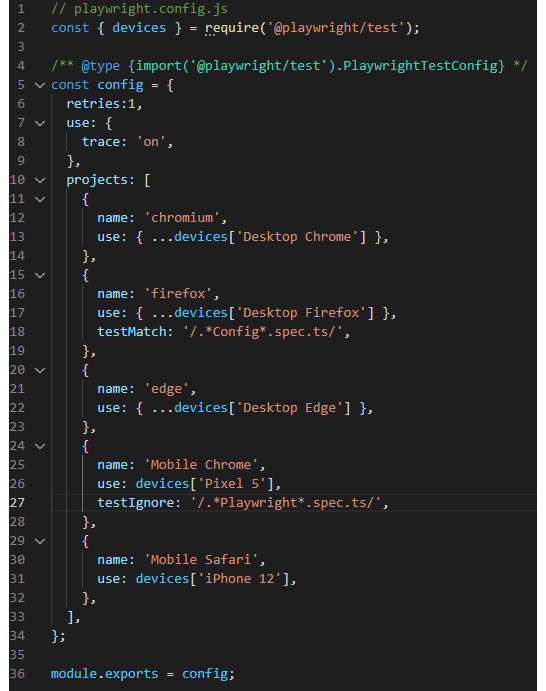
Figure 11.7 – Playwright advanced configuration using the testMatch and testIgnore options
To run the two test specifications, ConfigTestExample.spec.js and PlayWrightExample.spec.js, based on the following configuration, we can use the usual command:
npx playwright test
After running the two test files with the preceding configuration, this is the output that you will get on your IDE terminal (Visual Studio Code).
As you can see in the following screenshot, we have a total of eight test executions out of possible 10, since Playwright is ignoring the two test cases on the mobile Chrome platform:
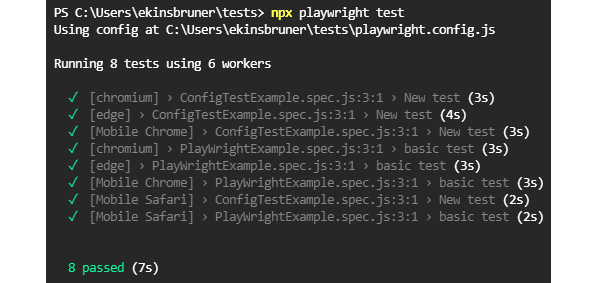
Figure 11.8 – Playwright terminal output upon execution with an advanced configuration
The two specification files and the configuration used above are on a public GitHub repository for you to clone and use (https://github.com/ek121268/PlaywrightExamples).
The TestConfig class is very extensive and rich, and we only looked at a few of its capabilities. However, there are many other useful options, including testConfig.grep and testConfig.reporter. The entire set of options that are part of this class is well documented here: https://playwright.dev/docs/api/class-testconfig.
Playwright integration with CI
Like Cypress, Selenium, and the next framework in the book, Puppeteer, the Playwright framework also integrates with continuous integration (CI) servers (https://playwright.dev/docs/ci) to expedite the testing and feedback loop. Among the CI servers that Playwright works with are GitHub Actions. As with Cypress, you will need to configure a .yml file that will install and run the Playwright test specs on the target new web application build.
The following is a sample GitHub Actions configuration file that will install all the Playwright dependencies and execute an end-to-end Playwright test in the event of a successful deployment state:
name: Playwright Tests
on:
  deployment_status:
jobs:
  test:
    timeout-minutes: 60
    runs-on: ubuntu-latest
    if: github.event.deployment_status.state == 'success'
    steps:
    - uses: actions/checkout@v2
    - uses: actions/setup-node@v2
      with:
        node-version: '14.x'
    - name: Install dependencies
      run: npm ci
    - name: Install Playwright
      run: npx playwright install --with-deps
    - name: Run Playwright tests
      run: npm run test:e2e
      env:
        # This might depend on your test-runner/language
          binding
        PLAYWRIGHT_TEST_BASE_URL:
          ${{ github.event.deployment_status.target_url }}
In addition to GitHub Actions, frontend developers can alternatively use Docker, Azure Pipelines, Travis CI, Circle CI, Jenkins, GitLab CI, and Bitbucket Pipelines.
In case you are using CI tools other than GitHub Actions, you can find the dedicated configuration for each of the supported tools here: https://playwright.dev/docs/ci.
With the above CI section, we have concluded our overview of the advanced features of the Playwright testing framework. In this section, we've covered the various supported test runners, the retry mechanism, advanced configuration abilities, POM design patterns, how to use Playwright Inspector, API testing, annotations, reporters, and a few more capabilities that can help expand web application testing coverage.
Now that we've completed our review of these capabilities, let's explore where Playwright is heading in the future and what we can expect to see.


