An overview of the menu bar
No chapter entitled Getting Familiar with the Affinity Designer's Interface would be complete without a quick look at the interface's top menu bar. As this is an overview, a lot of these menu items will be covered or touched on as we go through the book, especially in the three practical exercise chapters (Chapters 11-13). Once again, these menu bar items and the drop-down menu lists that follow are from the macOS desktop version of the software. There may be some slight differences in the Windows version, but overall, most are the same.

Figure 1.11 – The menu bar
Keyboard shortcuts
You may notice that the menu bar dropdowns in the following screenshots display some existing keyboard shortcuts that are already assigned here for many functions. Most are assigned by Affinity Designer while some are shortcuts that I have assigned for my personal workflow. We will cover assigning keyboard shortcuts in Chapter 3, How to Customize Your Affinity Designer Workspace, after which you will know how to create your own shortcuts that make sense to your working style.
The Affinity Designer menu
The drop-down sections of this menu are as follows:
- About: Here you'll find the current splash screen with the Affinity Designer version number.
- My Account: A quick link to register or sign in to your account.
- Check for Updates: Use this to see if your version of Affinity Designer is the latest.
- Personas: Personas that are not currently active. Selecting one makes it the active persona.
- Preferences: Various Affinity Designer preferences.
- Services: macOS services.
- Hide/Show All: Hide or show Affinity Designer or other applications.
- Quit: Quit the application.
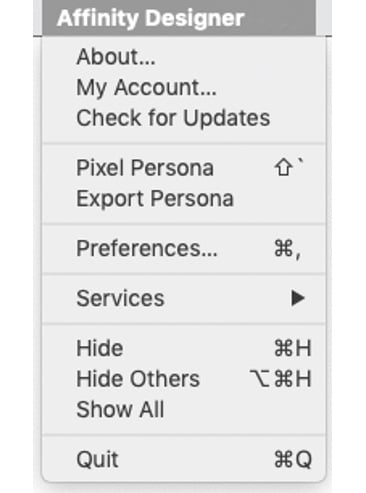
Figure 1.12 – The Affinity Designer menu dropdown
The File menu
The drop-down sections of this menu are as follows:
- New: Create a blank new file or a new file from Affinity Designer artwork that has been copied to the clipboard from another Affinity Designer file.
- Open: Opens a previously saved file or a recently saved file.
- Close: Closes the current file.
- Save: Saves the file or saves a new file with a different name.
- Save as Package: Saves a separate "Package" file format containing all of the file's relevant resources and fonts.
- Save History With Document: Saves the current file's history.
- Edit/Reveal: Allow editing in Affinity Photo and Affinity Publisher. Reveal the file's location in the Finder.
- Place: Places an image in the file.
- Export/Share: Export the file in a variety of formats, including templates. Share the file using email or messaging, or add to libraries.
- Document Setup/Print: Edit or review the document setup. Print the document.
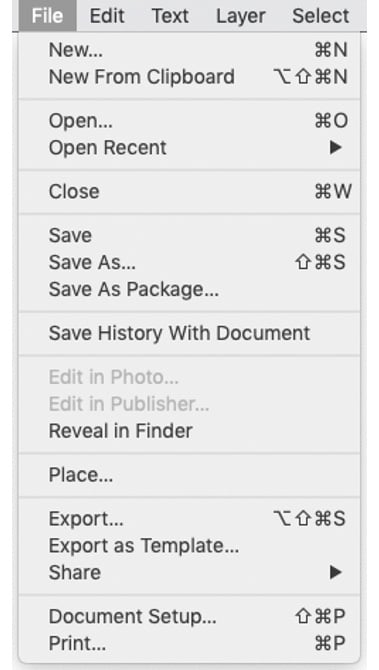
Figure 1.13 – The File menu dropdown
The Edit menu
The drop-down sections of this menu are as follows:
- Undo/Redo: Undo or redo operations performed.
- Cut/Copy/Paste/Duplicate/Delete: Cut and copy with paste options as well as duplicate and delete.
- Defaults/Create Style: Define element defaults. Create styles from a selection.
- Dictation/Emoji & Symbols: Start dictation. Create styles from a selection. Browse text emojis.
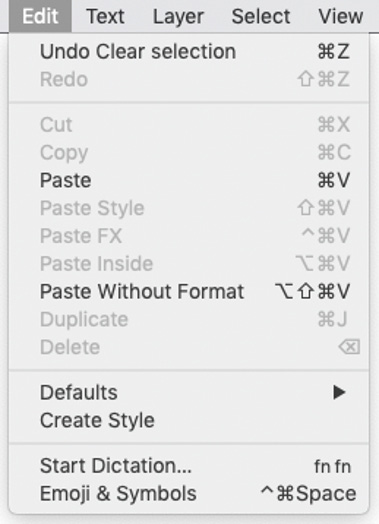
Figure 1.14 – The Edit menu dropdown
The Text menu
The drop-down sections of this menu are as follows:
- Show: Show text-related panels.
- Character: Adjust character options and positioning.
- Alignment: Adjust alignment and spacing.
- Styles: Create and adjust character and paragraph styles.
- Insert: Insert lines, dashes, spaces, and hyphens.
- Spelling: Check spelling and spelling options.
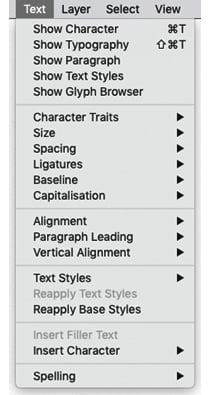
Figure 1.15 – The Text menu dropdown
The Layer menu
The drop-down sections of this menu are as follows:
- Group: Group or ungroup selected or all objects.
- Compound: Create compound shapes (shapes with holes).
- Positioning/Editing/Transforming: Options for arranging, editing, and transforming objects.
- New Layer types: New vector layer, new pixel layer, new adjustment layer
- Lock: Lock or unlock object options.
- Hide/Show: Hide or show object options.
- Find: Manually find the selected object in the layer stack. This can be changed to automatic.
- Convert: Convert/rasterize options for objects or text.
- Convert Artboard: Converts an object to an artboard or an artboard to an object.
- Fill Mode/Layer Effects: Fill mode for self-intersecting shapes and the Layer Effects panel.
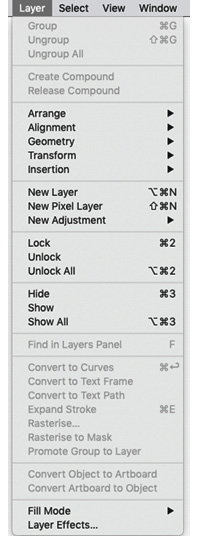
Figure 1.16 – The Layer menu dropdown
The Select menu
The drop-down sections of this menu are as follows:
- Select: Select all, deselect all, or invert the pixel selection.
- Select Next/Select Previous: Select the next object or select the previous object.
- Select Same/Select Object: Select the same object attributes. Select specific types of objects.
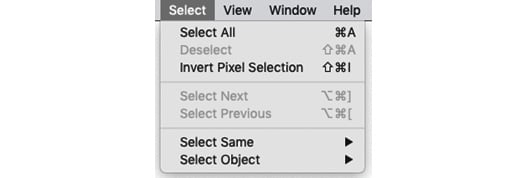
Figure 1.17 – The Select menu dropdown
The View menu
The drop-down sections of this menu are as follows:
- Zoom: Document zoom options.
- Rotate: Document rotate options.
- View Mode: Document view mode options.
- Views: Create new views. Browse saved views.
- Show/Hide: Grids, guides, bleed, margins, and rulers.
- Lock Guides: Lock or unlock guides toggle.
- Studio: Drop-down list of all studio panels.
- Studio Presets: The ability to save and choose custom studio panel setups.
- Managers/Color Picker: Five document managers; the Apple Color Picker.
- View Point: Browse the next or previous saved viewpoints.
- Show/Hide Context Toolbar: Context toolbar toggle.
- Show/Hide/Customise Toolbar: Toolbar toggle. Customize Toolbar
- Show/Hide/Dock/Customise Tools: Tools panel toggle/docking. Customize the Tools panel.
- Toggle UI: Hide or show all UI panels.

Figure 1.18 – The View menu dropdown
The Window menu
The drop-down sections of this menu are as follows:
- Modes: Normal mode or separated mode. Merge windows in separated mode.
- Minimize/Zoom: Choose whether the document fills the screen or is minimized to the dock.
- Fullscreen: Expand the window to fullscreen and hide the application menu bar.
- Floating Windows: Repositions floating windows.
- Filename(s): List of open Affinity Designer files.
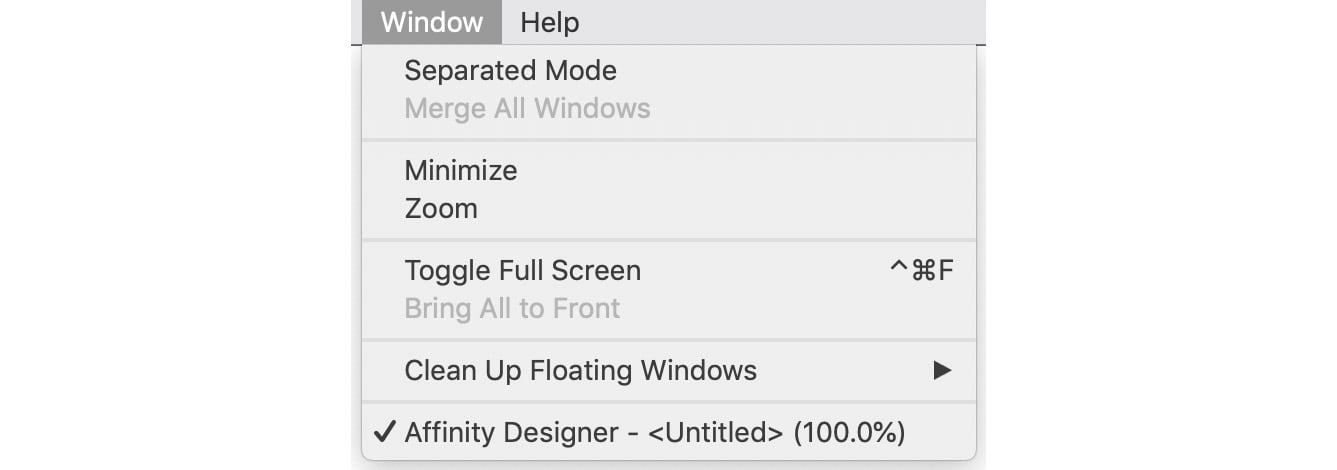
Figure 1.19 – The Window menu dropdown
The Help menu
The dropdown sections of this menu are as follows:
- Search: Menu bar search for a keyword.
- Help: Launches the Affinity Designer application's help topics browser.
- Welcome…/Tutorial…: The former launches the welcome splash screen. The latter launches the tutorial website.
- Support: Launches the Affinity online user forum website.

Figure 1.20 – The Help menu dropdown
With the main menu bar overview covered, let's focus a little more closely on some of Affinity Designer's Tools panels and toolbars.


