This recipe shows how to configure two most frequently used rig types: Generic and Humanoid. We will go through all the available options for both of them.
Configuring generic and humanoid rigs
Getting ready
As previously mentioned, make sure you have prepared two animated characters. One of them should be a humanoid and the other a non-humanoid, a quadruped for instance. You can also download the provided example Unity project and go to the Chapter 01 Working with animations\Recipe 02 Configuring generic and humanoid rigs\Rigs directory.
You will find there three FBX files:
- Generic.fbx
- Humanoid.fbx
- Quadruped.fbx
If you are creating your characters from scratch, the bones hierarchy of your humanoid rig is important for Unity to recognize the rig as a humanoid. It should follow this pattern:
HIPS -> SPINE -> CHEST -> NECK -> HEAD
HEAD -> EYE (for left and right eyes)
HEAD -> JAW
HIPS -> UPPER LEG -> LOWER LEG -> FOOT -> TOES (for left and right legs)
CHEST -> SHOULDER -> ARM -> FOREARM -> HAND (for left and right hands)
HAND -> PROXIMAL -> INTERMEDIATE -> DISTAL (for five fingers in left and right hands)
The hip bone is the root bone of the humanoid character. Fingers, shoulders, chest, neck, eyes, jaw, and toes are optional bones. Your humanoid character will work without them.
You should also remember to model the character in a T-POSE. It should face the Z axis in Unity (if your 3D software uses different axis alignment from Unity's like Blender, remember about the -90 and +90 degrees rotation trick shown in the Importing skeletal animations recipe). Hands of the character should be flat, palm down, and parallel to the ground along the X axis. A-POSE characters will also work.
How to do it...
To configure a generic rig you need to follow these steps:
- Import your animated asset into Unity the same way as in the Importing skeletal animations recipe.
- Select the asset and choose the Rig tab in the Inspector. Then select the Generic option in the Animation Tab drop-down menu. If you are using the provided example Unity Project, select the Generic.fbx file in the Chapter 01 Working with animations\Recipe 02 Configuring generic and humanoid rigs\Rigs directory.
- Choose the Create From This Model option from the Avatar Definition drop-down menu.
- Leave the Root Node option set to None.
- Leave the Optimize Game Objects option unchecked.
- Click on the Apply button to complete the configuration.
Humanoid rig configuration has a lot more options:
- First, import your skinned humanoid model to Unity the same way as in the Importing skeletal animations recipe.
- Select the asset and choose the Rig tab in the Inspector. Then select the Humanoid option in the Animation Tab drop-down menu. If you are using the provided example Unity Project, select the Humanoid.fbx file in the Chapter 01 Working with animations\Recipe 02 Configuring generic and humanoid rigs\Rigs directory.
- Choose the Create From This Model option from the Avatar Definition drop-down menu.
- Leave the Optimize Game Objects option unchecked.
- Click on the Apply button.
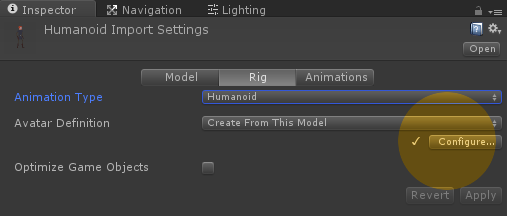
- You should see a Configure button with a tick icon near to it.

- The tick icon shows that Unity was able to automatically recognize the rig hierarchy as a humanoid. If Unity fails to recognize it, automatically a cross will be displayed instead of the tick. If you are using the provided example, you can observe it when you try to set the rig to Humanoid for the Generic.fbx file.
- Click on the Configure button to enter the Avatar Configuration Inspector. A new scene will be opened. You should be able to see your model in the scene and bone mapping section in the Inspector tab.

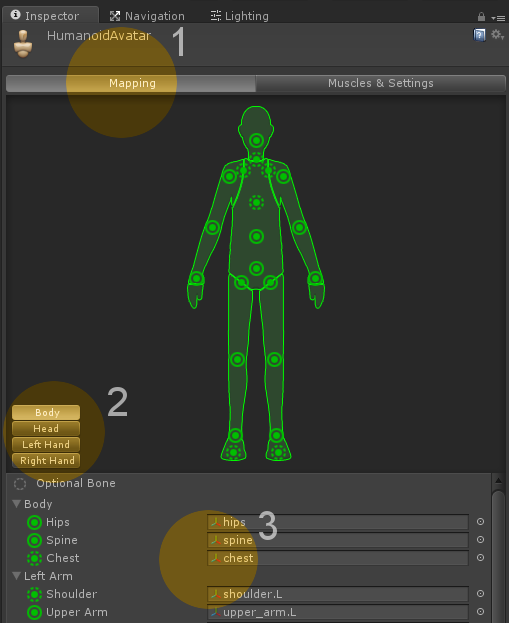
- Make sure you are in the Mapping section (1). All recognized and assigned bones are shown as green body parts on the displayed dummy character. If a required bone is missing or is not assigned, it will show up as red. You can navigate between the Body, Head, Left Hand, and Right Hand sections by clicking on a corresponding button (2). All bones are displayed in a list (3) for each section. Required bones are marked with circle icons and optional bones are marked with dotted circle icons.
- You can change the bone assignment by dragging a bone from the Hierarchy tab and dropping it onto a corresponding bone slot in the Inspector tab. Unity will occasionally miss a bone or two (especially fingers); thus, you should always check the bone assignment manually.
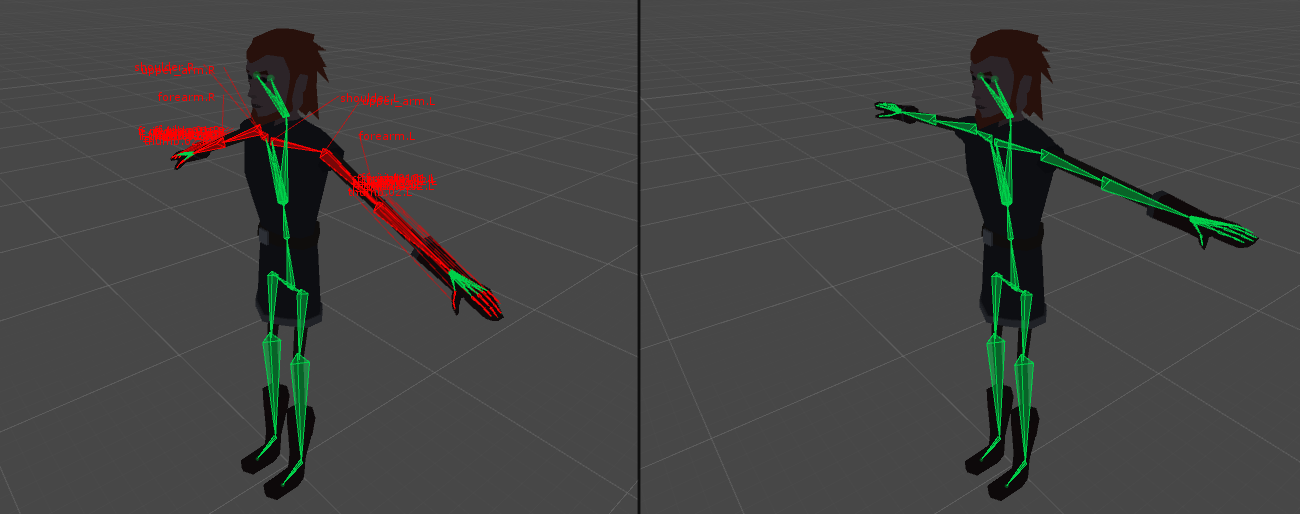
- If your character is not in a T-POSE (is modeled in an A-POSE for instance), a Character is not in T-POSE message will be displayed in the scene view and the character's bones will show up in red. Unity needs the character in a T-POSE for proper humanoid avatar configuration. You can enforce that pose by choosing the Pose |Enforce T-POSE option, found below the bones mapping list.

- Click on the Apply button and then the Done button to finish configuration.
How it works...
Humanoid rig uses more advanced Mecanim features than the Generic rig. You can find the list of such features below:
- Automatic retargeting: This is one of the most important differences between those two rigs. The Humanoid rig uses automatic retargeting, which means that you can have the same animations on different humanoid characters. Your characters can share a group of animations (basic movement or some common actions). It gives you the possibility to buy your animation assets from the Asset Store and easily use them on your characters. Generic rigs don't support this feature. You have to prepare animations for your specific rig or retarget them in a 3D package.
- Inverse kinematics: This feature lets you control your characters' feet and hands position with scripting. It is useful for making your characters stand on uneven ground or grab an object in the scene. It is a built-in feature for Humanoid rigs in Unity. Generic rigs have to use custom-made solutions.
- Advanced animation settings: Humanoid rigs have more settings for animation import, such as the mirror option. We will discuss them in depth in the Looping mirroring and offsetting animations recipe.
- Look at: Unity has a built-in solution for humanoid characters looking at something. You have to write custom systems for generic characters.
- Additional bones: A lot of people think that they cannot use additional bones with Humanoid rigs. It is not true. If your rig has an animated weapon slot for instance, you can still use it with the Humanoid rig. All you need to do is to find the Mask section in your animation import settings and enable the additional bone for each animation it is used in (you need to use the Transform foldout to find your additional bone).
I highly recommend using Humanoid rigs for all humanoid characters in your game.
There's more...
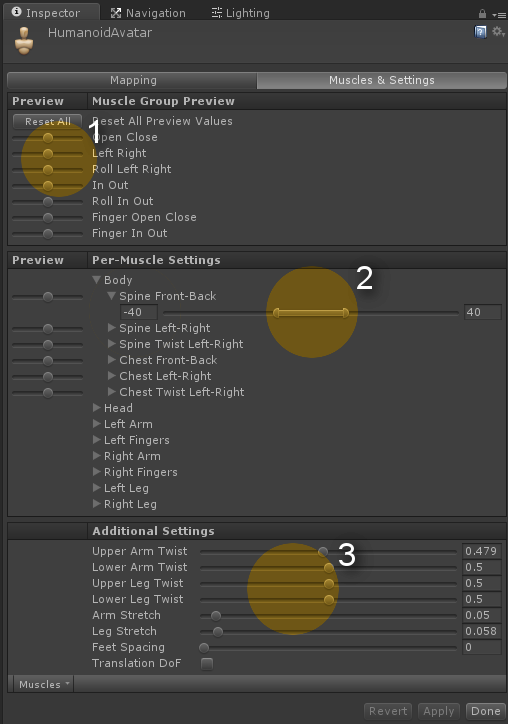
- In the Humanoid rig configuration, you can find the Muscles & Settings section, where you can preview and adjust the movement (muscle) range for your character.

- You can preview the range of movement in the Muscle Group Preview section by adjusting the sliders (1). You can preview the range of movement per muscle in the Per-Muscle Settings section. You can also adjust the range here by unfolding a given muscle foldout and using the slider (2). In the Additional Settings section, you can adjust more options of your avatar. These are mainly responsible for the flexibility of your rig. You can set how much a bone can be stretched during animation for instance.
- The Translation DoF option enables animating bones transition in your Humanoid rig. It is turned off by default, meaning that only rotation of the bones is used in animation.
- In the Rig tab in the model import settings, you can find some additional options:
- Avatar Definition: This option is responsible for creating a new avatar or copying the avatar from another model. The second option is useful for storing animations in multiple files. It will be discussed further in the Using animations from multiple assets recipe.
- Optimize Game Objects: This option lets you hide all bones from the Hierarchy view. The number of game objects in the game has an impact on the performance. You can still choose a number of bones that will be displayed in the Hierarchy. It is useful for having exposing weapon slots and similar gameplay-related bones while hiding others.
- Root node: This option is visible only for Generic rigs. It lets you choose the bone responsible for root motion calculation. We will discuss it further in Chapter 4, Character Movement.


