HTML and the DOM
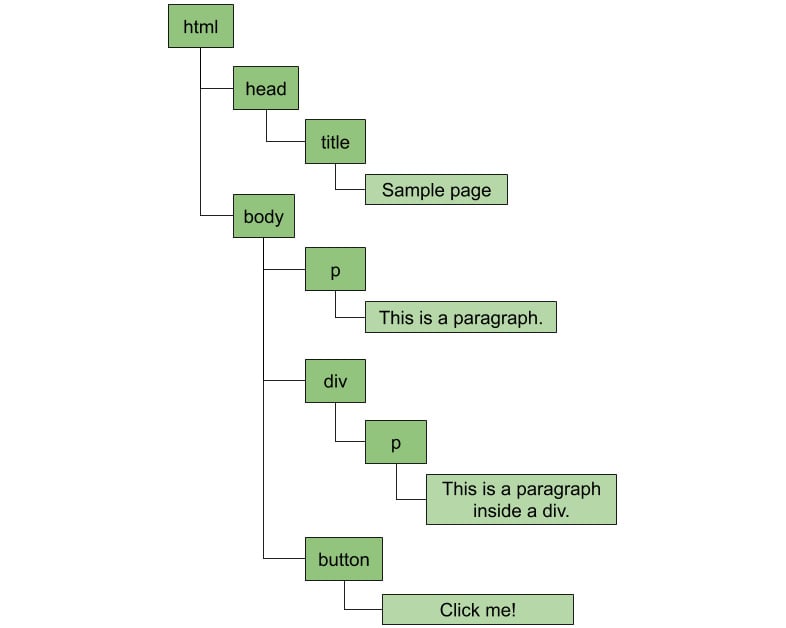
When a browser loads an HTML page, it creates a tree that represents that page. This tree is based on the DOM specification. It uses tags to determine where each node starts and ends.
Consider the following piece of HTML code:
<html>
  <head>
    <title>Sample Page</title>
  </head>
  <body>
    <p>This is a paragraph.</p>
    <div>
      <p>This is a paragraph inside a div.</p>
    </div>
    <button>Click me!</button>
  </body>
</html>
The browser will create the following hierarchy of nodes:

Figure 1.1: A paragraph node contains a text node
Everything becomes a node. Texts, elements, and comments, all the way up to the root of the tree. This tree is used to match styles from CSS and render the page. It's also transformed into an object and made available to the JavaScript runtime.
But why is it called the DOM? Because HTML was originally designed to share documents and not to design the rich dynamic applications we have today. That means that every HTML DOM starts with a document element, to which all elements are attached. With that in mind, the previous illustration of the DOM tree actually becomes the following:

Figure 1.2: All DOM trees have a document element at the root
What does it mean when I say that the browser makes the DOM available to the JavaScript runtime? It means that if you write some JavaScript code in your HTML page, you can access that tree and do some pretty interesting things with it. For example, you can easily access the document root element and access all of the nodes on a page, which is what you're going to do in the next exercise.
Exercise 1: Iterating over Nodes in a Document
In this exercise, we'll write JavaScript code to query the DOM to find a button and add an event listener to it so that we can execute some code when the user clicks on it. When the event happens, we'll query for all paragraph elements, count and store their content, then show an alert at the end.
The code files for this exercise can be found at https://github.com/TrainingByPackt/Professional-JavaScript/tree/master/Lesson01/Exercise01.
Perform the following steps to complete the exercise:
- Open the text editor of your preference and create a new file called
alert_paragraphs.htmlcontaining the sample HTML from the previous section (which can be found on GitHub: https://bit.ly/2maW0Sx):<html> <head> <title>Sample Page</title> </head> <body> <p>This is a paragraph.</p> <div> <p>This is a paragraph inside a div.</p> </div> <button>Click me!</button> </body> </html>
- At the end of the
bodyelement, add ascripttag such that the last few lines look like the following:</div> <button>Click me!</button> <script> </script> </body> </html>
- Inside the
scripttag, add an event listener for the click event of the button. To do that, you query the document object for all elements with thebuttontag, get the first one (there's only one button on the page), then calladdEventListener:document.getElementsByTagName('button')[0].addEventListener('click', () => {}); - Inside the event listener, query the document again to find all paragraph elements:
const allParagraphs = document.getElementsByTagName('p'); - After that, create two variables inside the event listener to store how many paragraph elements you found and another to store their content:
let allContent = "";
let count = 0;
- Iterate over all paragraph elements, count them, and store their content:
for (let i = 0; i < allParagraphs.length; i++) { const node = allParagraphs[i]; count++; allContent += `${count} - ${node.textContent}\n`; } - After the loop, show an alert that contains the number of paragraphs that were found and a list with all their content:
alert(`Found ${count} paragraphs. Their content:\n${allContent}`);You can see how the final code should look here: https://github.com/TrainingByPackt/Professional-JavaScript/blob/master/Lesson01/Exercise01/alert_paragraphs.html.
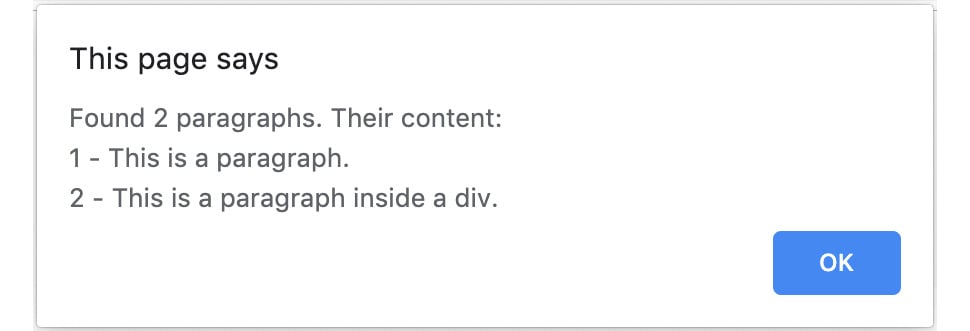
Opening the HTML document in the browser and clicking the button, you should see the following alert:

Figure 1.3: Alert box showing information about paragraphs on the page
In this exercise, we wrote some JavaScript code that queried the DOM for specific elements. We collected the contents of the elements to show them in an alert box.
We're going to explore other ways to query the DOM and iterate over nodes in later sections of this chapter. But from this exercise, you can already see how powerful this is and start imagining the possibilities this opens up. For example, I frequently use this to count things or extract data that I need from web pages all around the internet.


