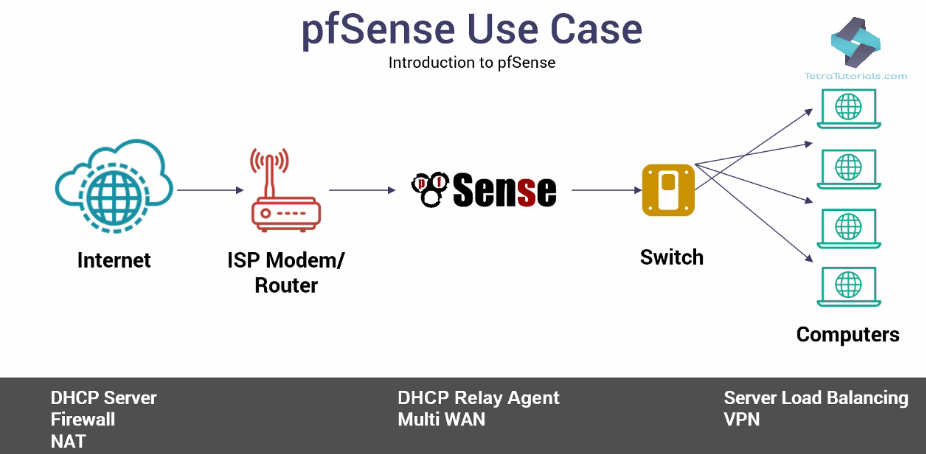
Let's discuss the pfSense features through a use-case diagram:

The preceding diagram gives you an idea of how pfSense plays a vital role in the network. The ISP Modem/Router connects pfSense to the internet. The Switch connects pfSense to various desktops.
In this scenario, pfSense acts as a DHCP Server, Firewall, and NAT device. It can play these roles distinctly or all at the same time simultaneously.
Let's explore some other standard features of pfSense:
- The DHCP Relay Agent feature serves the DHCP service for all clients.
- The Firewall feature filters requests and responses by source and destination IPs, and source and destination ports. It also limits simultaneous connections on a per rules basis.
- NAT port forwards include range and use of multiple public IPs and one-to-one NAT for individual IP or multiple subnets.
- The Multi WAN functionality enables the use of multiple internet connections, with load balancing, failover, and usage distribution. With this, you can achieve redundancy across multiple ISP connections, and not only that, you can distribute the traffic from your internal network to the internet to numerous links in a load-balanced fashion.
As a VPN server, pfSense offers two options for VPN connectivity:
- IPsec allows connectivity with any device supporting standard IPsec. This is most commonly used for site-to-site connectivity to other pfSense installations, and almost all other firewall solutions like Cisco, Juniper, and so on. It can also be used for mobile client connectivity.
- The second is OpenVPN. OpenVPN is a flexible, powerful SSL VPN solution supporting a wide range of client operating systems. Let's assume that the computers are in different sites. You can use IPsec VPN to connect them both together.
Now that you're familiar with pfSense, let's go ahead with installation and configuration of pfSense. But before we start with that, let's review the minimum hardware requirements for installing and running pfSense.


