Now, let's dive into preparing a machine learning Docker file. In this section, we will take a look at cloning the source files, the base images that are needed for Docker, installing additional required packages, exposing a volume so that you can share your work, and exposing ports so that you'll be able to see Jupyter Notebooks, which is the tool that we'll be using to explore machine learning.
Now, you'll need to get the source code that goes with these sections. Head on over to https://github.com/wballard/kerasvideo/tree/2018, where you can quickly clone the repository. Here, we're just using GitHub for Windows as a relatively quick way in order to make that repository cloned, but you can use Git in any fashion you're comfortable with. It doesn't matter what directory you put these files in; we're just downloading them into our local work directory. Then, we're going to use this location as the place to begin the build of the actual Docker container.
In the clone repository, take a look at the Docker file:

This is what we'll be using to create our environment. We're starting off with the base NVIDIA image that has the CUDA and cuDNN drivers, which will enable GPU support in the future. Now, in this next section, we're updating the package manager that will be on the container to make sure that we have git and wget updated graphics packages so that we'll be able to draw charts in our notebooks:

Now, we're going to be installing Anaconda Python. We're downloading it from the internet, and then running it as a shell script, which will place Python on the machine. We'll clean up after we're done:

Anaconda is a convenient Python distribution to use for machine learning and data science tasks because it comes with pre-built math libraries, particularly Pandas, NumPy, SciPy, and scikit-learn, which are built with optimized Intel Math Kernal Libraries. This is because, even if you don't have a GPU, you can generally get better performance by using Anaconda. It also has the advantage of installing, not as a root or globally underneath your system, but in your home directory. Therefore, you can add it on to an existing system without worrying about breaking system components that might rely on Python, say, in the user's bin or whats been installed by your global package manager.
Now, we're going to be setting up a user on our container called Keras:

When we're running notebooks, they're going to be running as this user, so you'll know who owns the files at all times. Creating a specific user in order to set up your container isn't strictly necessary, but it is convenient to guarantee that you have a consistent setup. As you use these techniques with Docker more, you'll likely explore different base images, and those user directories set up on those images may not be exactly as you expect. For example, you may be using a different shell or have a different home directory path. Setting up your own allows this to be consistent.
Now, we're actually going to be installing conda in our environment:

This will be the Python we're using here, and we'll be installing TensorFlow and Keras on top of it in order to have a complete environment. You'll notice here that we're using both conda and pip. So, conda is the package manager that comes with Anaconda Python, but you can also add packages that aren't available as conda prepackaged images by using the normal pip command. So in this fashion, you can always mix and match and get the packages you need.
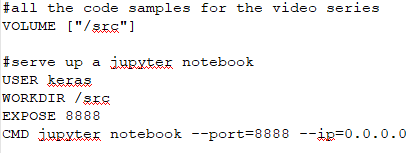
In these last sections, we're setting up what's called a VOLUME:

This is going to allow access to the local hard drive on your machine so that your files, as you're editing them and working on them, are not lost inside the container. Then, we're exposing a port that the IPython Notebooks will be shared over. So, the container is going to be serving up port 8888, running the IPython Notebook on the container, and then you'll be able to access it directly from your PC.
Remember that these settings are from the point of view of the container: when we say VOLUME src, what we're really saying is that on the container, create a /src that's ready to receive an amount from whatever your host computer is, which we'll do in a later section when we actually run the container. Then, we say USER keras: this is the user we created before. Afterwards, we say WORKDIR, which says use the /src directory as the current working directory when we finally run our command, that is, jupyter notebook. This sets everything so that we have some reasonable defaults. We're running as the user we expect, and we're going to be in the directory that we expect as we go to run the command that's being exposed on a network port from the container from our Docker.
Now that we've prepared our Docker file, let's take a look at some security settings and how we can share data with our container.


