Using the Autodesk 3D Print Utility
From the 123D Catch menu, the Autodesk 3D Print Utility (A3DP) can be accessed. It's a standalone program that repairs and optimizes your model for 3D printing. Though many features of the A3DP are designed for specific commercial 3D printers, the results can be exported to a file for use on any 3D printer. In the following recipe, we'll use the basic functions to create a properly scaled and watertight model.
Getting ready
You'll need a 3D scene open in 123D Catch with a model that is cleaned and ready for export. Go to File in the menu and select 3D print. Follow the download and install instructions for the utility. Once the initial installation has been completed, the program can be accessed from the menu.
Note
This book uses 3D Print Utility v1.1.1. After downloading, it can be accessed as a standalone program from the Autodesk folder in your Windows OS Program Files folder.
How to do it...
We will proceed as follows:
- With a scene ready for processing in 123D Catch, select 3D print in the File menu. This will open the Autodesk 3D Print Utility window and immediately begin the automatic processing of your model. It makes repairs to the model's mesh and positions the model properly on the build platform.
- Once the processing of the model is finished, it will appear in the build envelope. The pyramid object that's used as an example in this book can be seen in the following screenshot:

-
A series of navigation controls can be found in the top-right corner of the window. The basic controls allow for orbit, pan, zoom, center, and eye-level movements. They are accessed from the icon strip in which there's also a navigation cube icon [
 ].
].
- Left-click on the cube's front side. The view levels to a frontal view. Zoom in on the model using the magnifying glass icon, or use your scroll wheel on your mouse. The model should be clearly seen and should be similar to the pyramid model in the following screenshot:

Tip
Be sure to deselect the Show in preview box under Support Material. This function is likely to distort your view of the model.
- For each axis of the model, the A3DP Utility has given us a measurement in millimeters. This is the real-world measurement of our model if we were to print it. Our model was processed by 123D Catch without any information relating to its actual size in the physical world. Using the Scale function of A3DP, we can adjust the size of our model for final printing. To do this, take the recorded measurement of any one axis and determine its actual size. Enter the percentage of change for Scale and select Apply.
- If you're not sure how much the percentage should be, but you know your target size, use the following method to calculate the percentage. In this case, I'm using the z axis, which shows a measurement of 30.88 mm. I would like this height to be changed to 53 mm. Divide 53 by 30.88 and then take the quotient, 1.72, and multiply it by 100. The product gives me a 172 percent change. Enter this percentage for Scale and select Apply.
- Select Save to export the model as an STL file.
Tip
Stereolithography is a file format that describes only the surface geometry of a 3D object. It is the required file format for 3D printing.
How it works...
The A3DP Utility provides an easy solution for preparing a model, as follows:
- It automatically places the model properly on the build platform
- It repairs the holes and other mesh imperfections in the model
- It allows for manual scaling of the object
There are other options available in the utility, but they're not useful unless the model is exported for printing for one of the specified commercial machines, such as the MakerBot Replicator 2 (which is the default setting). These options are as follows:
- Support material
- Optimization
- Copies
Even with limited options, the A3DP Utility acts as an efficient tool in preparing models ready for slicing. A convenient feature of this utility is that it also works as a standalone program. Any .obj file, whether it is processed by 123D Catch or a 3D modeling program, can be loaded into the A3DP Utility, and it can be repaired and exported.
There's more...
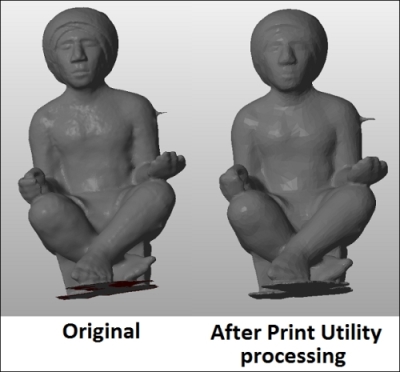
When the A3DP Utility processes a model ready for printing, it also automatically decimates the model, that is, it reduces the polygon count of the mesh. This enables more efficient printing, but at the cost of losing detail. Let's compare the original model of the statue after 123D Catch processing and the same model after it was processed with the A3DP Utility.

The original 123D Catch model has a polygon count of 151950, and the model processed with the A3DP Utility has a polygon count of 18670. This is a great difference, and it can be clearly seen in the preceding comparison. This is something to keep in mind when a higher-resolution print is required for finer details.


