In this article by Sunny Jha, the author of the book Mastering XenApp, we are going to implement the Citrix XenApp infrastructure components, which are going to work together to deliver the applications. The components we will be implementing are as follows:
- Setting up Citrix License Server
- Setting up Delivery Controller
- Setting up Director
- Setting up StoreFront
- Setting up Studio
Once you will complete this article, you will be able to understand how to install the Citrix XenApp infrastructure components for the effective delivery of applications.
(For more resources related to this topic, see here.)
Setting up the Citrix infrastructure components
You must be aware of the fact that Citrix reintroduced Citrix XenApp in the version of Citrix XenApp 7.5 with the new FMA-based architecture, replacing IMA. In this article, we will be setting up different Citrix components so that they can deliver the applications.
As this is the proof of concept, I will be setting up almost all the Citrix components on the single Microsoft Windows 2012 R2 machine, where it is recommended that in the production environment, you should keep the Citrix components such as License Server, Delivery Controller, and StoreFront. These need to be installed on the separate servers to avoid the single point of failure and better performance.
The components that we will be setting up in this article are:
- Delivery Controller: This Citrix component will act as broker, and the main function is to assign users to a server, based on their selection of application published.
- License Server: This will assign the license to the Citrix components as every Citrix product requires license in order to work.
- Studio: This will act as control panel for Citrix XenApp 7.6 delivery. Inside Citrix, studio administrator makes all the configuration and changes.
- Director: This component is basically for monitoring and troubleshooting, which is web-based application.
- StoreFront: This is the frontend of the Citrix infrastructure by which users connect to their application, either via receiver or web based.
Installing of Citrix components
In order to start the installation, we need the Citrix XenApp 7.6 DVD or ISO image. You can always download, from the Citrix website, all you need to have in the MyCitrix account.
Follow these steps:
- Mount the disc/ISO you have downloaded.
- When you will double-click on the mounted disc, it will bring up a nice screen where you have to make the selection between XenApp Deliver applications or XenDesktop Deliver application and desktops:
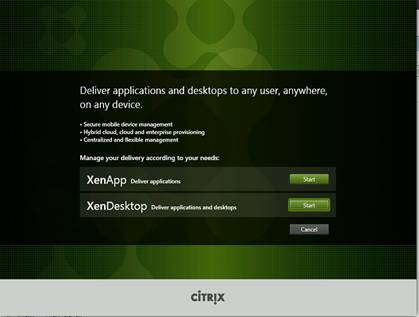
- Once you have made the selection, it will show you the next option related to the product. Here, we need to select XenApp.
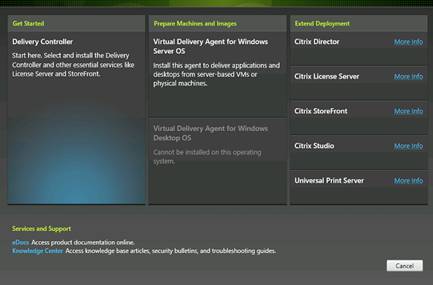
- Choose Delivery Controller from the options:
Unlock access to the largest independent learning library in Tech for FREE!
Get unlimited access to 7500+ expert-authored eBooks and video courses covering every tech area you can think of.
Renews at €18.99/month. Cancel anytime
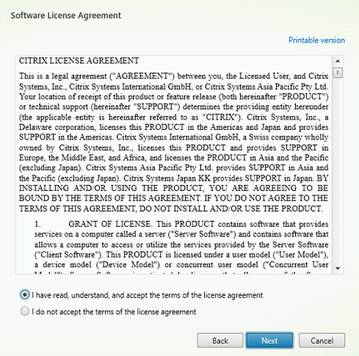
- The next screen will show you the License Agreement. You can go through it and accept the terms and click on Next:
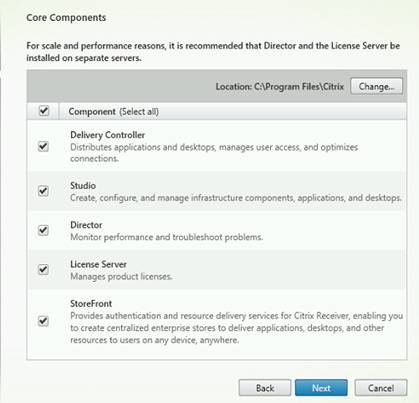
As described earlier, this is the proof of concept. We will install all the components on single server, but it is recommended to put each component on different server for better performance.
- Select all the components and click on Next:
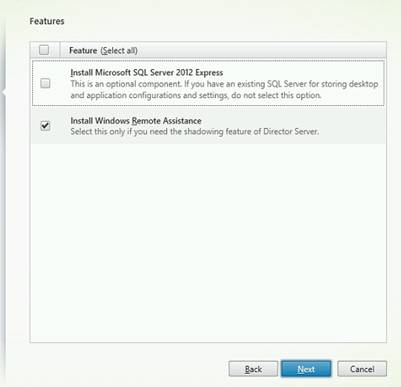
- The next screen will show you the features that can be installed. As we have already installed the SQL server, we don't have to select the SQL Express, but we will choose Install Windows Remote Assistance. Click on Next:
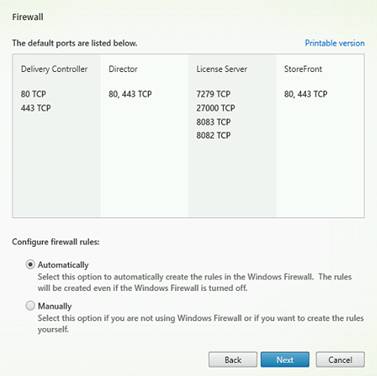
- The next screen will show you the firewall ports that needs to be allowed to communicate, and it can be adjusted by Citrix as well. Click on Next:
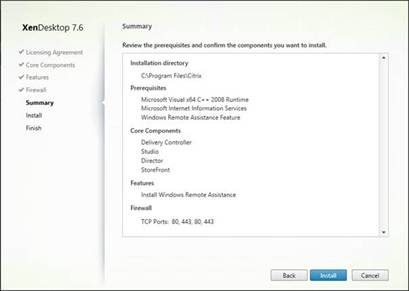
- The next screen will show you the summary of your selection. Here, you can review your selection and click on Install to install the components:
- After you click on Install, it will go through the installation procedure, and once the installation is complete, click on Next.
By following these steps, we completed the installation of the Citrix components such as Delivery Controller, Studio, Director, and StoreFront. We also adjusted the firewall ports as per the Citrix XenApp requirement.
Summary
In this article, you learned about setting up the Citrix infrastructure components and also how to install Citrix Director, License Server, Citrix Studio, and Citrix Director, and Citrix StoreFront.
Resources for Article:
Further resources on this subject:
 United States
 Great Britain
 India
India
 Germany
 France
 Canada
 Russia
 Spain
Spain
 Brazil
 Australia
 Singapore
 Hungary
 Ukraine
 Luxembourg
 Estonia
 Lithuania
 South Korea
 Turkey
 Switzerland
 Colombia
 Taiwan
 Chile
Chile
 Norway
 Ecuador
 Indonesia
 New Zealand
 Cyprus
 Denmark
 Finland
 Poland
 Malta
Malta
 Czechia
 Austria
 Sweden
 Italy
Italy
 Egypt
Egypt
 Belgium
 Portugal
 Slovenia
 Ireland
 Romania
 Greece
 Argentina
 Netherlands
 Bulgaria
 Latvia
 South Africa
 Malaysia
 Japan
Japan
 Slovakia
 Philippines
 Mexico
 Thailand


