We will add a few objects to the scene, including a unit cube, a flat plane, a red ball, and a photographic backdrop. Here is a photograph of a physical mock-up of the diorama we will build in VR:
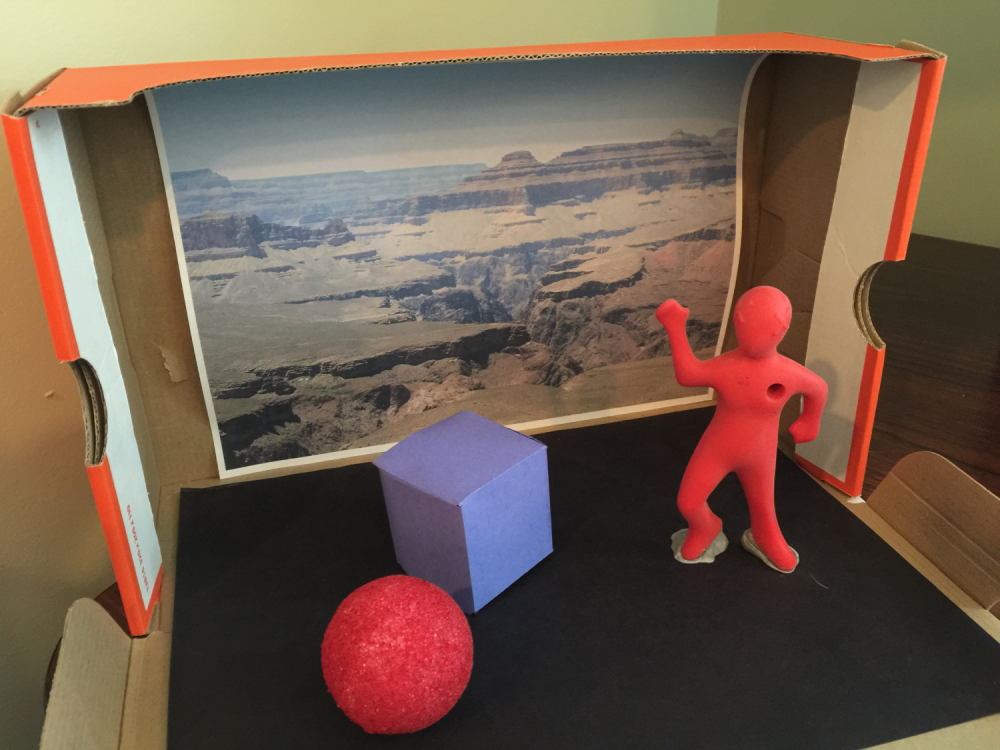
To begin, let's create a new scene and name it Diorama:
- If you haven't already, start a new scene in your opened project by selecting File | New Scene.
- Then select File | Save As....
- Open the Assets/Scenes/ folder.
- Set the file name to Diorama.
- Press Save.
Ok, now we'll add stuff.
Adding a cube and a plane
Let's add the first object to the scene, a unit-sized cube:
- Within theHierarchywindow,click on the+ (create) menu in the upper-left corner.
- Click on 3D Object | Cube. The same selection can also be found in the main menu bar's GameObject menu.
A default cube will be added to the scene, centered on the ground plane at the (0, 0, 0) position, with no rotation and a scale of 1, as you can see in the Inspector window. The Transform component should have Position (0, 0, 0), Rotation (0, 0, 0), and Scale (1, 1, 1). These are the reset settings. If for some reason your cube has other Transform values, set them in the Inspector panel, or go through the following steps:
- Click the three-dot menu icon in the upper right-hand side of the Inspector window's Transform component.
- Select Reset to reset the Transform values.
This cube has the dimensions of one unit on each side. As we'll see later, one unit in Unity corresponds to one meter in world coordinates. Its local center is the center of the cube.
Now, let's add a ground plane object to the scene:
- In the Hierarchy window, click on the + (create) menu in the upper-left (or main GameObject menu).
- Select 3D Object | Plane.
- If necessary, reset its Transform values.
- A default plane is added to the scene, centered on the ground plane at Position(0, 0, 0). Rename it as GroundPlanein the name field at the top of its Inspector.
Note that at a scale of (1, 1, 1), Unity's plane object actually measures 10 by 10 units in X and Z. In other words, the size of GroundPlane is 10 by 10 units and its transform's Scale is 1.
The cube is centered at Position (0, 0, 0), just like the ground plane; however, maybe it doesn't look like it to you. The Scene window may show a Perspective projection that renders 3D scenes onto your 2D computer monitor. The Perspective distortion makes the cube not seem centered on the ground plane, but it is. Count the grid lines on either side of the cube. As you'll see, when it is viewed in VR and you're actually standing in the scene, it won't look distorted at all. This is shown in the following screenshot (the default colors may look different on your screen than in this image; we'll adjust that soon):
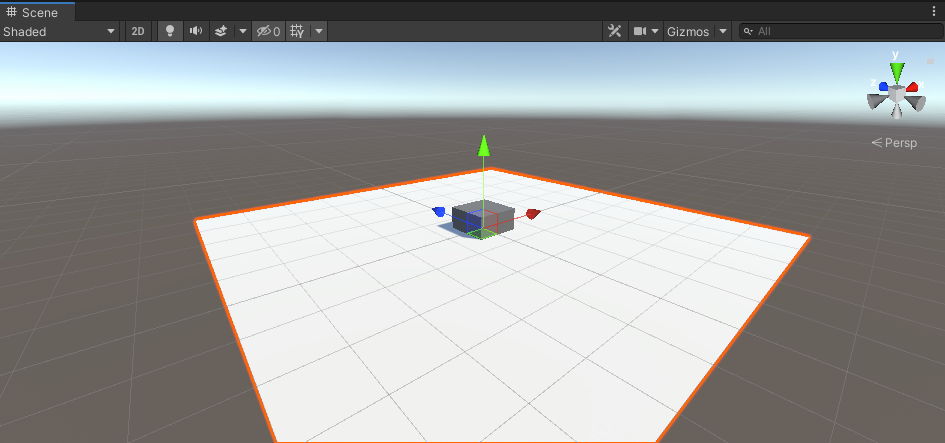
The Cube is submerged in the GroundPlane because its local origin is at its geometric center—it measures 1 by 1 by 1 and its middle point is (0.5, 0.5, 0.5). This might sound obvious, but it is possible for the origin of a model to not be its geometric center (such as one of its corners). The Transform component's position is the world space location of the object's local origin. Let's move the cube as follows:
- Move the Cube onto the surface of the GroundPlane—in the Inspector panel, set its Y position to 0.5: Position (0, 0.5, 0).
- Let's rotate the cube a bit around the y-axis. Enter 20 into its Y rotation: Rotation (0, 20, 0).
Note the direction in which it rotates—that's 20 degrees clockwise. Using your left hand, give a thumbs-up gesture. See the direction your fingers are pointing? Unity uses a left-handed coordinate system. (There is no standard for the coordinate system handedness; some software uses left-handedness, others use right-handedness).
In the previous screen capture, our GroundPlane is white. Yours probably still has the default gray color. Let's fix that by creating a new Material for the plane, as follows:
- In the Project window, open the Materials folder. (If there isn't one, select Create | Folder, and name it Materials).
- With the Materials folder selected, click on + | Material (or right-click in the Project folder) to create a new material and name it White Material.
- In the Inspector window, click the white rectangle to the right of Base Map, which opens the Color window. Select white (hexadecimal #FFFFFF).
- Drag the White Material from the Project window onto the Ground Plane in the Scene window.
- Also, for this demonstration, let's Auto Generate the environment lighting by selecting Window | Rendering | Lighting (orLighting Settings in Unity 2019). Ensure that the Scene tab is selected at the top of the window and check the Auto Generate checkbox at the bottom of the window (the Lighting settings window is discussed in more detail in later chapters).
Before we go much further, let's save our work by clicking File | Save and continue building our scene.
Adding a red ball
Next, let's add a sphere to the scene:
- From the main menu, select GameObject | 3D Object | Sphere.
- If necessary, select Reset from the Inspector panel's Transform component as we did earlier (using its three-dot-menu or by right-clicking).
Like the Cube, the Sphere has a radius of 1.0, with its origin at the center. It's hard to see the Sphere as it is embedded in the Cube. We need to move the Sphere position.
This time, let's use the Scene window's Gizmos tool to move the object. In the Scene view, you can select graphical controls, or Gizmos, to manipulate the object's transforms, as shown in the following illustration from the Unity documentation (http://docs.unity3d.com/Manual/PositioningGameObjects.html):

In the Scene window, with the Sphere selected, make sure that the Move tool is active (the second icon in the top-left icon toolbar) and use the arrows of the x-, y-, and z-axes to position it. I left mine at Position (3, 0.75, -1.75).
Let's make this Sphere into a red ball, with a new Material:
- In the Project window, with the Materials/ folder selected, Click Create | Material and name it Red Material.
- In the Inspector window, click the white rectangle to the right of Base Map, which opens the Color window. Choose a nice juicy red.
- Drag the Red Material from the Project window onto the Sphere (note that you can drag it onto the Sphere in the Scene window, in the Hierarchy, or, provided the Sphere is currently selected, directly onto its Inspector window).
The Sphere should now look red. Save your scene.
One more thing. The view in the Scene window is never necessarily aligned with the camera that renders the scene in the Game window. It's easy to align the two:
- In the Hierarchy, select the Main Camera.
- From the main menu, click GameObject | Align View to Selected (don't click Align With View, as this would change the Main Camera rather than the Scene view camera; if you make that mistake, press Ctrl + Z to undo, or click Edit | Undo).
Here's what my scene looks like now:

Let's look at other ways of changing the scene view next.
Changing the scene view
You can change the scene view any time in a number of ways, and this varies depending on whether you have a mouse with three-buttons, two-buttons, or a Mac mouse with only one button. Read up on it in the Unity Manual (which can be found at https://docs.unity3d.com/Manual/SceneViewNavigation.html) to find out what works for you.
In general, combinations of left and right mouse clicks with the Shift + Ctrl + Alt keys will let you perform the following actions:
- Drag the camera around.
- Orbit the camera around the current pivot point.
- Zoom in and out.
- Press Alt and right-click to swing the current eye orbit up, down, left, and right.
- When the hand tool is selected (in the upper-left icon bar), the right mouse button moves the eye.
In the upper-right-hand side of the Scene window, you have the Scene View Gizmo, which depicts the current scene view orientation, as shown in the following screenshot. It may indicate, for example, a Perspective view, with X extending back to the left and Z extending back to the right:

You can change the view to look directly along any of the three axes by clicking on the corresponding colored cone, as shown in the following screenshot. Clicking on the small cube in the center changes the Perspective (3D) view to the Orthographic (2D nondistorted) view:

Next, let's improve our diorama with some image textures.
Making a Crate Material
We've already used Materials to apply an albedo color to the simple geometry in the scene, including the white plane and the red sphere. But Materials can do more, much more. Materials define how a surface should be rendered, including the textures for the object's surface and how it reacts to lights. This information is used by the shader code associated with the Material.
A texture is an image file that gets "painted" onto the object's surface, not unlike wallpaper or package labeling. It is used for simulating details and making objects appear more realistic. Let's make our Cube look like a wooden crate. We've included a crate.jpg texture file with this book, or you can Google search wooden crate texture to find one on your own:
- In the Project window, created another Asset subfolder named Textures (by clicking on + | Folder).
- Drag the crate image file from your filesystem into the Unity project's Textures folder. Ours is named crate.jpg.
- In the Project window, in the Assets/Materials/ folder, create another material (right-click, then go to Create | Material) named Crate Material.
- In Inspector, select the little doughnut icon next to the Base Map to open a Select Texture dialog box, then choose the crate one (note that the search bar at the top of the dialog has the keyboard focus, so you can readily start typing the first few letters of the name to search).
- Select the texture with a double-click (or single-click, then close the box with the red X in the upper right).
- Set the Base Map to full color (white) by clicking its color chip and selecting white (#FFFFFF) so that the full fidelity of the texture pixels is not tinted.
- Now, drag the Crate Material from the Project window onto the Cube in the Scene (or in the Hierarchy list).
- Let's be more specific about our crate box. Rename it as Crate by selecting it in the Scene or Hierarchy and editing its name at the top of the Inspector.
- Save your work (File | Save).
The following screenshot shows the Crate Material in the Inspector, already applied to the cube. I've also opened the Base Map texture for preview by Ctrl-clicking the texture tile with the mouse:

Next, we'll add another texture to the scene, this time as a backdrop image.
Adding a photo
Let's add a photo of the big-screen backdrop of our diorama. We've included with this book a photo I took at the Grand Canyon, but you can use one of your own (the idea is to use a vista image with no nearby objects in the foreground). The steps are similar to the ones we used for the crate:
- Drag the photo image from your filesystem into the Unity project's Textures/ folder. Ours is named GrandCanyon.jpg.
- Create a quadrilateral (a simple four-sided square) 3D primitive object by navigating to GameObject | 3D Object | Quadand naming it Photo.
- In Inspector, reset its transform if necessary (Transform | 3-dot-icon | Reset).
- Scale it to the size of the GroundPlane. Set its transform Scale to (10, 10, 10) (you may recall that the planes in Unity are 10 by 10 units, whereas other primitives, such as Cube and Sphere, are 1-unit sized).
- Move it to the edge of the GroundPlane at a Position value of Z =5, and above, at Position value of Y =5.
- In the Project window, in theMaterials/folder, create another material (right-click and go to Create | Material) namedGrandCanyon Material.
- Drag the GrandCanyon Material from the Project window onto the Photo quad in the Scene (or in the Hierarchy list).
- In the Inspector, select the little doughnut icon next to the Base Map to open a Select Texture dialog box, then double-click to choose the GrandCanyon one.
- Set the Base Map to full color (white) by clicking its color chip and selecting white (#FFFFFF).
In my scene, the image looks a little squished compared to the original. My original photo is 2576 x 1932 pixels or a 0.75 aspect ratio. But our quad is square. Let's fix that up:
- Select the Photo quad in the scene.
- Set its transform Scale Y to 7.5.
- Set its transform Position Y to 3.75 (this is its new center offset, 7.5 / 2; in fact, you can type 7.5/2 into the Y value slot and Unity will evaluate the calculation).
Why 3.75? The height started at 10, so we scaled it to 7.5. The scaling of objects is relative to their origin. So now, half of the height is 3.75. We want to position the center of the backdrop 3.5 unit above the ground plane.
We have the size and position set up, but the photo looks washed out. That's because the ambient lighting in the scene is affecting it. You might want to keep it that way, especially as you build more sophisticated lighting models and materials in your scenes. But for now, we'll disallow lighting effects on the photo using the Unlit shader. With Photo selected, change it to Unlit by going through the following steps:
- Select the Photo object.
- In Inspector, note that the photo's GrandCanyon Material component in the Inspector window has its default Shader set as Universal Render Pipeline/Lit.
- Change the Material's Shader to Universal Render Pipeline/Unlit using the dropdown selection list.
One more thing: let's adjust the GroundPlane color to better match the photo ground:
- Create a new material in the Materials folder and name it Ground Material.
- Drag it onto the GroundPlane object.
- Then, change itsBase Mapcolor. I suggest using the dropper (icon) to pick a sandy tone from the image in your photo plane.
Here's what mine looks like; yours should be similar:

There! That looks pretty good. Save your scene.
We have created a 3D diorama scene consisting of a few geometry primitives, including a Plane, Cube, Sphere, and Quad, and applied some simple Materials. Obviously, Unity is capable of using more complex and interesting graphics. Next, we'll look at using Unity prefabs for managing reusable GameObjects.


