MongoDB Atlas Organizations, Projects, Users, and Clusters
MongoDB Atlas enforces a basic structure for your environment. This includes the concepts of organizations, projects, users, and clusters. MongoDB provides a default organization and a project to help you get started easily. This section will teach you what these entities mean and how to set them up.
Organizations
A MongoDB Atlas organization is the top-level entity in your account, containing other elements such as projects, clusters, and users. You need to set up an organization first before any other resources.
Exercise 1.02: Setting Up a MongoDB Atlas Organization
You have successfully created an account on MongoDB Atlas, and in this exercise, you will set up an organization based on your preferences:
- Log on to your MongoDB account created in Exercise 1.01, Setting Up a MongoDB Atlas Account. To create an organization, select the
Organizationsoption from your account menu as shown in the following figure:
Figure 1.7: User options – Organizations
- You will see the default organization in the list of organizations. To create a new organization, click the
Create New Organizationbutton in the top-right corner:
Figure 1.8: Organizations list
- Type the organization name in the
Name Your Organizationfield. Leave the default selection forCloud ServiceasMongoDB Atlas. ClickNextto proceed to the next step:
Figure 1.9: Organization Name
You will be presented with the following screen:

Figure 1.10: Create Organization page
- You will see your login as the
Organization Owner. Leave everything as their defaults and clickCreate Organization.Once you have successfully created the organization, the following
Projectsscreen will appear:
Figure 1.11: Projects page
So, in this exercise, you have successfully created the organization for your MongoDB application.
Projects
A project provides a grouping of clusters and users for a specific purpose; for example, you would like to segregate your lab, demo, and production environments. Similarly, you may like a different network, region, and user setup for different environments. Projects allow you to do this grouping as per your own organizational needs. In the next exercise, you will create a project.
Exercise 1.03: Creating a MongoDB Atlas Project
In this exercise, you will set up a project on MongoDB Atlas using the following steps:
- Once you have created an organization in Exercise 1.02, Setting Up MongoDB Atlas Organization, the
Projectsscreen will appear on your next login. ClickNew Project:
Figure 1.12: Projects page
- Provide a name for your project on the
Name Your Projecttab. Name the projectmyMongoProject. ClickNext:
Figure 1.13: Create a Project page
- Click
Create Project. TheAdd Members and Set Permissionspage is not mandatory, so leave it as the default. Your name should appear as theProject Owner:
Figure 1.14: Add Members and Set Permissions for the project
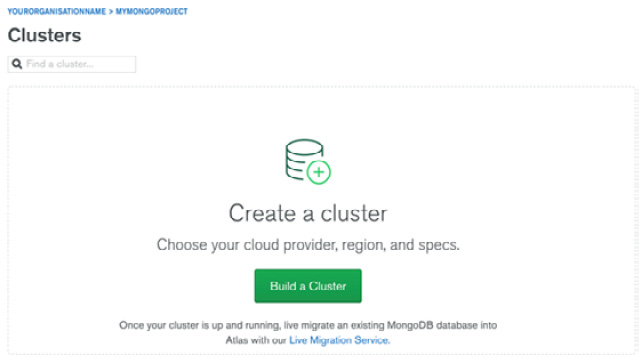
Your project is now set up. A cluster setup splash screen appears as shown in the following figure:

Figure 1.15: Clusters page
Now that you have created a project, you can create your first MongoDB cloud deployment.
MongoDB Clusters
A MongoDB cluster is the term used for a database replica set or shared deployments in MongoDB Atlas. A cluster is a distributed set of servers used for data storage and retrieval. A MongoDB cluster, at the minimum level, is a three-node replica set. In a sharded environment, a single cluster may contain hundreds of nodes/servers containing different replica sets with each replica set comprised of at least three nodes/servers.
Exercise 1.04: Setting Up Your First Free MongoDB Cluster on Atlas
In this section, you will set up your first MongoDB replica set on Atlas free tier (M0). Here are the steps to do this:
- Go to https://www.mongodb.com/cloud/atlas and log on to your account using the credentials that you used in Exercise 1.01, Setting Up a MongoDB Atlas Account. The following screen appears:

Figure 1.16: Clusters page
- Click
Build a Clusterto configure your cluster:
Figure 1.17: Build a Cluster page
The following cluster options will appear:

Figure 1.18: Available cluster options
- Select the
Shared Clustersoption marked asFREEas shown in the previous figure. - A cluster configuration screen will be presented to select different options for your cluster. Select the cloud provider of your choice. For this exercise, you will be using AWS, as shown here:

Figure 1.19: Selecting the cloud provider and region
- Select the
Recommended regionthat is closest to your location and is free. In this case, you are selectingSydney, as can be seen from the following figure:
Figure 1.20: Selecting the recommended region
On the region selection page, you will see your cluster setting as per your selection. The
Cluster Tierwill beM0 Sandbox(Shared RAM, 512 MB storage),Additional Settingswill beMongoDB 4.2 No Backup, andCluster Namewill beCluster0:
Figure 1.21: Additional Settings for the cluster
- Ensure that the selections are made correctly in the preceding step so that the cost appears as
FREE. Any selections different from what is recommended in the previous steps may add costs for your cluster. Click onCreate Cluster:
Figure 1.22: FREE tier notification
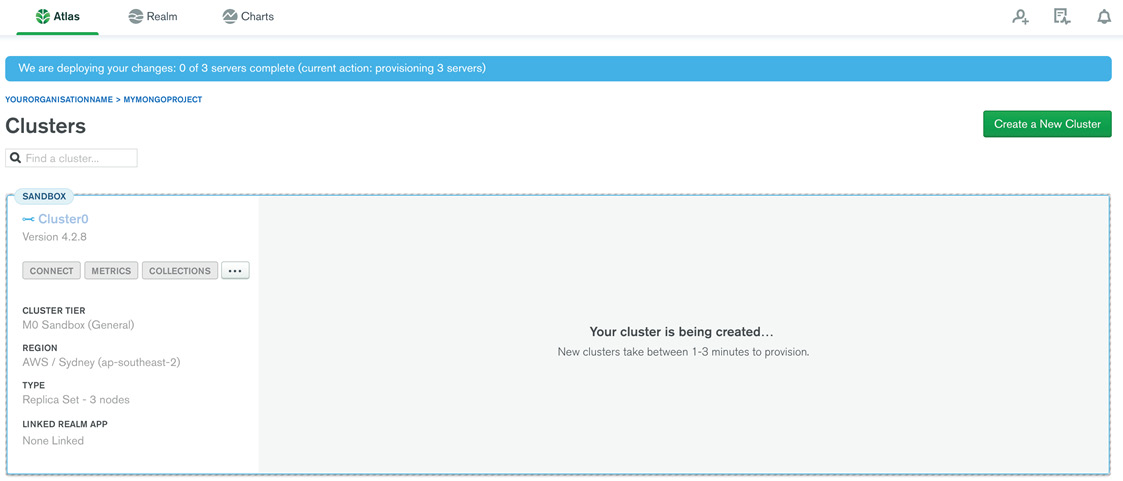
A success message of Your cluster is being created… appears on the screen. It generally takes a few minutes to set up the cluster:

Figure 1.23: MongoDB Cluster getting created
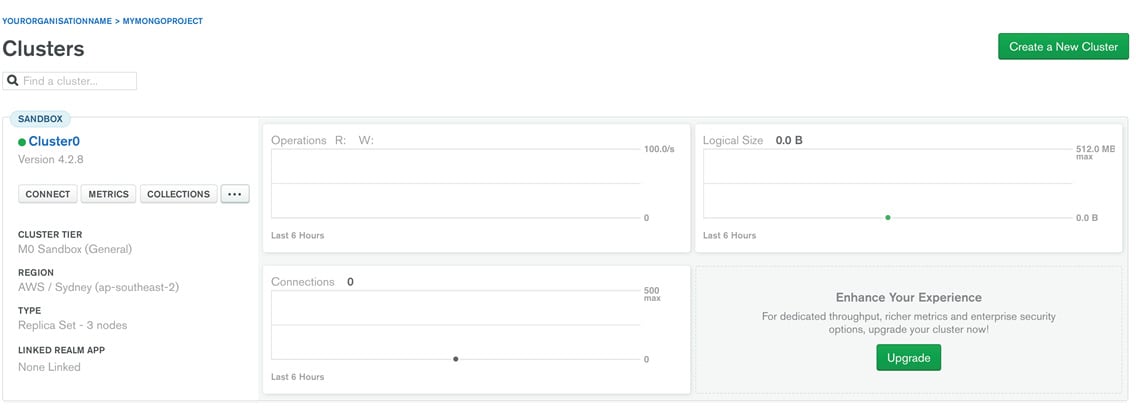
After a few minutes, you should see your new cluster, as shown here:

Figure 1.24: MongoDB cluster created
You have successfully created a new cluster.
Connecting to Your MongoDB Atlas Cluster
Here are the steps to connect to your MongoDB Atlas cluster running on the cloud:
- Go to https://account.mongodb.com/account/login. The following window appears:

Figure 1.25: MongoDB Atlas login page
- Provide your email address and click
Next:
Figure 1.26: MongoDB Atlas Login page (password)
- Now type your
Passwordand clickLogin. TheClusterswindow appears as shown here:
Figure 1.27: MongoDB Atlas Clusters screen
- Click the
CONNECTbutton underCluster0. It will open a modal screen as follows:
Figure 1.28: MongoDB Atlas modal screen
The first step before you connect to the cluster is to whitelist your IP address. MongoDB Atlas has a built-in security feature that is enabled by default, which blocks connectivity to the database from everywhere. So, the whitelisting of the client IP is necessary to connect to the database.
- Click
Add Your Current IP Addressto whitelist your IP as shown here:
Figure 1.29: Adding your current IP address
- The screen will show your current IP address; just click on the
Add IP Addressbutton. If you wish to add more IPs to the whitelist, you can add them manually by clicking theAdd a Different IP Addressoption (see preceding figure):
Figure 1.30: Adding your current IP address
The following message appears once the IP is whitelisted:

Figure 1.31: IP whitelisted message
- To create a new MongoDB user, provide a
UsernameandPasswordfor a new user and click on theCreate Database Userbutton to create a user as shown here:
Figure 1.32: Creating a MongoDB user
Once the details are successfully updated, the following screen appears:

Figure 1.33: MongoDB user created screen
- To choose a connection method, click on the
Choose a connection methodbutton. Select the Connect with the mongo shell option as shown here:
Figure 1.34: Choosing the connection type
- Download and install the mongo shell by selecting the options for your workstation/client machine as shown in the following screenshot:

Figure 1.35: Installing the mongo shell
The mongo shell is a command-line client to connect to your Mongo server(s). You will be using this client throughout the book, so it is imperative that you install it.
- Once you have the mongo shell installed, run the connection string you grabbed in the preceding step to connect to your database. When prompted, enter the password that you used for your MongoDB user in the previous step:

Figure 1.36: Installing the mongo shell
If everything goes well, you should see the mongo shell connected to your Atlas cluster. Here is a sample output of a connecting string execution:

Figure 1.37: Output of connecting string execution
Ignore the warnings seen in Figure 1.37. At the end, you should see your cluster name and a command prompt. You can run the show databases command to list the existing database. You should see the two databases that are used by MongoDB for administrative purposes. Here is some sample output of the show databases command:
MongoDB Enterprise Cluster0-shard-0:PRIMARY> show databases
admin  0.000GB
local  4.215GB
You have successfully connected to your MongoDB Atlas instance.
MongoDB Elements
Let us dive into some very basic elements of MongoDB, such as databases, collections, and documents. Databases are basically aggregations of collections, which in turn, are made up of documents. A document is the basic building block in MongoDB and contains information about the various fields in a key-value format.
Documents
MongoDB stores data records in documents. A document is a collection of field names and values, structured in a JavaScript Object Notation (JSON)-like format. JSON is an easy-to-understand key-value pair format to describe data. The documents in MongoDB are stored as an extension of the JSON type, which is called BSON (Binary JSON). It is a binary-encoded serialization of JSON-like documents. BSON is designed to be more efficient in space than standard JSON. BSON also contains extensions that allow the representation of data types that cannot be represented in JSON. We will look at these in detail in Chapter 2, Documents and Data Types.
Document Structures
MongoDB documents contain field and value pairs and follow a basic structure, as follows:
{
     "firstFieldName": firstFieldValue,
     "secondFieldName": secondFieldValue,
     …
     "nthFieldName": nthFieldValue
}
The following is an example of a document that contains details about a person:
{
    "_id":ObjectId("5da26111139a21bbe11f9e89"),
    "name":"Anita P",
    "placeOfBirth":"Koszalin",
    "profession":"Nursing"
}
The following is another example with some fields and date types from BSON:
{
    "_id" : ObjectId("5da26553fb4ef99de45a6139"),
    "name" : "Roxana",
    "dateOfBirth" : new Date("Dec 25, 2007"),
    "placeOfBirth" : "Brisbane",
    "profession" : "Student"
}
The following example of a document contains an array and a sub-document. An array is a set of values and can be used when you need to store multiple values for a key such as hobbies. Sub-documents allow you to wrap related attributes in a document against a key, such as an address:
{
    "_id" : ObjectId("5da2685bfb4ef99de45a613a"),
    "name" : "Helen",
    "dateOfBirth" : new Date("Dec 25, 2007"),
    "placeOfBirth" : "Brisbane",
    "profession" : "Student",
    "hobbies" : [
     "painting",
     "football",
     "singing",
     "story-writing"],
    "address" : {
     "city" : "Sydney",
    "country" : "Australia",
    "postcode" : 2161
  }
}
The _id field shown in the preceding snippet is auto generated by MongoDB and is used as a unique identifier for the document. We will learn more about this in the upcoming chapters.
Collections
In MongoDB, documents are stored in collections. Collections are analogous to tables in relational databases. You need to use the collection name in your queries for operations such as insert, retrieve, delete, and so on.
Understanding MongoDB Databases
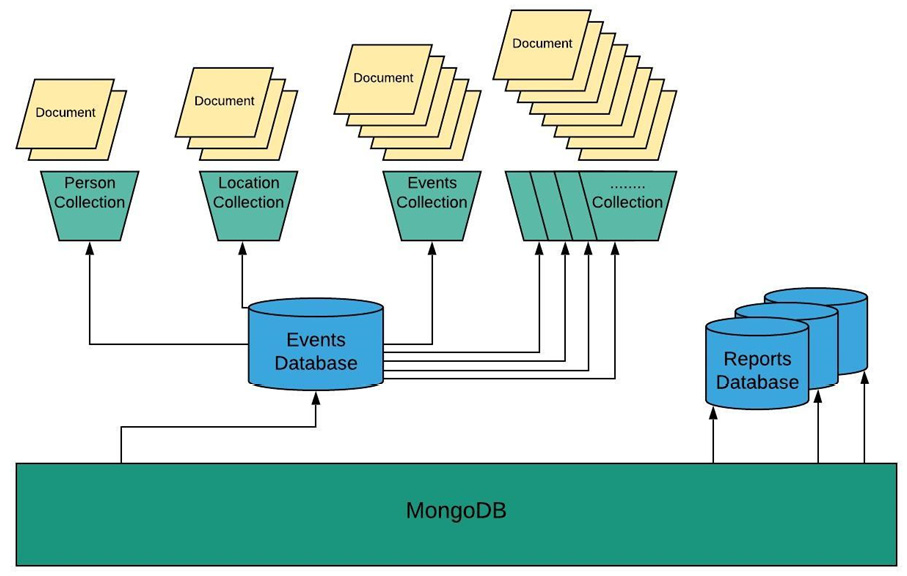
A database is a container for collections grouped together. Each database has several files on the filesystem that contain database metadata and the actual data stored in collections. MongoDB allows you to have multiple databases, and each of these databases can have various collections. In turn, each of these collections can have numerous documents. This is illustrated in the following figure, which shows an events database that contains collections for different event-related fields, such as Person, Location, and Events; these, in turn, contain various documents with all the granular data:

Figure 1.38: Pictorial representation of a MongoDB database
Creating a Database
Creating a database in MongoDB is very simple. Execute the use command in the mongo shell as follows, by replacing yourDatabaseName with your own choice of database name:
use yourDatabaseName
If the database does not exist, Mongo will create the database and will switch the current database to the new database. If the database exists, Mongo will refer to the existing database. Here is the output of the last command:
switched to db yourDatabaseName
Note
Naming conventions and using logical names always help even if you are working on a learning project. The project name is meant to be replaced by something more meaningful for you and understandable for later use. This rule applies to the name of any asset that we create, so try to use logical names.
Creating a Collection
You can use the createCollection command to create a collection. This command allows you to utilize different options for your collection, such as a capped collection, validation, collation, and so on. Another way to create a collection is by just inserting a document in a non-existent collection. In such a case, MongoDB checks whether the collection exists, and if not, it will create the collection before inserting the documents passed. We will try to utilize both methods to create a collection.
To create the collection explicitly, use the createCollection operation in the syntax as follows:
db.createCollection( '<collectionName>',
{
     capped: <boolean>,
     autoIndexId: <boolean>,
     size: <number>,
     max: <number>,
     storageEngine: <document>,
     validator: <document>,
     validationLevel: <string>,
     validationAction: <string>,
     indexOptionDefaults: <document>,
     viewOn: <string>,
     pipeline: <pipeline>,
     collation: <document>,
     writeConcern: <document>
})
In the following snippet, we are creating a capped collection with a maximum of 5 documents, with each document having a size limit of 256 bytes. The capped collection works like a circular queue, which means older documents will go out to make space for the latest inserts when the maximum size is reached:
db.createCollection('myCappedCollection',
{
     capped: true,
     size: 256,
     max: 5
})
Here is the output of the createCollection command:
{
        «ok» : 1,
        «$clusterTime» : {
                «clusterTime» : Timestamp(1592064731, 1),
                «signature» : {
                        «hash» : BinData(0,»XJ2DOzjAagUkftFkLQIT                           9W2rKjc="),
                        «keyId» : NumberLong(«6834058563036381187»)
                }
        },
        «operationTime» : Timestamp(1592064731, 1)
}
Do not worry about the preceding options much as none of them are mandatory. If you do not need to set any of these, then your createCollection command can be simplified as follows:
db.createCollection('myFirstCollection')
The output of this command should look as follows:
{
        «ok» : 1,
        «$clusterTime» : {
                «clusterTime» : Timestamp(1597230876, 1),
                «signature» : {
                        «hash» : BinData(0,»YO8Flg5AglrxCV3XqEuZG                           aaLzZc="),
                        «keyId» : NumberLong(«6853300587753111555»)
                }
        },
        «operationTime» : Timestamp(1597230876, 1)
}
Creating a Collection Using Document Insertion
You do not need to create a collection before inserting documents. MongoDB creates a collection if it does not exist on the first document insertion. You would use this method as follows:
use yourDatabaseName;
db.myCollectionName.insert(
{
    "name" : "Yahya A",  "company" :  "Sony"}
);
The output of your command should look like this:
WriteResult({ "nInserted" : 1 })
The preceding output returns the number of documents inserted into the collection. As you have inserted a document in a non-existent collection, MongoDB must have created the collection for us before inserting this document. To confirm that, display your collections list using the following command:
show collections;
The output of your command should display the list of collections in your database, something like this:
myCollectionName
Creating Documents
As you must have noticed in the previous section, we used the insert command to put a document in a collection. Let us look at a couple of variants of insert commands.
Inserting a Single Document
The insertOne command is used to insert one document at a time, as in the following syntax:
db.blogs.insertOne(
  { username: "Zakariya", noOfBlogs: 100, tags: ["science",    "fiction"]
})
The insertOne operation returns the _id value of the newly inserted document. Here is the output of the insertOne command:
{
  "acknowledged" : true,
  "insertedId" : ObjectId("5ea3a1561df5c3fd4f752636")
}
Note
insertedId is the unique ID for the document that is inserted, and it will not be the same for you as mentioned in the output.
Inserting Multiple Documents
The insertMany command inserts multiple documents at once. You can pass an array of documents to the command as mentioned in the following snippet:
db.blogs.insertMany(
[
      { username: "Thaha", noOfBlogs: 200, tags: ["science",       "robotics"]},
      { username: "Thayebbah", noOfBlogs: 500, tags: ["cooking",     "general knowledge"]},
      { username: "Thaherah", noOfBlogs: 50, tags: ["beauty",        "arts"]}
]
)
The output returns the _id values of all the newly inserted documents:
{
  «acknowledged» : true,
  «insertedIds» : [
    ObjectId(«5f33cf74592962df72246ae8»),
    ObjectId(«5f33cf74592962df72246ae9»),
    ObjectId(«5f33cf74592962df72246aea»)
  ]
}
Fetching Documents from MongoDB
MongoDB provides the find command to fetch documents from a collection. This command is useful to check whether your inserts are actually saved in the collections. Here is the syntax for the find command:
db.collection.find(query, projection)
The command takes two optional parameters: query and projection. The query parameter allows you to pass a document to apply filters during the find operation. The projection parameter allows you to pick desired attributes from the returned documents instead of all the attributes. When no parameter is passed in the find command, then all the documents are returned.
Formatting the find Output Using the pretty() Method
When the find command returns multiple records, it is sometimes hard to read them as they are not formatted properly. MongoDB provides the pretty() method at the end of the find command to get the returned records in a formatted manner. To see it in action, insert a couple of records in a collection called records:
db.records.insertMany(
[
  { Name: "Aaliya A", City: "Sydney"},
  { Name: "Naseem A", City: "New Delhi"}
]
)
It should generate an output as follows:
{
  "acknowledged" : true,
  "insertedIds" : [
    ObjectId("5f33cfac592962df72246aeb"),
    ObjectId("5f33cfac592962df72246aec")
  ]
}
First, fetch these records using the find command without the pretty method:
db.records.find()
It should return an output as shown here:
{ "_id" : ObjectId("5f33cfac592962df72246aeb"), "Name" : "Aaliya A",   "City" : "Sydney" }
{ "_id" : ObjectId("5f33cfac592962df72246aec"), "Name" : "Naseem A",   "City" : "New Delhi" }
Now, run the same find command using the pretty method:
db.records.find().pretty()
It should return the same records, but in a beautifully formatted way as shown here:
{
  "_id" : ObjectId("5f33cfac592962df72246aeb"),
  "Name" : "Aaliya A",
  "City" : "Sydney"
}
{
  "_id" : ObjectId("5f33cfac592962df72246aec"),
  "Name" : "Naseem A",
  "City" : "New Delhi"
}
Clearly, the pretty() method can be quite useful when you are looking at multiple or nested documents, as the output is more easily readable.
Activity 1.01: Setting Up a Movies Database
You are one of the founders of a company that builds software about movies from all over the world. Your team does not have much database administration skills and there is no budget to hire a database administrator. Your task is to provide a deployment strategy and basic database schema/structure and set up the movies database.
The following steps will help you complete the activity:
- Connect to your database.
- Create a movies database named
moviesDB. - Create a movies collection and insert the following sample data: https://packt.live/3lJXKuE.
[ { "title": "Rocky", "releaseDate": new Date("Dec 3, 1976"), "genre": "Action", "about": "A small-time boxer gets a supremely rare chance to fight a heavy- weight champion in a bout in which he strives to go the distance for his self-respect.", "countries": ["USA"], "cast" : ["Sylvester Stallone","Talia Shire", "Burt Young"], "writers" : ["Sylvester Stallone"], "directors" : ["John G. Avildsen"] }, { "title": "Rambo 4", "releaseDate ": new Date("Jan 25, 2008"), "genre": "Action", "about": "In Thailand, John Rambo joins a group of mercenaries to venture into war-torn Burma, and rescue a group of Christian aid workers who were kidnapped by the ruthless local infantry unit.", "countries": ["USA"], "cast" : [" Sylvester Stallone", "Julie Benz", "Matthew Marsden"], "writers" : ["Art Monterastelli", "Sylvester Stallone"], "directors" : ["Sylvester Stallone"] } ] - Check whether the documents are inserted by fetching the documents.
- Create an
awardscollection with a few records using the following data:{ "title": "Oscars", "year": "1976", "category": "Best Film", "nominees": ["Rocky","All The President's Men","Bound For Glory","Network","Taxi Driver"], "winners" : [ { "movie" : "Rocky" } ] } { "title": "Oscars", "year": "1976", "category": "Actor In A Leading Role", "nominees": ["PETER FINCH","ROBERT DE NIRO", "GIANCARLO GIANNINI","WILLIAM HOLDEN","SYLVESTER STALLONE"], "winners" : [ { "actor" : "PETER FINCH", "movie" : "Network" } ] } - Check whether your inserts have saved the documents in the collection as desired by fetching the documents.
Note
The solution for this activity can be found via this link.


