Setting up and managing Ports
Inside BizTalk, we have both Receive and Send Ports. Ports are entry points and exit points in and out of BizTalk. All messages entering BizTalk will be received through a Receive Port and almost all messages exiting BizTalk will be through a Send Port. Even if it is possible to send out messages directly through code inside an Orchestration, this will not be the correct approach very often.
Receive Ports
Receive Ports are the entry points for messages that enter BizTalk. Each Receive Port contains one to many different Receive Locations (we can create Receive Ports without any Receive Locations, but that wouldn't make much sense since the Port would have no function).
To create a new Receive Port, perform the following steps:
Right-click on the Receive Ports folder in the Application where the Port should be created, and choose New | One-way Receive Port or Request Response Receive Port.
The same action can be performed in the Actions pane on the right when Receive Ports is selected.
In most routing scenarios, One-Way Receive Ports are used, and the use of Request-Response Receive Ports should be limited to flows where BizTalk exposes services, where an actual response message is required, or the consumer of the service needs to know if certain events have taken place before closing the connection to BizTalk. Read more about best practice later in this chapter in the Implementing messaging patterns section.
Next, we need to give a name to the Port, as shown in the following screenshot:

Next, click on OK to create the Receive Port.
Note
The names of the various Ports inside a BizTalk Group must be unique, not just per Application but for the whole Group.
Port Authentication
One way of making sure that only messages from known partners enter BizTalk is by using the Authentication feature available on Receive Ports, as seen in the following screenshot:
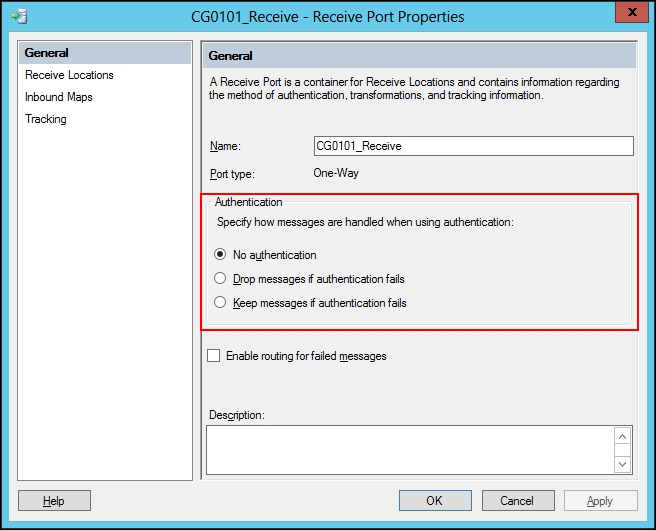
When using Receive Ports, we can set up filters so that only messages from known parties are allowed to pass through to the MessageBox. This will only work if messages are signed and we have the public certificates of the sending parties in store or if the Windows user who submitted the message can be located. There are three Authentication properties on each Receive Port:
|
Type |
Description |
|---|---|
|
No authentication (Default) |
All messages will be let through to the |
|
Drop messages if authentication fails |
If the party resolver does not match a valid sender from the message signature, the message will be thrown away and not submitted to the |
|
Keep messages if authentication fails |
If the party resolver does not match a valid sender from the message signature, the message will be suspended inside the |
Receive Locations
As mentioned earlier, a Receive Port with no Receive Locations doesn't have any function. No messages can be received through that Port. So, for each Receive Port, at least one Receive Location should be created and configured.
The reason for having multiple Receive Locations inside one Receive Port is to have the ability to receive different messages from different locations and having BizTalk treat them as if they were received from the same place and/or had the same message type.
To make a new Receive Location, you can create it from within an already created Receive Port, as you can see in the following screenshot:
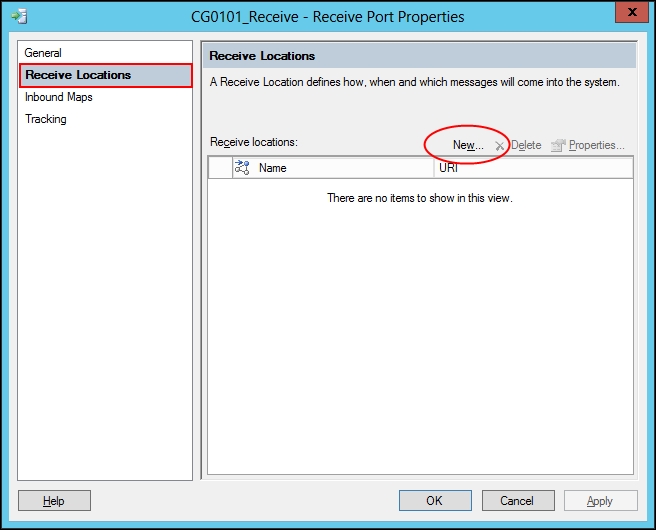
Another option is to right-click on the Receive Locations folder in the Application and choose New | One-Way Receive Location or Request-Response Receive Location. As for Receive Location types, only One-Way Receive Locations can be added to a One-Way Receive Port, and only Request-Response Locations to a Request-Response Port.
If a Receive Location is created directly, the console will prompt for a parent Receive Port before we can configure the location, since all locations must be a part of one specific Port.
Choose the appropriate Receive Port; click on OK, and the Receive Location configuration will appear.
Just as Receive Ports, Receive Locations need to be supplied with a name. Also, a type (Adapter) needs to be selected and configured, a Receive Handler (Host) needs to be selected, and finally, a Pipeline needs to be chosen. Read more about Pipelines in Chapter 2, Developing BizTalk Artifacts – Creating Schemas and Pipelines.
Service windows
Each Receive Location can be scheduled to only operate at certain times.
On the Schedule page inside the Receive Location, Start date, Stop date, and Service Window can be applied, as shown in the following screenshot:
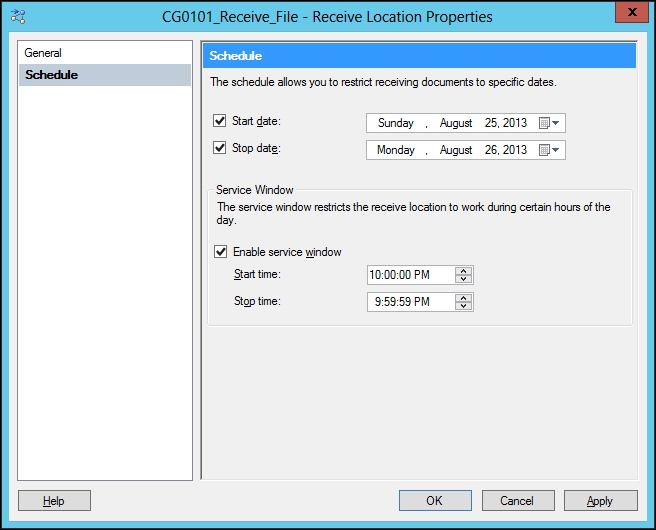
As seen in the previous screenshot, each of the three parameters can be enabled or disabled, and each enabled time period will limit the time the Receive Location is enabled for receiving messages.
Location states
A Receive Location can have two different states, enabled or disabled. If the location is enabled, it will receive any available messages; if disabled, no messages will be received.
Enabling a Receive Location can be done by right-clicking on it inside the BizTalk Administration Console and choosing enable. It can also be done through code script or PowerShell.
The state of a Receive Location is merely a flag inside the Receive Location table in the Management database of the BizTalk Group. It has nothing to do with whether or not the Host Instances (Windows Services) are running. Therefore, a Receive Location will only pick up messages if it is enabled, and at least one instance of the Host type it is using is running.
Error threshold
If errors occur in a Receive Location (for example, access denied in a file folder, logon failure to a database, and so on) when trying to pick up messages, the Host Instance will start to write warning entries in the Event Log. At some point, the error threshold (this differs for different Adapters) might be reached and the Receive Location will become disabled. If a Receive Location becomes disabled, it will not start itself again automatically, but instead it will write an error message in the Event Log on the BizTalk Server where the final unsuccessful try occurred, and therefore monitoring the Event Logs on all BizTalk Servers is critical. A disabled Receive Location results in no messages being received by BizTalk.
Let's say that we were polling mails from a mail server by using the POP3 Receive Adapter. The following screenshot shows the Error Threshold attribute for the POP3 Adapter:
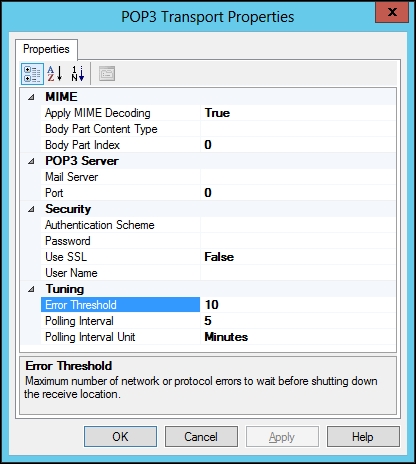
When setting up the Adapter, we are asked for the values of Polling Interval and Error Threshold. If set to 5 and 10, as seen in the preceding screenshot, the following consequences would occur if the Receive Location started failing:
BizTalk will poll mails every five minutes. At some point, the mail server becomes unavailable and the process of logging on and retrieving mails starts failing.
The first time BizTalk unsuccessfully tries to access the mail server, it will write a warning in the Event Log stating that it wasn't able to connect to the mail server and that it will try again later.
The second try will be five minutes later and unless the mail server becomes available again, this will go on for an additional seven times.
When the last retry occurs, BizTalk will no longer retry and therefore it will stop the retrying scenario by disabling the Receive Location, writing an error to the Event Log stating that the number of retries were reached, and leave it to the administrators to fix the problem and enable the Receive Location again.
When configuring the various Receive Locations, we need to find a balance between how many retries (error threshold) we want. If we have an unstable environment, such as an FTP Server, residing somewhere outside our control with multiple unscheduled service windows and general unavailability, it might be tempting to increase the error threshold to 9,000 or similar. This way we can have long periods of unavailability, and when the FTP Server eventually comes back online, we don't risk the Receive Location having shut down.
This might not be the best of approaches, since it is likely that the people monitoring BizTalk will only look at errors and not warnings in the Event Log, so nobody will notice that we are not polling data from the source if something more critical happens (such as our password expiring). In that case, we will not be notified until all 9,000 attempts fail and the Receive Location, after possibly months, eventually shuts down.
Receive Port Maps
Receive Port Maps are applied to a message after the message leaves the Pipeline; at which point all messages should be in the format of XML. This is important, since Maps can only take XML as input and also because a Map will always output XML.
Maps can only be applied if the Pipeline has discovered the message type of the incoming message (this will happen automatically unless the PassThruReceive Pipeline or some other custom Pipeline with no Disassemble stage is used). For more information on Pipelines, see Chapter 2, Developing BizTalk Artifacts – Creating Schemas and Pipelines. If the message type is not known by the time the message leaves the Pipeline, no Map will be applied, even if a Map matching the message is present on the Port.
The matching of a Map works as follows:
If the message type was discovered and promoted by the Receiving Pipeline, BizTalk will look for a Map with a source type matching the message type. If such a Map is found, it will be executed and the source message will be mapped using that Map.
It is also worth mentioning that after a Map has been executed on a Receive Port, an XML Disassemble Pipeline Component is executed against the output XML. This is why we can promote properties on the destination Schema of a Map executed on the Receive Port and still have the properties promoted before the message is submitted to the MessageBox. Also, not more than one Map will be executed even if a map-chain exists. The following example will explain this:
On a Receive Port (PortA), we have applied three different Maps:
MessageA_to_MessageU
MessageB_to_MessageU
MessageU_to MessageI
If we receive Message A (and the message type is discovered in the Pipeline), the message will be transformed to Message U. But after that, the message exits the Port, no additional Map discovery will be done, so even though we may want Message A to be transformed first into message U and then into message I, this will not happen. The same goes for Message B, and only if we submit a message U will the Map (MessageU_to_MessageI) be applied.
Maps are applied on Receive Ports by selecting Properties on the Port and then selecting Inbound Maps, as shown in the following screenshot:
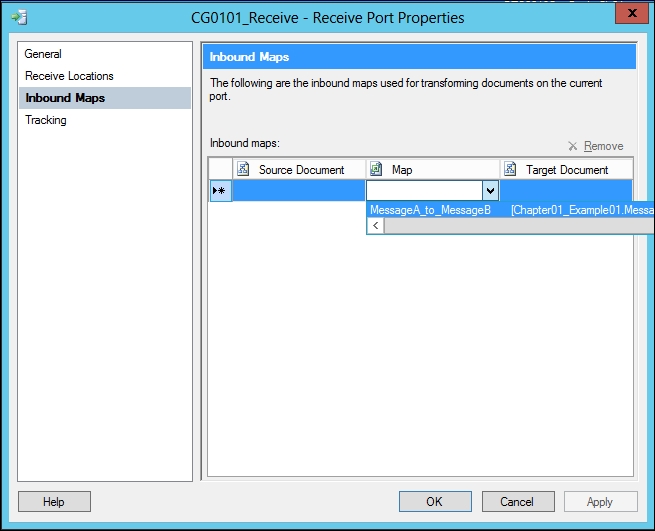
Under the Map section, use the drop-down list, then all Maps deployed in the Application (or Applications that are being referenced) should appear. Choose the Map(s) to be applied on the Receive Port; remember that multiple Maps can be selected.
Tip
If many Maps are present in the Application and/or in the referenced Applications, it might be difficult to find the correct Map to apply. If the source or target document is known, it might help to first choose one of these, since this will limit the list of available Maps.
Send Ports
Unlike Receive Ports, Send Ports do not operate with locations. Each Send Port will point to a specific location, database, application, service, and so on, somewhere outside of BizTalk. Just as the Receive Location, a Send Port uses one Pipeline and one Adapter so that the desired message format and Protocol is used for transporting the message to the target destination.
In order to create a new One-Way Send Port, click on Send Ports inside the desired Application and choose New | Static One-Way Send Port.
When creating a new Send Port, at least three properties need to be selected and, in some cases, configured.
First, we need to supply the Send Port with a name. A type (Adapter) also needs to be selected and configured. Next, we can choose a Send Handler (Host) if we don't want to use the default Host. Finally, if the default Pipeline is not adequate, a Pipeline must be chosen and configured.
Transport Advanced Options
In Transport Advanced Options, several common parameters can be configured in the Send Port.
The transport options consist of three parameters:
|
Retry count |
The number of tries the Send Port should try to resend the message on failure before giving up and suspending the message in the |
|
Retry interval |
The number of minutes to wait between the retries in case of failure |
|
Priority |
The priority given to the Send Port subscription (1 being the highest and 10 the lowest); the higher the priority, the faster the Send Port will get messages it has subscribed to from the Host Queue |
Retry on a Send Port is a bit different from Receive Locations. First of all, the behavior is per message and the Port will never disable itself after any number of retries has been exhausted, but rather suspend the message.
What the Send Port does is try to send each message it receives the number of times specified in the Retry count parameter, with an interval specified in the Retry interval parameter. When the number of retries has been exhausted, the message will be suspended and an error will be written to the Event Log. (Just as the Receive Location, the first failure(s) results in warnings in the Event Log; only the final try, that also causes the suspension of the message, will result in an error).
Scheduling and service window
Each Send Port created can have a scheduled service window in which messages will be sent through the Port. The setup is done under Transport Advanced Options, which is shown in the following screenshot:
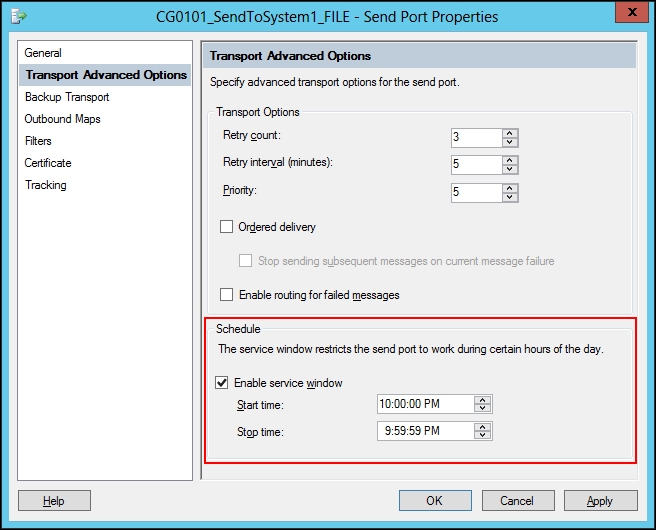
Similar to Receive Locations, certain operation periods can be set up on a Send Port. We can specify a period within the day, where messages should be sent through the Port. At all other times, all messages going to the Port will be queued up inside BizTalk, and when the Operation Window opens, all the queued-up messages will be sent.
The term service window might be a bit confusing. Normally, a service window is a time period where maintenance is going on, and therefore a period where no messages should be sent to the system. However, in this case, the service window is the time where messages are actually sent through the Send Port.
Backup transport
Each Send Port can have a backup transport configured, where an alternate Adapter and/or address can be selected so that if the primary target has exceeded its retry counts, the Send Port will try to send the message to an secondary location.
Send Port Maps
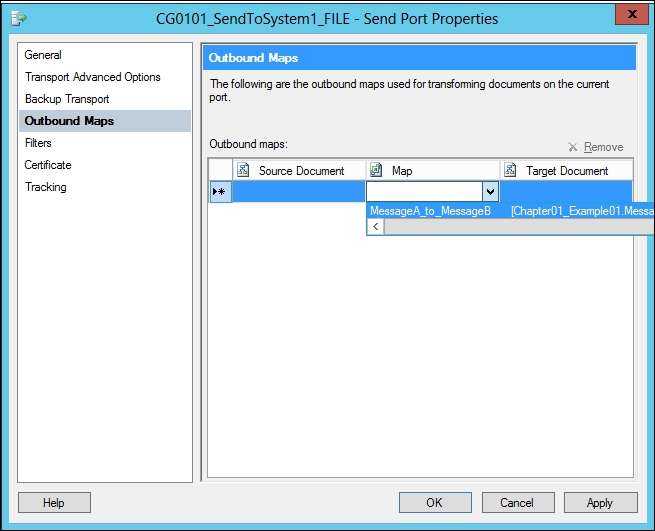
Just as Receive Ports, multiple Maps can be applied to the Send Ports in order to transform the messages being sent from the MessageBox to the target format requested by the target system or the format required for the Pipeline to proceed. Also, multiple Maps may be applied to the Send Port, but only one of them will be used, and only if the message type is known by BizTalk at the time the message is sent from the MessageBox to the Send Port.
To apply Maps to Send Ports, open Send Port properties and click on Outbound Maps, as shown in the following screenshot:
Configuring Filters (subscriptions)
Inside the Filters page, it is possible to set up subscriptions for the Send Port. The filters can be a combination of several Boolean expressions and include a combination of promoted properties, operators, and values. Only promoted properties deployed through Property Schemas in the BizTalk Server Group will be selectable in a filter.
The following screenshot shows how to set up a subscription on a Send Port:
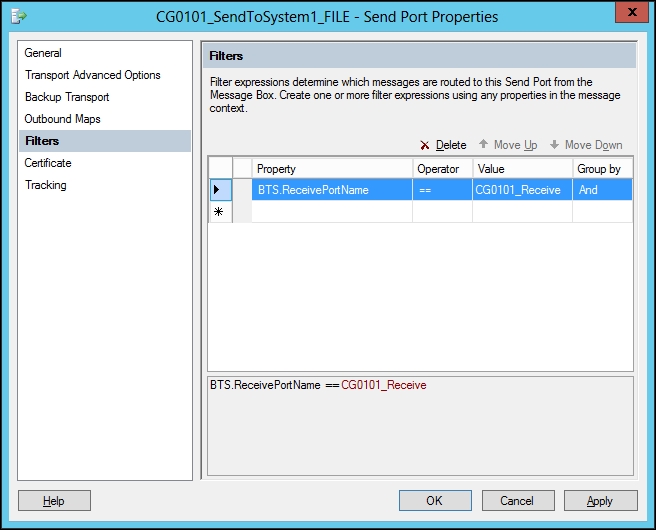
The example in the previous screenshot will subscribe to all messages that come from the Receive Port CG0101_Receive.
Port states
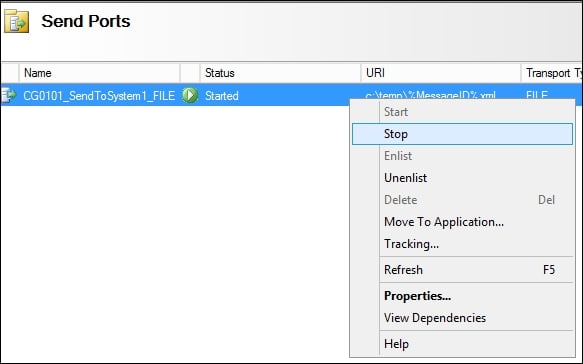
A Send Port can have the following states:
Started: The Send Port will be getting messages that match its subscriptions and send them to the target system, if it is not outside the service window.
Stopped: The Send Port will be getting messages that match its subscriptions, but the messages will reside in a Send Port queue inside the
MessageBoxand not be sent through the Send Port until it is started.Unenlisted: The Send Port does not subscribe to any messages and no messages will be sent through the Port. The Port will not be able to get messages that are already received in the
MessageBoxlater on. This behavior is similar to the instance of the Port not being created all together.
Port states can be changed by right-clicking on the Port inside the Administration Console, as shown in the following screenshot:
Tip
Note that if we right-click on an Unenlisted Port, the state will be named Enlist and not Stop in the menu.
The Stopped state will queue up all messages for the Send Port, and when the Port is started again, all messages will be sent immediately through the Send Port (if no service window is configured). This might not always be what is desired, especially not if the Port was stopped due to some configuration error in BizTalk or on the target system, resulting in messages failing upon arrival at the target. In that case, sending 100 messages all at once, when we think the problem has been resolved, might not be the best approach.
If we just want to send one of the 100 messages currently lying in the MessageBox waiting for the Port to be started, we can go to the Group Hub window, find the 100 suspended messages, and resume just one of them while the Port is still in the Stopped state. This will force the one message to be sent through the Send Port even though the state is still set to Stopped; on acceptance that the problem is gone, we can then start the Port and the last 99 messages (or more if more messages have arrived in the MessageBox) will be sent automatically through the Port.
Dynamic Send Ports
Dynamic Send Ports differ from Static Ports as their Adapter and/or address is not configured and hardcoded on the Port. Both protocol (Adapter) and address can be set from inside BizTalk (from either Orchestrations or Pipeline components), and therefore, the Port can send messages to different locations using different protocols (SMTP, FTP, and so on).
They are often used for SMTP because an SMTP Send Port often requires sending mails to different addresses that might be located somewhere in the message. This is not possible with a static Send Port, which will always point to the same address (as well as all other static Ports using any type of Adapters). So, to solve this problem, Dynamic Ports can be used.
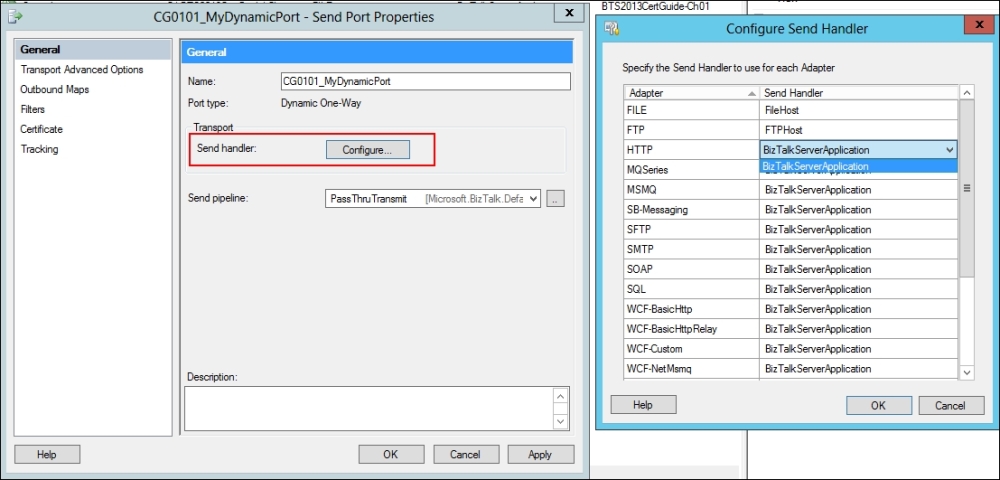
In BizTalk Server 2013, a new Handler configuration has become available. It is now possible to choose individual Handlers (Host) for each Adapter type, so even though the actual Adapter is not known at configuration time, potential Handlers can still be chosen, as shown in the following screenshot:
Dynamic Ports are usually combined with Orchestrations and will be discussed further in Chapter 4, Developing BizTalk Artifacts – Creating Orchestrations.
Send Port Groups
Send Port Groups are logical subscription containers, where one or more Send Port can join the subscription of the group. A Send Port can be a part of multiple Send Port Groups, and also have its own local subscription, and can therefore have multiple subscriptions.
Send Port Groups are created by right-clicking on the Send Port Group folder inside an Application and choosing New | Send Port Group. You are then presented with the following screen:
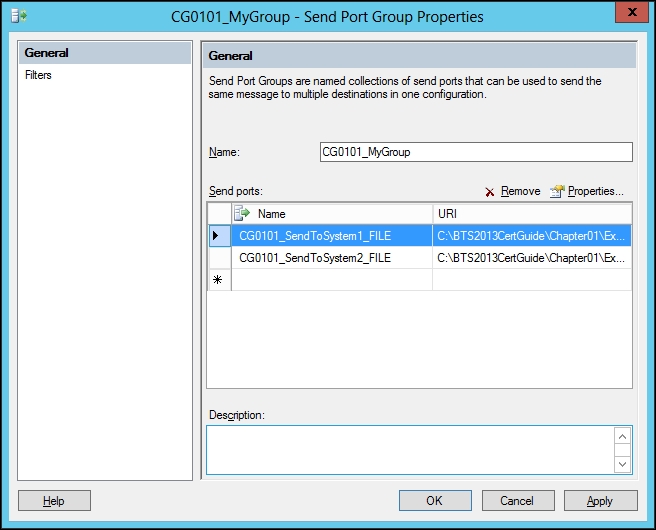
Inside the Send Port Group configuration, we can configure Filter and Send Ports that should be a part of the group subscription.
Tip
A Send Port can be a part of many groups and have its own subscription (Filter) on the Port. The result could be that the same message submitted to the MessageBox can also be sent through the Port multiple times if more than one of these subscriptions match the Context of the message.
Failed message routing
It is possible to enable routing for failed messages on both Receive and Send Ports. What this will do is, in case of an error occurring in the Port (could be either the Pipeline throwing an error, mapping failure, or a Send Port that is not able to send to the target system), the message will have all the normal Context Properties unpromoted (written) and instead have some error-specific Context Properties promoted (all in the ErrorReport namespace).
The examples of Error Context Properties are ErrorReport.ErrorType and ErrorReport.ReceivePortName.
A Send Port or Orchestration can then subscribe to these error properties and deal with the errors in some way.
To set up failed message routing on a Receive Port, go to the properties of the Port, on the General tab, and enable the Enable routing for failed messages checkbox.
To set up failed message routing on a Send Port, go to the properties of the port and on the Transport Advanced Options page, enable the Enable routing for failed messages checkbox.
See more about Failed Message Routing in Chapter 5, Testing, Debugging, and Exception Handling.
Ordered delivery
Ordered delivery might not come as easy as one might think in BizTalk. Only a few Receive Adapters are able to provide true ordered delivery out of the box.
For example, we receive files during the day from a file drop location. Our ERP system has requested that it receives all files in the same order as they were submitted to the file folder, because receiving data in the wrong order could potentially cause inconsistent data.
Let's think of BizTalk as a post office. If one customer has asked the mailman to deliver today's letter in exactly the same way he received the letters in the mailbox on the street, the mailman immediately faces a problem. He can give the customer the letters in the same order that he got the letters out of the mailbox, but that is not necessarily the same order that they were put into the mailbox. The same is true for BizTalk. We are able to send messages through a Send Port or to an Orchestration in the same order as they were submitted to the MessageBox, but that order might not be the same order that the original submitter intended.
Let's consider the file drop example. The FILE Adapter, just as many other Adapters, might not submit the messages received in the same order as one might intend/expect. The FILE Adapter doesn't look at timestamps, file sizes, or even filenames when choosing which file to process first. There could also be more than one Host Instance receiving batches of files at the same time from the same folder and submitting them in the same MessageBox. In other words, if BizTalk is started and two files are present at a certain file location, we have no way of knowing if the oldest file is taken first, and therefore have no certain way of making a total first in first out (FIFO) scenario using the FILE Receive Adapter. In fact, this is true for most of the BizTalk Receive Adapters, and out of the box, only the message queue Adapters (MSMQ, MQSeries, and WCF-NetMsmq) support true ordered delivery. Some database Adapters and WCF Service Adapters can be set up to implement ordered delivery, but only with certain limitations such as only one Host Instance.
Receive Locations
On the receive side, it is based on the different protocols (Adapters) if ordered delivery is supported or not. For the very few Adapters that do support it (mainly MQ), it can usually be enabled on the Receive Adapter.
Send Ports
Each Send Port can be set up to use ordered delivery. Setting a Send Port to ordered delivery means that all messages will be sent through that Port in the same order as they were received in the MessageBox. If messages are not received in the MessageBox in the order intended, which was discussed before, using ordered delivery on a Send Port might not have the desired result.
Using ordered delivery on a Send Port has some serious performance impacts, since only one thread can submit messages through the Port, and each message has to wait for the message ahead to complete before it can be processed. This can be both an advantage and a disadvantage. The disadvantage is obvious; BizTalk will perform slower when using ordered delivery.
In some cases, however, this might turn into an advantage. If, for instance, a Send Port calls a service that cannot handle multiple calls, we might experience a lot of messages going into a retry or even fail state, because the amount of messages being sent to the service is exceeding the amount of messages the service can handle. In this case, it could make sense to introduce ordered delivery to the Send Port, not because we necessarily need the messages to be sent in a certain order, but merely because this will result in BizTalk sending only one message at a time.
To set up ordered delivery on a Send Port, go to the properties of a Send Port (either by double-clicking on Send Port or right-clicking and choosing Properties).
Go to the Transport Advanced Options page and enable Ordered delivery, as shown in the following screenshot:

When enabling ordered delivery, an additional setting, Stop sending subsequent messages on current message failure, will become active. This means that if 10 messages are currently queued up to be sent through the Sent Port (message 1 to 10), and message 3 fails, the rest of the messages (4 to 10) will get suspended together with message 3. If true ordered delivery is required, this option should be enabled, simply because if it is not, the solution is not 100 percent ordered delivery. On the other hand, if ordered delivery is nice to have, but not vital for the solution, or we are simply using ordered delivery to slow down the Send Port, then the option should be disabled.
Tip
Ordered delivery, if used, does not work on the backup transport.


