Search icon CANCEL
Subscription
0
Cart icon
Your Cart (0 item)
Close icon
You have no products in your basket yet
Arrow left icon
Explore Products
Best Sellers
New Releases
Books
Videos
Audiobooks
Learning Hub
Free Learning
Arrow right icon
Arrow up icon
GO TO TOP
Implementing Microsoft Dynamics 365 Business Central On-Premise

You're reading from   Implementing Microsoft Dynamics 365 Business Central On-Premise Explore the capabilities of Dynamics NAV 2018 and Dynamics 365 Business Central and implement them efficiently

Arrow left icon
Product type Paperback
Published in Dec 2018
Publisher
ISBN-13 9781789133936
Length 764 pages
Edition 4th Edition
Arrow right icon
Authors (2):
Arrow left icon
Roberto Stefanetti Roberto Stefanetti
Author Profile Icon Roberto Stefanetti
Roberto Stefanetti
Alex Chow Alex Chow
Author Profile Icon Alex Chow
Alex Chow
Arrow right icon
View More author details
Toc

Table of Contents (16) Chapters Close

Preface 1. Exploring Dynamics NAV and MSDYN365BC – Overview 2. Microsoft Dynamics NAV 2018 – An Overview FREE CHAPTER 3. General Considerations 4. Implementation Process – Partner's Perspective 5. Implementation Process – Customer's Perspective 6. Migrating Data 7. Upgrading to Dynamics NAV and MSDYN365BC 8. Development Considerations 9. Implementing Functional Changes 10. Data Analysis and Reporting 11. Debugging with Dynamics NAV and MSDYN365BC 12. Popular Reporting Options 13. Microsoft Dynamics 365 Business Central 14. Working and Developing with Docker and Sandboxes 15. Other Books You May Enjoy

Personalization feature versus "In-client" Designer feature in Web client


What are the differences between using the personalization feature and in-client designer feature with Web client? In Microsoft Dynamics 365 Business Central SaaS, with sandboxes you have both at hands, while in production you only have personalization. In shorts, there is also personalization feature that could be used if you want to add fields hidden on a page.

"In-client" Designer—you can use the "In-client" Designer feature to personalize your page:
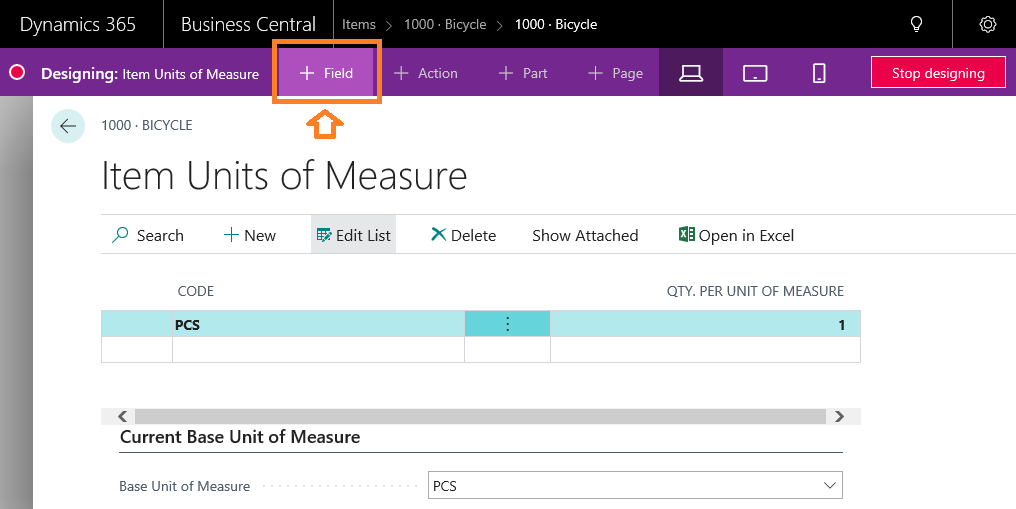
Put the cursor on Customize Fields and select the Add Field to Page option. After a drag and drop operation on a selected field (in this case, the Height field), the field will be added to the Items list page, as shown in the following screenshot:
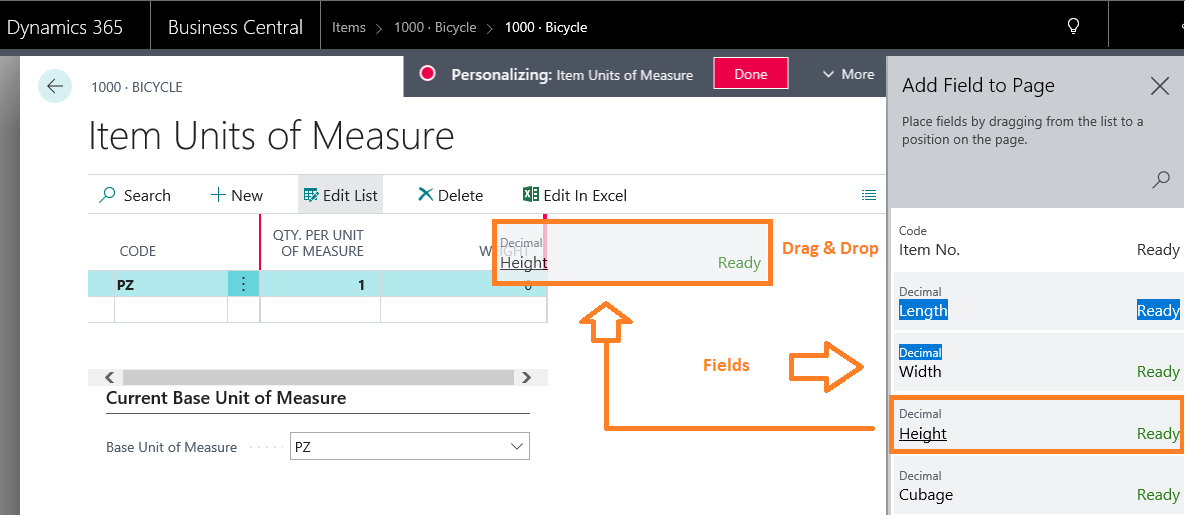
When you have completed the customization, click on Done to save it:

The customized Item Units of Measure page now has the new fields added, as you can see in the following screenshot:
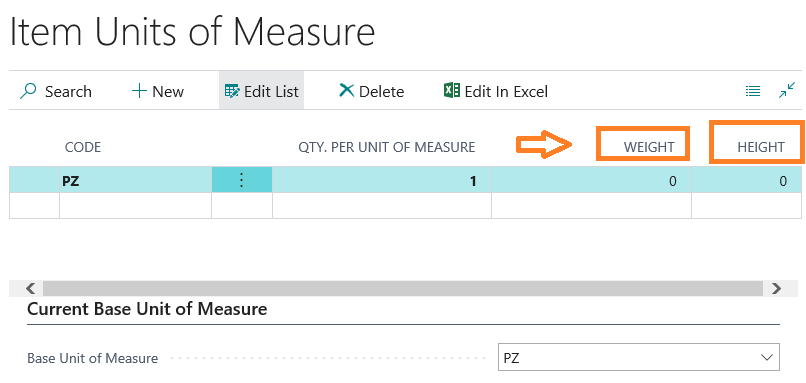
So, remember that if you want a field from...

lock icon The rest of the chapter is locked
Register for a free Packt account to unlock a world of extra content!
A free Packt account unlocks extra newsletters, articles, discounted offers, and much more. Start advancing your knowledge today.
Unlock this book and the full library FREE for 7 days
Get unlimited access to 7000+ expert-authored eBooks and videos courses covering every tech area you can think of
Renews at $19.99/month. Cancel anytime
Banner background image