Exercise 6: Configuring Autoscale in Azure App Service
In this exercise, you will explore autoscale settings for Azure App Service or an App Service plan and learn how to adjust resource allocation dynamically based on usage metrics. Let’s jump into the portal once more and take a closer look:
- From within the Azure portal, open either your App Service or the App Service plan and open the Scale up blade.
If you’re in App Service, notice that it has (App Service plan) appended to the blade label to point out that it’s the App Service plan controlling resources, as discussed earlier in this chapter. Don’t change anything here; just notice that these options increase the total resources available. They don’t increase instances. A restart of the app would be required to scale vertically.
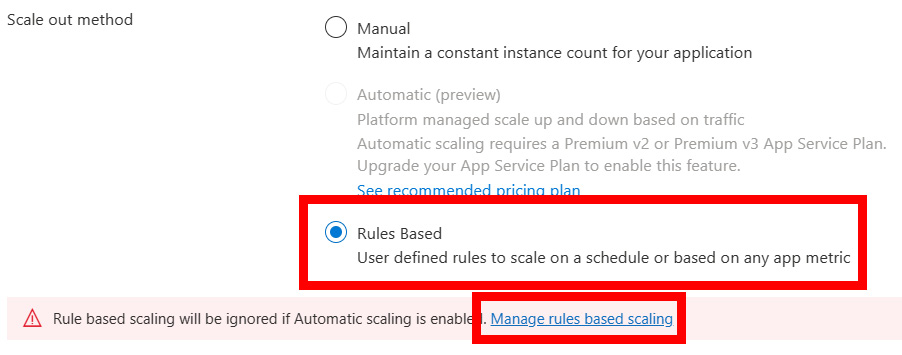
- Open the Scale out blade and notice that this is currently set to a manually set instance count. While this can be useful, what you want to investigate here is autoscale, so select the Rules Based option, followed by Manage rules based scaling:

Figure 2.21: Options to configure rule-based scaling
Azure portal UI changes
The Azure portal interface is updated all the time, so you may see some slight differences from what you see in screenshots throughout this book. At the time of writing, the options just mentioned were new, so they may have changed by the time you read this.
- Select the Custom autoscale and Scale based on a metric option.
- Set Instance limits to a minimum of
1and a maximum of2. It’s up to you, but this allows the lowest cost while still being able to demonstrate this. You’re welcome to change the values but be aware of the cost. Also, set Default to1.The Default value will be used to determine the instance count should there be any problems with autoscale reading the resource metrics.
- Click on the Add a rule link. Here, you can define the metric rules that control when the instance count should be increased or decreased, which is extremely valuable when the workload may vary unpredictably.
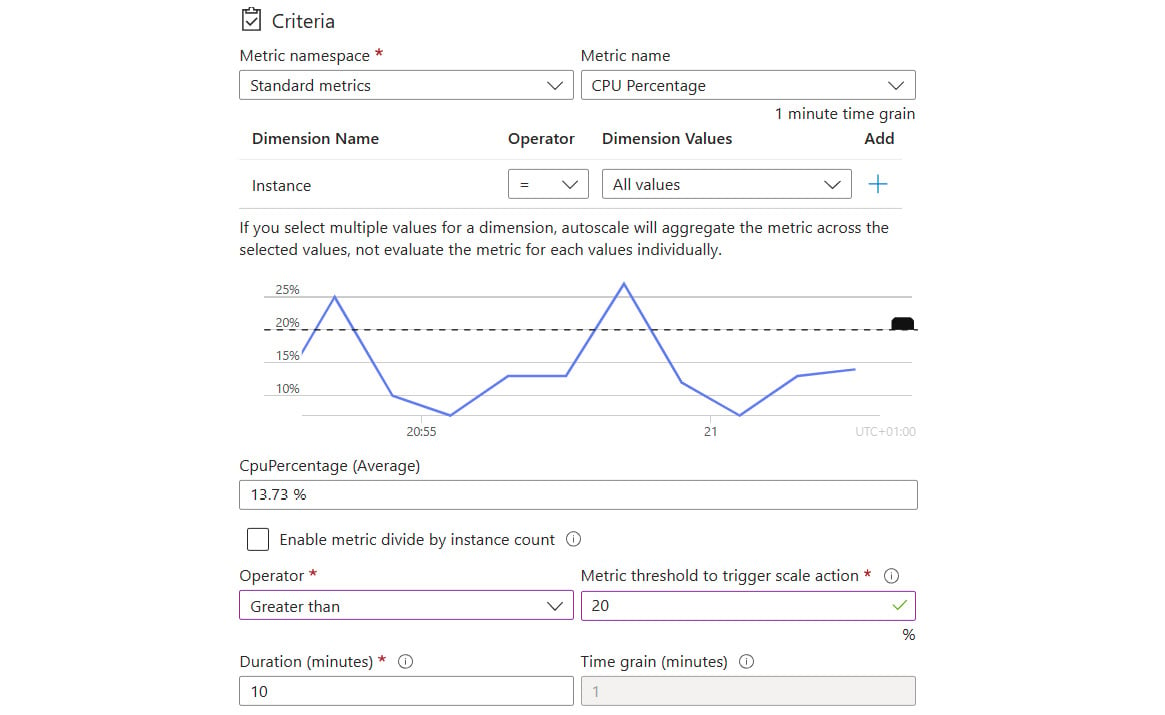
- Check out the options available but leave the settings as default for now. The graph on this screen helps identify when the rule would have been met based on the options you select. For example, if you change your metric threshold to be greater than 20% for CPU percentage, the graph will show that this rule would have been matched three times over the last 10 minutes (when the lines rise above the dashed line):

Figure 2.22: Custom metric condition visual
- Set the threshold to
20and click on Add. - With this rule added, it’s usually advisable to add a rule to scale back down. So, click on Add a rule again and repeat this process, but this time, use a Less than or equal to operator, change the threshold figure to 15%, and select Decrease count by for the Operation setting. You should now have a scale-out rule increasing the instance count and a scale-in rule decreasing the instance count.
- Scroll to the bottom of the page and click on Add a scale condition. Notice that this time, you can set up date and time periods for the rule to apply, either scaling to a specific count during that period or based on a metric, as you did previously. The first condition you configured acts as a default, only executing if none of the other conditions are matched.
- Feel free to add and customize conditions and rules until you’re comfortable. Click either Save or Discard in the top-left corner of the screen. You won’t cause autoscale to trigger in this example.
You can view any autoscale actions through the Run history tab or via the App Service Activity Log.
The following are a few quick points on scaling out when using this outside of self-learning:
- Consider the default instance count that will be used when metrics are not available for any reason.
- Make sure the maximum and minimum instance values are different and have a margin between them to ensure autoscaling can happen when you need it.
- Don’t forget to set scale-in rules as well as scale-out. Most of the time, you won’t want to scale out without being able to scale back in.
- Before scaling in, autoscale will estimate what the final state would be after it has scaled in. If the thresholds are too close to each other, autoscale may estimate that it would have to scale back out immediately after scaling in, and that would likely get stuck in a loop (this is known as “flapping”), so it will decide not to scale in at all to avoid this. Ensuring there’s a margin between metrics can avoid this behavior.
- A scale-out rule runs if any of the rules are met, whereas a scale-in rule runs only if all rules are met.
- When multiple scale-out rules are being evaluated, autoscale will evaluate the new capacity of each rule that gets triggered and choose the scale action that results in the greatest capacity, to ensure service availability. For example, if you have a rule that would cause the instance count to scale to five instances and another that would cause the instance count to scale to three instances, when both rules are evaluated to be true, the result would be scaling to five instances, as the higher instance count would result in the highest availability.
- When there are no scale-out rules and only scale-in rules (providing all the rules have been triggered), autoscale chooses the scale action resulting in the greatest capacity to ensure service availability.
One important point to remember is that, since scaling rules are created on the App Service plan rather than App Service (because the App Service plan is responsible for the resources), if the App Service plan increases the instances, all of your App Services in that plan will run across that many instances, not just the App Service that’s getting all the traffic. App Service uses a load balancer to load balance traffic across all instances for all of your App Services on the App Service plan.
So far, any impactful changes we’ve pushed to App Service would cause the service to restart, which would lead to downtime. This is not desirable in most production environments. App Service has a powerful feature called deployment slots to allow you to test changes before they hit production, control how much traffic gets routed to each deployment slot, promote those changes to production with no downtime, and roll back changes that were promoted to production if needed. Let’s wrap up this chapter by learning about deployment slots.


