Extra Gym functionality – wrappers and monitors
What we have discussed so far covers two-thirds of the Gym core API and the essential functions required to start writing agents. The rest of the API you can live without, but it will make your life easier and your code cleaner. So, let's briefly cover the rest of the API.
Wrappers
Very frequently, you will want to extend the environment's functionality in some generic way. For example, imagine an environment gives you some observations, but you want to accumulate them in some buffer and provide to the agent the N last observations. This is a common scenario for dynamic computer games, when one single frame is just not enough to get the full information about the game state. Another example is when you want to be able to crop or preprocess an image's pixels to make it more convenient for the agent to digest, or if you want to normalize reward scores somehow. There are many such situations that have the same structure – you want to "wrap" the existing environment and add some extra logic for doing something. Gym provides a convenient framework for these situations – the Wrapper class.
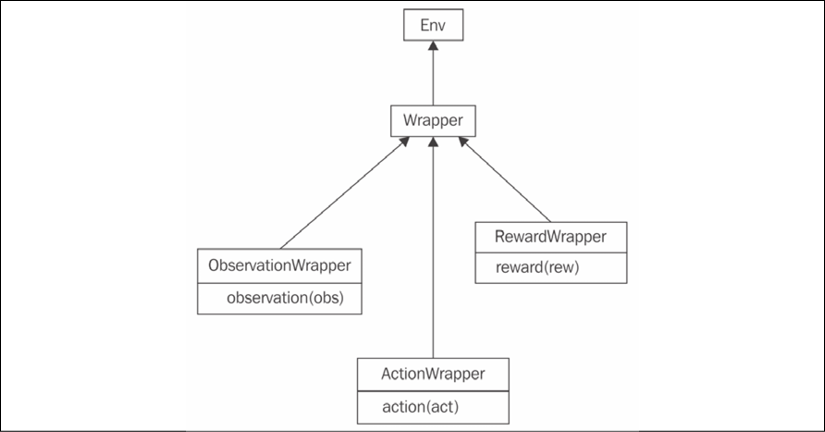
The class structure is shown in the following diagram.

Figure 2.4: The hierarchy of Wrapper classes in Gym
The Wrapper class inherits the Env class. Its constructor accepts the only argument – the instance of the Env class to be "wrapped." To add extra functionality, you need to redefine the methods you want to extend, such as step() or reset(). The only requirement is to call the original method of the superclass.
To handle more specific requirements, such as a Wrapper class that wants to process only observations from the environment, or only actions, there are subclasses of Wrapper that allow the filtering of only a specific portion of information. They are as follows:
ObservationWrapper: You need to redefine the observation (obs) method of the parent. Theobsargument is an observation from the wrapped environment, and this method should return the observation that will be given to the agent.RewardWrapper: This exposes the reward (rew) method, which can modify the reward value given to the agent.ActionWrapper: You need to override the action (act) method, which can tweak the action passed to the wrapped environment by the agent.
To make it slightly more practical, let's imagine a situation where we want to intervene in the stream of actions sent by the agent and, with a probability of 10%, replace the current action with a random one. It might look like an unwise thing to do, but this simple trick is one of the most practical and powerful methods for solving the exploration/exploitation problem that I mentioned briefly in Chapter 1, What Is Reinforcement Learning?. By issuing the random actions, we make our agent explore the environment and from time to time drift away from the beaten track of its policy. This is an easy thing to do using the ActionWrapper class (a full example is in Chapter02/03_random_action_wrapper.py).
import gym
from typing import TypeVar
import random
Action = TypeVar('Action')
class RandomActionWrapper(gym.ActionWrapper):
    def __init__(self, env, epsilon=0.1):
        super(RandomActionWrapper, self).__init__(env)
        self.epsilon = epsilon
Here, we initialized our wrapper by calling a parent's __init__ method and saving epsilon (the probability of a random action).
    def action(self, action: Action) -> Action:
        if random.random() < self.epsilon:
            print("Random!")
            return self.env.action_space.sample()
        return action
This is a method that we need to override from a parent's class to tweak the agent's actions. Every time we roll the die, and with the probability of epsilon, we sample a random action from the action space and return it instead of the action the agent has sent to us. Note that using action_space and wrapper abstractions, we were able to write abstract code, which will work with any environment from Gym. Additionally, we must print the message every time we replace the action, just to verify that our wrapper is working. In the production code, of course, this won't be necessary.
if __name__ == "__main__":
    env = RandomActionWrapper(gym.make("CartPole-v0"))
Now it's time to apply our wrapper. We will create a normal CartPole environment and pass it to our Wrapper constructor. From here on, we will use our wrapper as a normal Env instance, instead of the original CartPole. As the Wrapper class inherits the Env class and exposes the same interface, we can nest our wrappers in any combination we want. This is a powerful, elegant, and generic solution.
    obs = env.reset()
    total_reward = 0.0
    while True:
        obs, reward, done, _ = env.step(0)
        total_reward += reward
        if done:
            break
    print("Reward got: %.2f" % total_reward)
Here is almost the same code, except that every time we issue the same action, 0, our agent is dull and does the same thing. By running the code, you should see that the wrapper is indeed working.
rl_book_samples/Chapter02$ python 03_random_actionwrapper.py
Random!
Random!
Random!
Random!
Reward got: 12.00
If you want, you can play with the epsilon parameter on the wrapper's creation and verify that randomness improves the agent's score on average.
We should move on now and look at another interesting gem that is hidden inside Gym: Monitor.
Monitor
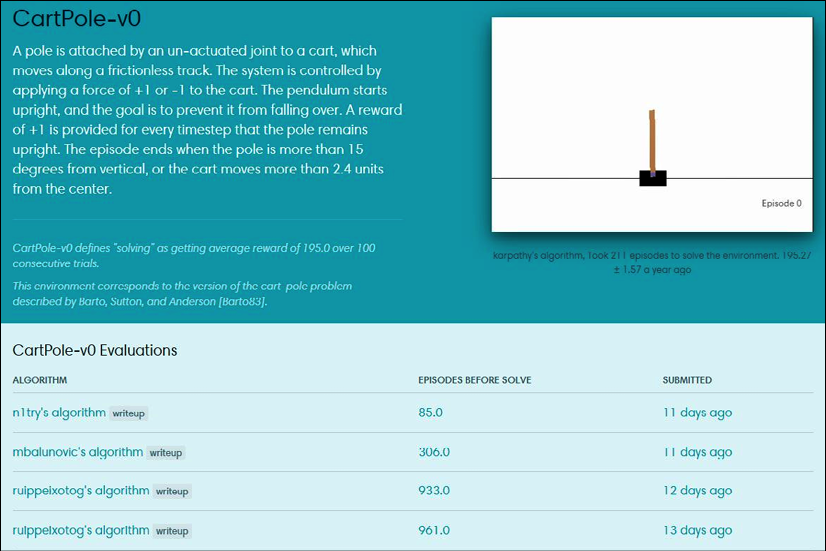
Another class that you should be aware of is Monitor. It is implemented like Wrapper and can write information about your agent's performance in a file, with an optional video recording of your agent in action. Some time ago, it was possible to upload the result of the Monitor class' recording to the https://gym.openai.com website and see your agent's position in comparison to other people's results (see the following screenshot), but, unfortunately, at the end of August 2017, OpenAI decided to shut down this upload functionality and froze all the results. There are several alternatives to the original website, but they are not ready yet. I hope this situation will be resolved soon, but at the time of writing, it is not possible to check your results against those of others.
Just to give you an idea of how the Gym web interface looked, here is the CartPole environment leaderboard:

Figure 2.5: The Gym web interface with CartPole submissions
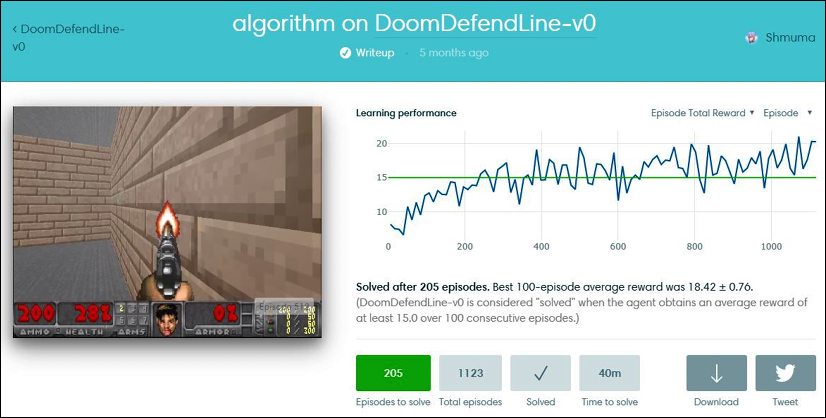
Every submission in the web interface had details about training dynamics. For example, the following is my solution for one of Doom's mini-games:

Figure 2.6: Submission dynamics for the DoomDefendLine environment
Despite this, Monitor is still useful, as you can take a look at your agent's life inside the environment. So, here is how we add Monitor to our random CartPole agent, which is the only difference (the entire code is in Chapter02/04_cartpole_random_monitor.py).
if __name__ == "__main__":
    env = gym.make("CartPole-v0")
    env = gym.wrappers.Monitor(env, "recording")
The second argument that we pass to Monitor is the name of the directory that it will write the results to. This directory shouldn't exist, otherwise your program will fail with an exception (to overcome this, you could either remove the existing directory or pass the force=True argument to the Monitor class' constructor).
The Monitor class requires the FFmpeg utility to be present on the system, which is used to convert captured observations into an output video file. This utility must be available, otherwise Monitor will raise an exception. The easiest way to install FFmpeg is using your system's package manager, which is OS distribution-specific.
To start this example, one of these three extra prerequisites should be met:
- The code should be run in an X11 session with the OpenGL extension (GLX)
- The code should be started in an
Xvfbvirtual display - You can use X11 forwarding in an SSH connection
The reason for this is video recording, which is done by taking screenshots of the window drawn by the environment. Some of the environment uses OpenGL to draw its picture, so the graphical mode with OpenGL needs to be present. This could be a problem for a virtual machine in the cloud, which physically doesn't have a monitor and graphical interface running. To overcome this, there is a special "virtual" graphical display, called Xvfb (X11 virtual framebuffer), which basically starts a virtual graphical display on the server and forces the program to draw inside it. This would be enough to make Monitor happily create the desired videos.
To start your program in the Xvfb environment, you need to have it installed on your machine (this usually requires installing the xvfb package) and run the special script, xvfb-run:
$ xvfb-run -s "-screen 0 640x480x24" python 04_cartpole_random_monitor.py [2017-09-22 12:22:23,446] Making new env: CartPole-v0
[2017-09-22 12:22:23,451] Creating monitor directory recording
[2017-09-22 12:22:23,570] Starting new video recorder writing to recording/openaigym.video.0.31179.video000000.mp4
Episode done in 14 steps, total reward 14.00
[2017-09-22 12:22:26,290] Finished writing results. You can upload them to the scoreboard via gym.upload('recording')
As you may see from the preceding log, the video has been written successfully, so you can peek inside one of your agent's sections by playing it.
Another way to record your agent's actions is to use SSH X11 forwarding, which uses the SSH ability to tunnel X11 communications between the X11 client (Python code that wants to display some graphical information) and X11 server (software that knows how to display this information and has access to your physical display).
In X11 architecture, the client and the server are separated and can work on different machines. To use this approach, you need the following:
- An X11 server running on your local machine. Linux comes with an X11 server as a standard component (all desktop environments use X11). On a Windows machine, you can set up third-party X11 implementations, such as open source VcXsrv (available in https://sourceforge.net/projects/vcxsrv/).
- The ability to log into your remote machine via SSH, passing the
–Xcommand-line option:ssh –X servername. This enables X11 tunneling and allows all processes started in this session to use your local display for graphics output.
Then, you can start a program that uses the Monitor class and it will display the agent's actions, capturing the images in a video file.


