Managing the Database Users
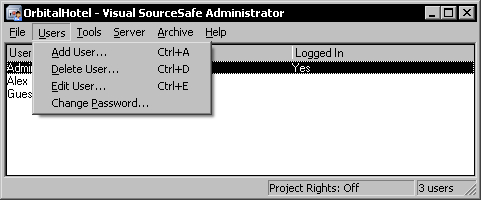
User administration is performed by using the commands available in the Users menu.
Adding Users
To add a new database user, we use the Add User command in the Users menu. This command will display the Add User dialog.
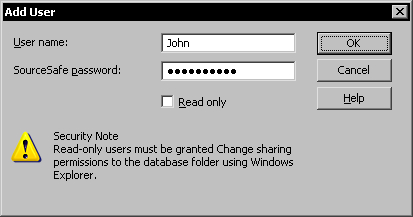
Specify the new username and an initial SourceSafe password for the user. The user will later be able to change the password using the Visual SourceSafe Explorer application.
Note
The best practice for naming SourceSafe users is to give them the same names as their Windows account names used to access the database. This ensures that automatic user login is possible, especially when accessing the database remotely over simple HTTP.
You can give certain users read-only access to the database by checking the Read only option. These users will only be able to see the contents of the database without being able to change, add, or delete files in the database when using the SourceSafe applications. These restrictions are only enforced at application logic level.
The Security Note warns about the fact that these read-only users will still need Change sharing permissions on the database shared folder. Because we used the two Windows groups to manage the user security permissions and we have given the required permissions to these groups rather than managing users individually, we are covered.
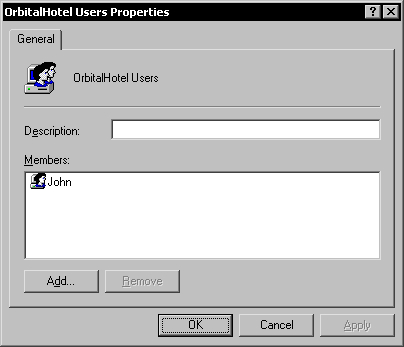
To allow a new user into the database, we have to create a Windows account for this user if he or she doesn't already have an account, and add his or her account to either the Admins Windows group or the Users Windows group, depending on the role of the user. In my case I will add John to the Users group for the database.
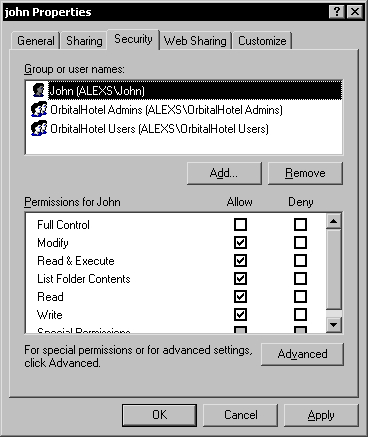
To enable the user to log in, we have to grant Modify permissions to his or her personal folder under the database users folder. In my case, I will grant Modify permissions to John's Windows account for the users/john folder.
Now, John can log in to the database successfully.
We've seen that we can set read-only permissions for users who wouldn't have to change anything in the database. However, a better way to deal with users that require read-only permissions is by using shadow folders.
Setting Shadow Folders for Read-Only Users
A shadow folder is a special folder that contains copies of the most recently checked-in files for a specific project. Each time a check in is performed on a shadowed project the latest versions for the modified resources are copied to the shadow folder.
Note
The latest file versions are copied to the shadow folder by the user's client SourceSafe application, and not by the server.
You will most often use a shadow folder in a team environment to allow users to view, but not modify files. Another use for the shadow folder is for the compilation of the latest project version, for example in a nightly build.
Because shadow-folder users don't have access to the database, it is not recommended to set the shadow folder under the database folder. Instead, the shadow folder must be set to a different shared folder.
Shadow folders are created using the Options dialog in the Visual SourceSafe Administrator application. To display this dialog use the Tools | Options menu command.
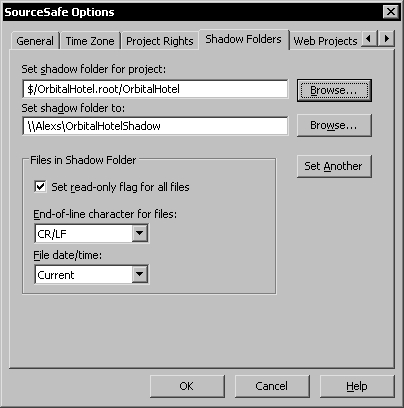
Select the database project you want to shadow using the first Browse button and the shared shadow folder using the second Browse button.
Note
When setting shadow folders, always use the server's (UNC) network path to the shared folder designated to hold the shadow copies. If you set local paths, because files are copied to the shadow folders by the SourceSafe client applications, when users check in files they will be copied into the local folder on their machines. Use the network name to identify the server folder correctly.
You can set more than one shadow folder for a project. To do that, use the Set Another button.
The security permissions for the shadow folders must be the same as for the database, where administrators have Full Control permissions and the users have Modify permissions, to allow the files to be copied on the server by local clients.
In addition, to manage the read-only users you can create an additional Windows group that contains these users. This group must have only Read Only permissions to the shadow folder.
Changing the User Name
To change a user's name use the Users | Edit User menu command in the Visual SourceSafe Administrator application.
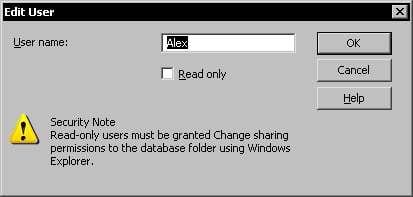
Enter the new user name in the text box and click OK.
Note
After changing the user's name you have to reapply the Windows security for the user's new folder name in the users folder.
Changing the User Password
To change a user's password use the Users | Change password menu command in the Visual SourceSafe Administrator application.

Enter the new user password in the text box and click OK.
Users can change their passwords using Visual SourceSafe Explorer.
Note
Instruct the users not to choose the same password as their Windows account password so that SourceSafe passwords cannot be used as leverage in attempts to crack the Windows password. The Windows security assures that only authorized users can access the database.
Allowing Automatic User Logins
You can choose not to use the SourceSafe passwords and rely only on Windows security. Users will log in to the database without the need to specify their SourceSafe password as long as their Windows account used to access the database has the same name as their SourceSafe user account name.
Note
When using remote access using simple HTTP, you have to always allow automatic user logins. This is required because the SourceSafe internet plug-in doesn't send SourceSafe usernames and password to the server when not using a secured HTTPS connection. The SourceSafe Web Service will try to automatically log in to the database using the SourceSafe username that matches the Windows account's username used for server authentication.
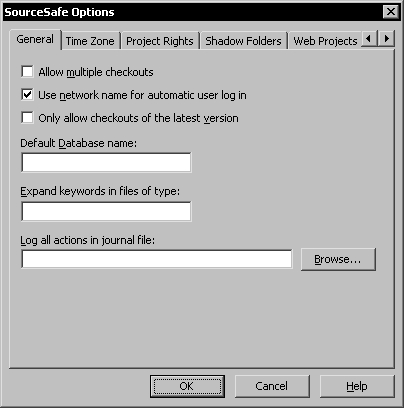
To enable automatic user logins, open the Visual SourceSafe Administrator Options window and select the General tab page. Select the Use network name for automatic user log in option.
Setting Project Rights for Users
You can set different rights for SourceSafe users on projects. This can be useful if each user works on specific projects where he or she needs to have full access, while having restricted access on the other projects.
By default project rights are disabled for a new database. To enable project rights, we have to go to the Options dialog in the Visual SourceSafe Administrator. Use the Tools | Options command to display this dialog and select the Project Rights tab page. Click the Enable Rights and Assignments commands option to enable project rights.
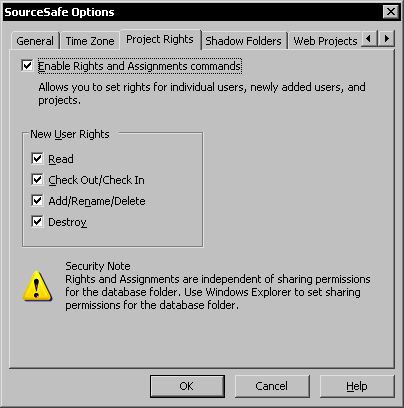
After enabling project rights, you can also set the rights assigned for new users when they are first added. By default all the rights are assigned to a new user. To restrict the default rights, uncheck the rights that shouldn't be assigned to new users. For example, you can set Read permissions to new users, and then assign Rights by Project.
Project rights are assigned using the first three commands in the Tools menu. After enabling project rights, these commands will be enabled.
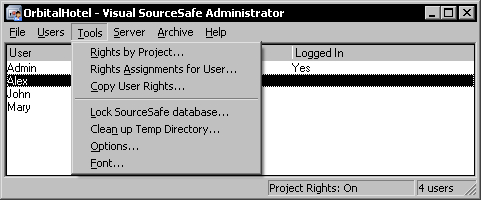
To assign rights by project, use the Rights by Project command. This will display the Project Rights dialog.
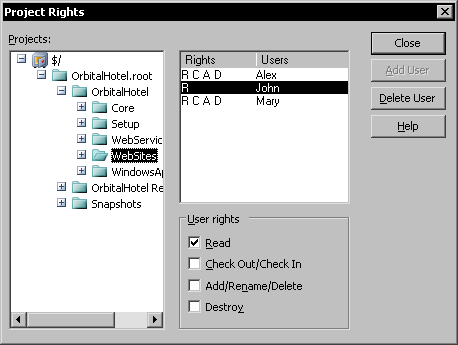
To assign the rights a user has for a specific project, select the project you want to assign rights for in the Projects tree. Then, select the user to assign the rights for in the user list. Assign the rights for the user using the User rights group under the user list. In my case, because John is not assigned to work on the WebSites project, I will only give him Read rights, to prevent him to make accidental modifications to that project.
At any time you can see and edit the rights assignments for a user by selecting the username in the Visual SourceSafe Administrator main window and using the Rights Assignment for User command. This will display the Assignments window.
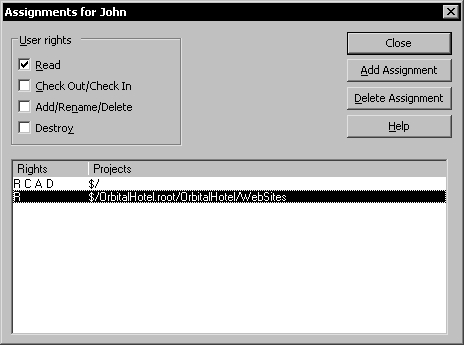
In the Assignments window you can see all the assignments for the selected user with the possibility to add, edit, or remove them.
To add new assignments use the Add Assignment button.
To edit the rights for an assignment, select the assignment in the list and use the User rights group box to edit the rights.
To delete an assignment, select the assignment in the list and click the Delete Assignment button.
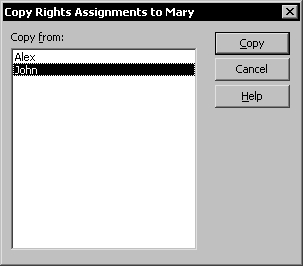
You can also copy rights assignments form one user to another. This allows you to use a user as a template for another user. To copy the rights form one user to another, select the user you want to copy the rights to in the Visual SourceSafe Administrator main window and use the Copy User Rights command in the Tools menu.
For example, I will give Mary the same rights as John by copying the rights from John.
Note
Copying the rights from another user will delete any previous assignments the target user had.
Auditing User Actions with Journal Files
To monitor the actions of database users, you can set up a journal file. A journal file is a text file that records any action by a user that generates a history entry for a file or project in the database.
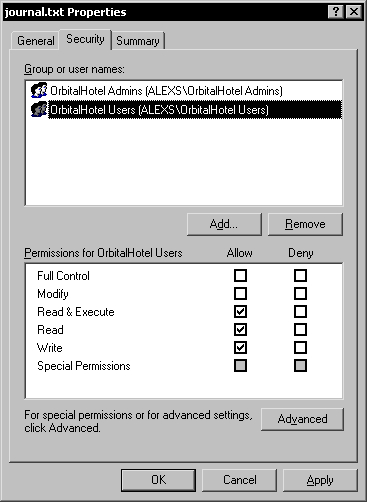
To set up a journal file, create a text file in the database folder, for example journal.txt.
Note
Entries in the journal.txt file are created by local SourceSafe applications, and not by the server.
As a result, to be able to write to this file, give members of the Users group Write permissions to the journal file.
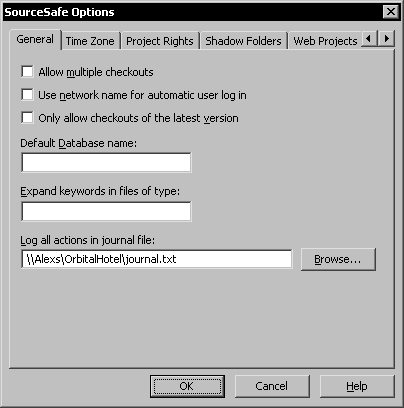
To set the file as a journal file, open the Options dialog in the Visual SourceSafe Administrator and select the General tab page. Enter the network path for the journal.txt file in the Log all actions in journal file text box.
Note
Do not use a local path for the journal file because the path is used globally by all the clients to write entries in the journal. If you use local paths, the journal.txt file is created on each user's local computer.
The entries in a journal file look like this:

Deleting Users
Before deleting a user, make sure he or she has all the files checked in first. To delete a user from the SourceSafe database, select the user in the Visual SourceSafe Administrator main window and use the Users | Delete User menu command. A question dialog will be displayed to confirm the user deletion.

Click Yes to delete the user from the database. This will delete the personal user folder under the users database folder.
You will also have to prevent the user from having access to the shared database folder by removing the user's access permissions. Because the user is part of one of the two user groups that control access to the database, all you have to do is remove the user from the Windows groups he is assigned to.
Note
If the user still has checked out items, you must undo the checkouts by logging in to the Visual SourceSafe Explorer using the Admin account and using the Undo Checkout command.


