Building cactuses
Creating smooth yet optimal rounded ends can sometimes be a challenge on Roblox. In the following recipe, we will build a variety of cactuses through a workflow method that allows you to line up the rounded corner edges seamlessly together. We will be working with both cylindrical and spherical parts to give the cactus a proper non-blocky shape and will then learn how to rapidly create new variants of the original model. We will complete the recipe by applying differing colors and materials to give each cactus its own distinct look.
How to do it…
We will be building the body and arms out of cylinder parts. We will then then use spheres to round the elbows on the cactus arms. Finally, we will apply color and material to the model. To begin this recipe, follow these steps:
- Start by navigating to the Model tab and selecting the Part drop-down arrow. Next, select the Cylinder option to insert a cylinder part onto the baseplate.
- Rescale the cylinder part to your desired height. In this example, the cylinder part being used is
12studs tall and2studs wide. This will be the body of the cactus. - Next, duplicate the body.
- Rotate the duplicated part
90degrees so that, together, both parts create a t shape. This creates arms for the cactus, which you can rescale to differing lengths. - Next, we will be creating three spheres to fit on both ends of the arms and the top of the cactus. First, we need to get the size of each sphere. To do this, select a part on the cactus and copy the number in the Size input box within the Property tab.
For this example, the cactus body part size is
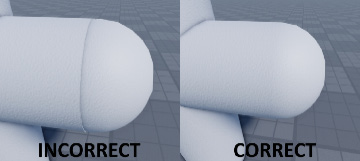
12,2,2, so the sphere should be scaled2,2,2, as that is the proportionate size:

Figure 1.5: Ensure there is no crease between the ball and cylinder
- Next, insert a sphere part and paste the dimensions that you copied in step 5 into the sphere’s Size box, found inside the part’s Properties box.
- Duplicate the sphere three times and move the added spheres to the ends of both arms and the top of the cactus, as seen in Figure 1.6.
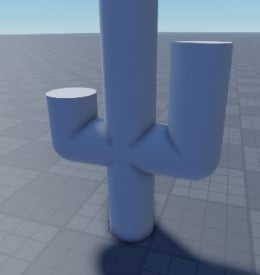
If you’re having trouble placing the sphere in the center, copy the numbers in the Position box of the arm or body of the cactus and then paste the position number into the Position box of the sphere. This will center the sphere exactly in the middle of the arm or body, leaving you with something similar to Figure 1.6:

Figure 1.6: Finished basic model of the first cactu.
- Now, duplicate the body of the cactus and move it along one of the arms to be flush with the spheres that we previously placed on the ends of each arm, creating a rounded elbow.
- Next, duplicate the sphere of the arm that you just placed a cylinder part onto and move it up to round the top of the cylinder part.
- Select all of the parts of the cactus and then anchor them.
- With all of the parts of the cactus still selected, group them together by pressing Ctrl + G.
- Next, rename your model
Cactusfrom the explorer’s Workspace or the Properties box of the model. - Now, select all the parts in the model and change the color to (
127,142,100). - Finally, change the material of all parts to Grass to finish your cactus model.
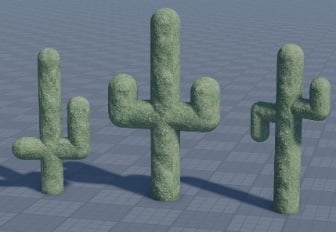
This completes the final step of the recipe and should leave you with the knowledge to work with sphere parts as well as to create clean elbow bends without getting misaligned seams:

Figure 1.7: Various cactus styles
There’s more…
The Move tool (Ctrl + 2) and the Rotate tool (Ctrl + 4) can be set to move or rotate in increments by typing a number into the Rotate and Move fields found under the Snap to Grid section of the Model tab. This allows for consistent placements of our parts. When doing this, it is best to move parts with increments that can be multiplied into whole numbers such as 1; for example, 0.1, 0.25, 0.5, 1. Use increments that add up to 360 when using the Rotate tool, such as 5, 15, 30, 90. This helps keep things aligned and scale better.


