Search icon CANCEL
Subscription
0
Cart icon
Your Cart (0 item)
Close icon
You have no products in your basket yet
Save more on your purchases! discount-offer-chevron-icon
Savings automatically calculated. No voucher code required.
Arrow left icon
Explore Products
Best Sellers
New Releases
Books
Videos
Audiobooks
Learning Hub
Free Learning
Arrow right icon
Arrow up icon
GO TO TOP
Final Cut Pro X Cookbook

You're reading from   Final Cut Pro X Cookbook Edit with style and ease using the latest editing technologies in Final Cut Pro X! with this book and ebook.

Arrow left icon
Product type Paperback
Published in Oct 2012
Publisher Packt
ISBN-13 9781849692960
Length 452 pages
Edition 1st Edition
Arrow right icon
Author (1):
Arrow left icon
Jason Cox Jason Cox
Author Profile Icon Jason Cox
Jason Cox
Arrow right icon
View More author details
Toc

Table of Contents (17) Chapters Close

Final Cut Pro X Cookbook
Credits
About the Author
About the Reviewers
www.PacktPub.com
Preface
1. Importing Your Media 2. Customizing Your Workflow FREE CHAPTER 3. Basic Editing Mechanics 4. Enhancing Your Editing 5. Sweetening and Fixing Your Sound 6. Practical Magic a.k.a Useful Effects 7. Titles, Transitions, and Generators 8. Get Your Movie to Move 9. Altering the Aesthetics of Your Image 10. Getting Your Project Out of FCPX Working with Motion and Compressor

Working with (and without) the Magnetic Timeline


One of the biggest paradigm shifts in all of FCPX is the Magnetic Timeline. In most other video editing software, if you drag a clip around in the timeline, you have to be careful where and how you drop it, because it will likely overwrite or insert itself, potentially damaging your timeline or messing with the timing of your project. So Apple said, "No more!" Aiming to make your basic edits as nondestructive as possible, Apple created the Magnetic Timeline, allowing editors to swap clips to and fro in their timeline all day long without any chance of overwriting clips or messing with timing.

Getting ready

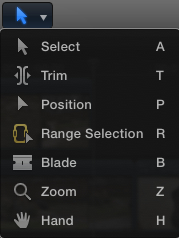
Append at least five clips into a test project. Also, ensure that the Select tool is active. Either press A on your keyboard or select it from the tool palette in the toolbar:
How to do it...

  1. 1. Click-and-drag the second clip in your project to the right, between your fourth and fifth clips. Don't let go yet. Notice a few things as follows:

    • The...

lock icon The rest of the chapter is locked
Register for a free Packt account to unlock a world of extra content!
A free Packt account unlocks extra newsletters, articles, discounted offers, and much more. Start advancing your knowledge today.
Unlock this book and the full library FREE for 7 days
Get unlimited access to 7000+ expert-authored eBooks and videos courses covering every tech area you can think of
Renews at $19.99/month. Cancel anytime
Banner background image