Automatic plugin installation
Out of the box, WordPress comes with its own plugin app store, which allows you to search through a huge library of free plugins. To access WordPress's built-in plugin browser, click Add New under the Plugins menu. Once inside the plugin app store, you have the option to either search by keyword or name, browse by popular tags, or see the newest plugins added.
 |
After you search or browse by a tag, you will be presented with a list of plugins that are available for you to install from WordPress's Plugin Directory. Each will list its version number (the later the version, the more stable, usually), a community rating, a more detailed description, and an Install link.
Now is a good time to remember that you are dealing with FREE software; what you are about to install will most likely offer NO guarantees or warrantees. Never forget that a plugin runs server-side code on your website, which means that a plugin can access your database(s), can read, write, and delete files, and even send e-mails from your domain.
Note
Please read the reviews and listen to what the community has to say about the plugin you are about to install.
If a plugin is rated with 1 star by a lot of the community, it would be wise to keep your distance. But if a plugin has been installed 40,000 times and has a 3+ star rating, it's fair to say that it is trustworthy.
Clicking Install on this screen will not actually install the plugin; instead, it will launch a window that provides even more details about the specific plugin.
Plugin detail
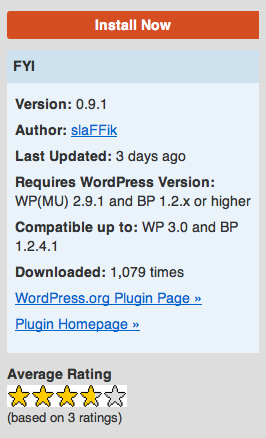
The plugin details pop-up window provides you with a deeper look into the plugin you are about to install.

The important areas to pay attention to are as follows:
The number of downloads shows how popular a plugin is.
The average rating shows you what the community thinks about the plugin.
Last Updated date tells you if the project is still being actively worked upon.
Compatible up to tells you if the plugin has been tested on your version or not. Keep in mind that a lot of plugins might not have been "tested" with your current version, but will still work.
Many times, plugins require no additional setup or configuration, while others need a bit more tooling around to get running. If the developer provided Installation instructions, make sure to look them over to ensure that you're not getting in over your head. If you are happy with what you see, click the big red Install Now button.
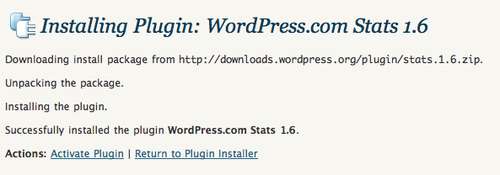
Downloading, unpacking, installing
If, after clicking the Install Now button, you make it through all of the steps and see Activate Plugin, you're in for a treat! Congratulations, your web host supports the Automatic Install of WordPress.

Activating the plugin
While you have installed the plugin, you aren't done yet! We still need to activate it.
Once you click Activate Plugin, WordPress will go through the process of turning the plugin on. Depending on what the plugin does, this process could include creating new database tables or setting up new folders and files.
Once activated, you still might be required to provide more information before the plugin can run properly. For example, if you're installing Alex King's Twitter Tools plugin, you'll need to provide your Twitter credentials before it can do any of its magic.
Connection Information required
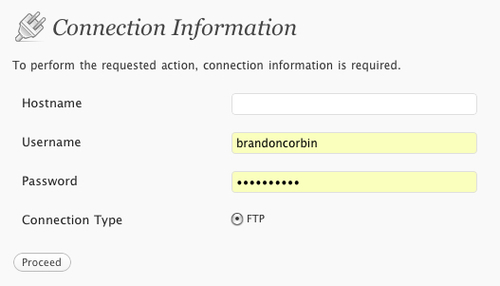
If, when you click Install Now, you see the Connection Information form, like the image in the next screenshot, then we have a little more work to do before we can start installing plugins automatically. However, you still have a chance to have "Automatic Install" if your hosting-provider allows it. Follow the next few steps to see if it's still a possibility. Don't worry if the next steps fail; we will still be able to install plugins quickly, just not as quickly as the "Automatic Install".

In this window, provide your Hostname, which will most likely be just your domain name. For example: icorbin.com (minus the http), your FTP username, and its password. Some installations might have FTP and SFTP for the connection type; if SFTP is available and it works when you click proceed, use it.
If your web host doesn't support this method, then we need to attack the problem without WordPress and instead use our own FTP client.


