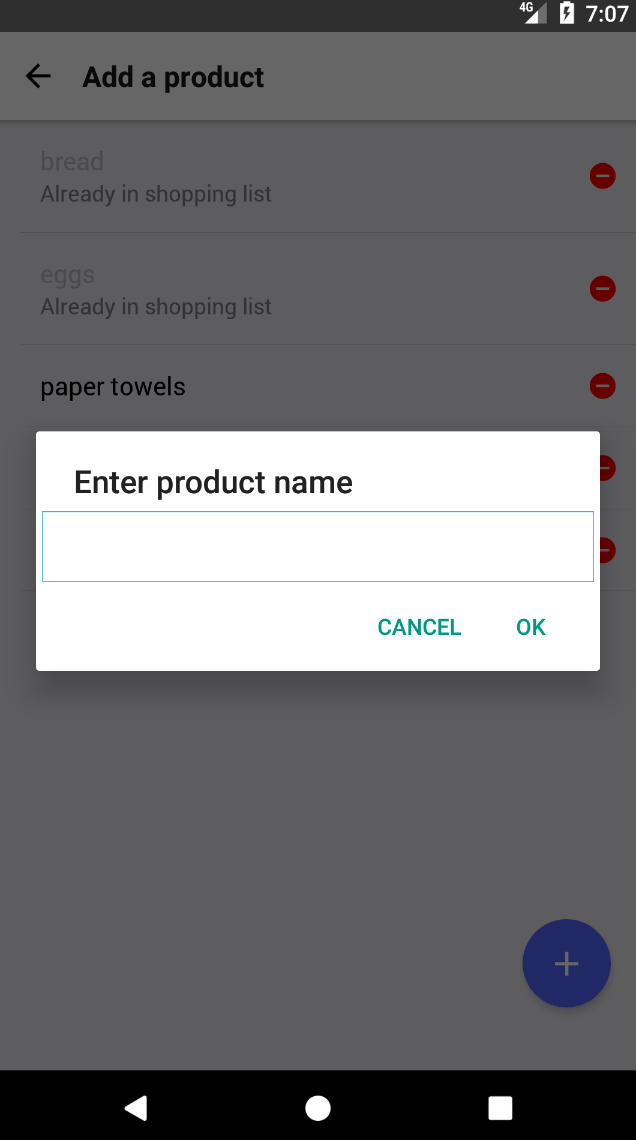
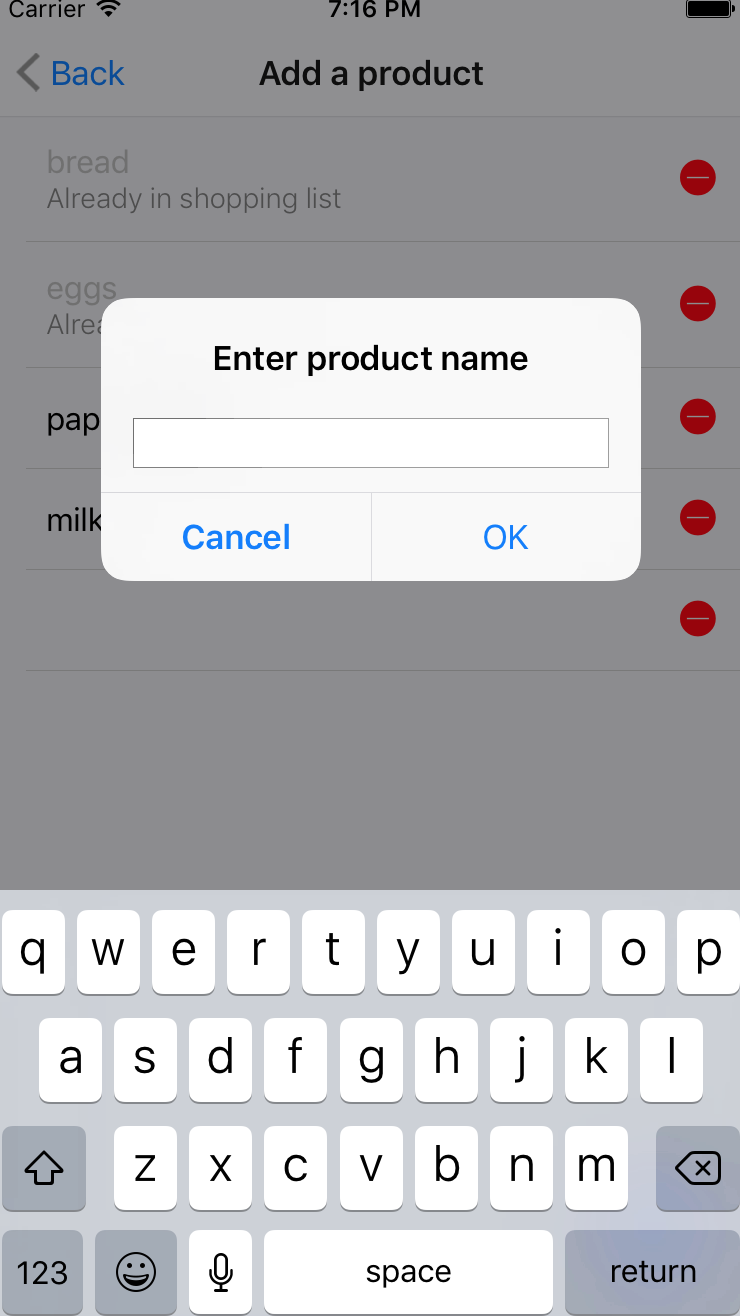
As the user will have the need of adding new products to the shopping list, we need to build a screen in which we can prompt the user for the name of the product to be added and save it in the phone's storage for later use.
Building the AddProduct screen
Using AsyncStorage
When building a React Native app, it's important to understand how mobile devices handle the memory used by each app. Our app will be sharing the memory with the rest of the apps in the device so, eventually, the memory which is using our app will be claimed by a different app. Therefore, we cannot rely on putting data in memory for later use. In case we want to make sure the data is available across users of our app, we need to store that data in the device's persistent storage.
React Native offers an API to handle the communication with the persistent storage in our mobile devices and this API is the same on iOS and Android, so we can write cross-platform code comfortably.
The API is named AsyncStorage, and we can use it after importing from React Native:
import { AsyncStorage } from 'react-native';
We will only use two methods from AsyncStorage: getItem and setItem. For example, we will create within our screen a local function to handle the addition of a product to the full list of products:
/*** AddProduct ***/

...
async addNewProduct(name) {
  const newProductsList = this.state.allProducts.concat({
    name: name,
    id: Math.floor(Math.random() * 100000)
  });

  await AsyncStorage.setItem(
    '@allProducts',
    JSON.stringify(newProductsList)
  );

  this.setState({
    allProducts: newProductsList
  });
 }
...
There are some interesting things to note here:
- We are using ES7 features such as async and await to handle asynchronous calls instead of promises or callbacks. Understanding ES7 is outside the scope of this book, but it is recommended to learn and understand about the use of async and await, as it's a very powerful feature we will be using extensively throughout this book.
- Every time we add a product to allProducts, we also call AsyncStorage.setItem to permanently store the product in our device's storage. This action ensures that the products added by the user will be available even when the operating system clears the memory used by our app.
- We need to pass two parameters to setItem (and also to getItem): a key and a value. Both of them must be strings, so we would need to use JSON.stringify, if we want to store the JSON-formatted data.
Adding state to our screen
As we have just seen, we will be using an attribute in our component's state named allProducts, which will contain the full list of products the user can add to the shopping list.
We can initialize this state inside the component's constructor to give the user a gist of what he/she will be seeing on this screen even during the first run of the app (this is a trick used by many modern apps to onboard users by faking a used state):
/*** AddProduct.js ***/

...
constructor(props) {
  super(props);
  this.state = {
    allProducts: [
      { id: 1, name: 'bread' },
      { id: 2, name: 'eggs' },
      { id: 3, name: 'paper towels' },
      { id: 4, name: 'milk' }
    ],
    productsInList: []
  };
}
...
Besides allProducts, we will also have a productsInList array, holding all the products which are already added to the current shopping list. This will allow us to mark the product as Already in shopping list, preventing the user from trying to add the same product twice in the list.
This constructor will be very useful for our app's first run but once the user has added products (and therefore saved them in persistent storage), we want those products to display instead of this test data. In order to achieve this functionality, we should read the saved products from AsyncStorage and set it as the initial allProducts value in our state. We will do this on componentWillMount:
/*** AddProduct.js ***/

...
async componentWillMount() {
  const savedProducts = await AsyncStorage.getItem('@allProducts');
  if(savedProducts) {
    this.setState({
      allProducts: JSON.parse(savedProducts)
    });
  }

  this.setState({
    productsInList: this.props.navigation.state.params.productsInList
  });
}
...
We are updating the state once the screen is ready to be mounted. First, we will update the allProducts value by reading it from the persistent storage. Then, we will update the list productsInList based on what the ShoppingList screen has set as the state in the navigation property.
With this state, we can build our list of products, which can be added to the shopping list:
/*** AddProduct ***/

...
render(){
  <List>
    {this.state.allProducts.map(product => {
       const productIsInList = this.state.productsInList.find(
         p => p.id === product.id
       );
       return (
         <ListItem key={product.id}>
           <Body>
             <Text
               style={{
                color: productIsInList ? '#bbb' : '#000'
               }}
             >
               {product.name}
             </Text>
             {
               productIsInList &&
               <Text note>
                 {'Already in shopping list'}
               </Text>
             }
          </Body>
        </ListItem>
      );
    }
 )}
 </List>
}
...
Inside our render method, we will use an Array.map function to iterate and print each possible product, checking if the product is already added to the current shopping list to display a note, warning the user: Already in shopping list.
Of course, we still need to add a better layout, buttons, and event handlers for all the possible user actions. Let's start improving our render method to put all the functionality in place.
Adding event listeners
As it happened with the ShoppingList screen, we want the user to be able to interact with our AddProduct component, so we will add some event handlers to respond to some user actions.
Our render method should then look something like this:
/*** AddProduct.js ***/

...
render() {
  return (
    <Container>
      <Content>
        <List>
          {this.state.allProducts.map(product => {
            const productIsInList = this.state.productsInList.
            find(p => p.id === product.id);
            return (
              <ListItem
                key={product.id}
                onPress={this._handleProductPress.bind
                (this, product)}
              >
                <Body>
                  <Text
                    style={{ color: productIsInList? '#bbb' : '#000' }}
                  >
                    {product.name}
                  </Text>
                 {
                   productIsInList &&
                   <Text note>
                     {'Already in shopping list'}
                   </Text>
                 }
                 </Body>
                 <Right>
                   <Icon
                     ios="ios-remove-circle"
                     android="md-remove-circle"
                     style={{ color: 'red' }}
                     onPress={this._handleRemovePress.bind(this,
                     product )}
                   />
                 </Right>
               </ListItem>
             );
           })}
         </List>
       </Content>
     <Fab
       style={{ backgroundColor: '#5067FF' }}
       position="bottomRight"
       onPress={this._handleAddProductPress.bind(this)}
     >
       <Icon name="add" />
     </Fab>
   </Container>
   );
 }
...
There are three event handlers responding to the three press events in this component:
- On the blue <Fab> button, which is in charge of adding new products to the products list
- On each <ListItem>, which will add the product to the shopping list
- On the delete icons inside each <ListItem> to remove this product from the list of the products, which can be added to the shopping list
Let's start adding new products to the available products list once the user presses the <Fab> button:
/*** AddProduct.js ***/

...
_handleAddProductPress() {
  prompt(
    'Enter product name',
    '',
    [
      { text: 'Cancel', style: 'cancel' },
      { text: 'OK', onPress: this.addNewProduct.bind(this) }
    ],
    {
      type: 'plain-text'
    }
  );
}
...
We are using here the prompt function from the react-native-prompt-android module. Despite its name, it's a cross-platform prompt-on-a-pop-up library, which we will use to add products through the addNewProduct function we created before. We need to import the prompt function before we use it, as follows:
import prompt from 'react-native-prompt-android';
And here is the output:


Once the user enters the name of the product and presses OK, the product will be added to the list so that we can move to the next event handler, adding products to the shopping list when the user taps on the product name:
/*** AddProduct.js ***/

...
_handleProductPress(product) {
  const productIndex = this.state.productsInList.findIndex(
    p => p.id === product.id
  );
  if (productIndex > -1) {
    this.setState({
      productsInList: this.state.productsInList.filter(
        p => p.id !== product.id
      )
    });
    this.props.navigation.state.params.deleteProduct(product);
  } else {
    this.setState({
      productsInList: this.state.productsInList.concat(product)
    });
    this.props.navigation.state.params.addProduct(product);
 }
}
...
This handler checks if the selected product is on the shopping list already. If it is, it will remove it by calling deleteProduct from the navigation state and also from the component's state by calling setState . Otherwise, it will add the product to the shopping list by calling addProduct in the navigation state and refresh the local state by calling setState.
Finally, we will add an event handler for the delete icon on each of the <ListItems>, so the user can remove products from the list of available products:
/*** AddProduct.js ***/

...
async _handleRemovePress(product) {
  this.setState({
    allProducts: this.state.allProducts.filter(p => p.id !== product.id)
  });
  await AsyncStorage.setItem(
    '@allProducts',
    JSON.stringify(
      this.state.allProducts.filter(p => p.id !== product.id)
    )
  );
}
...
We need to remove the product from the component's local state, but also from the AsyncStorage so it doesn't show during later runs of our app.
Putting it all together
We have all the pieces to build our AddProduct screen, so let's take a look at the general structure of this component:
import React from 'react';
import prompt from 'react-native-prompt-android';
import { AsyncStorage } from 'react-native';
import {
 ...
} from 'native-base';

export default class AddProduct extends React.Component {
  static navigationOptions = {
    title: 'Add a product'
  };

  constructor(props) {
   ...
  }

  async componentWillMount() {
    ...
  }

  async addNewProduct(name) {
    ...
  }

  /*** User Actions Handlers ***/
  _handleProductPress(product) {
   ...
  }

  _handleAddProductPress() {
    ...
  }

  async _handleRemovePress(product) {
    ...
  }

  /*** Render ***/
  render() {
    ....
  }
}
We have a very similar structure to the one we built for ShoppingList : the navigatorOptions constructor building the initial state, user action handlers, and a render method. In this case, we added a couple of async methods as a convenient way to deal with AsyncStorage.


