Search icon CANCEL
Subscription
0
Cart icon
Your Cart (0 item)
Close icon
You have no products in your basket yet
Save more on your purchases! discount-offer-chevron-icon
Savings automatically calculated. No voucher code required.
Arrow left icon
Explore Products
Best Sellers
New Releases
Books
Videos
Audiobooks
Learning Hub
Newsletter Hub
Free Learning
Arrow right icon
timer SALE ENDS IN
0 Days
:
00 Hours
:
00 Minutes
:
00 Seconds
Arrow up icon
GO TO TOP
OpenLayers Cookbook

You're reading from   OpenLayers Cookbook The best method to learn the many ways OpenLayers can be used to render data on maps is to dive straight into these recipes. With a mix of basic and advanced techniques, it's ideal for JavaScript novices and experts alike.

Arrow left icon
Product type Paperback
Published in Aug 2012
Publisher Packt
ISBN-13 9781849517843
Length 300 pages
Edition 1st Edition
Languages
Arrow right icon
Toc

Table of Contents (15) Chapters Close

OpenLayers Cookbook
Credits
About the Author
About the Reviewers
www.PacktPub.com
Preface
1. Web Mapping Basics 2. Adding Raster Layers FREE CHAPTER 3. Working with Vector Layers 4. Working with Events 5. Adding Controls 6. Theming 7. Styling Features 8. Beyond the Basics Index

Placing controls outside the map


By default, all the controls are placed on the map. This way, controls such as the PanPanel, EditingToolbar, or MousePosition are rendered on top of the map and over any layer. This is the default behavior, but OpenLayers is flexible enough to allow us to put controls outside the map:
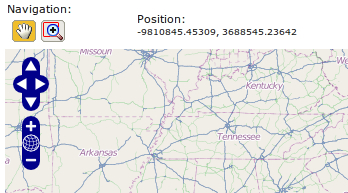
In this recipe we are going to create a map where the navigation toolbar and the mouse position controls are placed outside and above the map.

How to do it...

  1. Create an HTML file and add the OpenLayers dependencies. Add the following CSS code required to redefine some aspects of the controls we are going to use:

    <style>
        .olControlNavToolbar {
            top: 0px;
            left: 0px;
            float: left;
        }
        .olControlNavToolbar div {
            float: left;
        }
    </style>
  2. Now, add the HTML code to place the two controls above the map:

    <table>
        <tr>
            <td>
                Navigation: <div id="navigation" class="olControlNavToolbar"></div...
lock icon The rest of the chapter is locked
Register for a free Packt account to unlock a world of extra content!
A free Packt account unlocks extra newsletters, articles, discounted offers, and much more. Start advancing your knowledge today.
Unlock this book and the full library FREE for 7 days
Get unlimited access to 7000+ expert-authored eBooks and videos courses covering every tech area you can think of
Renews at $19.99/month. Cancel anytime
Banner background image