Chapter 11. Building Our Own Package
In this chapter, we will learn how to build our own package. Writing packages allows us to create closed-functionality components that can be shared between many apps. In the second half of the chapter, we will publish our app on Atmosphere, Meteor's third-party package repository, at https://atmospherejs.com.
In this chapter, we will cover the following topics:
- Structuring a package
- Creating a package
- Publishing your own package
Note
In this chapter, we will package the
ReactiveTimerobject that we built in Chapter 9, Advanced Reactivity. To follow the examples in this chapter, download the previous chapter's code examples from either the book's web page at https://www.packtpub.com/books/content/support/17713 or from the GitHub repository at https://github.com/frozeman/book-building-single-page-web-apps-with-meteor/tree/chapter10.
The structure of a package
A package is a bundle of JavaScript files that exposes only specific variables to a Meteor app. Other than in a Meteor app, package files will get loaded in the loading order we specify.
Every package needs a package.js file that contains the configuration of that package. In such a file, we can add a name, description, and version, set the loading order, and determine which variables should be exposed to the app. Additionally, we can specify unit tests for our packages to test them.
An example of a package.js file can look like this:
Package.describe({
  name: "mrt:moment",
  summary: "Moment.js, a JavaScript date library.",
  version: "0.0.1",
  git: "https://..."
});

Package.onUse(function (api, where) {
  api.export('moment');

  api.addFiles('lib/moment-with-langs.min.js', 'client');
});

Package.onTest(function(api){
  api.use(["mrt:moment", "tinytest"], ["client", "server"]);
  api.addFiles("test/tests.js", ["client", "server"]);
});
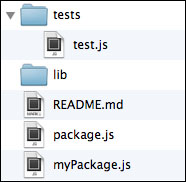
We can structure the files and folders in our package as we wish, but a good basis is the following arrangement:

tests: This contains the package's unit tests and thetests.jsfilelib: This contains third-party libraries used by the packageREADME.md: This contains simple instructions on how to use the packagepackage.js: This contains the package's metadatamyPackage.js: These are one or more files that contain the package code
To test a package, we can use Meteor's tinytest package, which is a simple unit testing package. If we have tests, we can run them using the following command:
$ meteor test-packages <my package name>
This will start a Meteor app at http://localhost:3000, which runs our package tests. To see how to write a package, take a look at the next chapter.
Creating our own package
To create our own package, we will use our ReactiveTimer object, which we built in Chapter 9, Advanced Reactivity:
- We go to our terminal, in our app's folder and run the following command:
$ meteor create --package reactive-timer - This will create a folder named
packageswith areactive-timerfolder inside it. Inside thereactive-timerfolder, Meteor has already created apackage.jsfile and some example package files. - Now we can delete all the files inside the
reactive-timerfolder, except thepackage.jsfile. - Then we move the
my-meteor-blog/client/ReactiveTimer.jsfile, which we created in Chapter 9, Advanced Reactivity, to our newly createdreactive-timerpackage folder. - Lastly, we open the copied
ReactiveTimer.jsfile and remove the following lines:timer = new ReactiveTimer(); timer.start(10);
Later, we'll instantiate the
timerobject inside the app itself and not in the package file.
We should now have a simple folder with the default package.js file and our ReactiveTimer.js file. This is almost it! We just need to configure our package and we are ready to use it in our app.
Adding the package metadata
To add the package's metadata, we open the file called package.js and add the following lines of code:
Package.describe({
  name: "meteor-book:reactive-timer",
  summary: "A simple timer object, which can re-run reactive functions based on an interval",
  version: "0.0.1",
  // optional
  git: "https://github.com/frozeman/meteor-reactive-timer"
});
This adds a name to the package as well as a description and a version.
Note that the package name is namespaced with the author's name. This exists so that packages with the same name can be made distinct through the names of their authors. In our case, we choose meteor-book, which is not a real username. To publish the package, we need to use our real Meteor developer username.
After the Package.describe() function come the actual package dependencies:
Package.onUse(function (api) {
  // requires Meteor core packages 1.0
  api.versionsFrom('METEOR@1.0');

  // we require the Meteor core tracker package
  api.use('tracker', 'client');

  // and export the ReactiveTimer variable
  api.export('ReactiveTimer');

  // which we find in this file
  api.addFiles('ReactiveTimer.js', 'client');
});
Here, we define the version of the Meteor core packages this package should use:
- With
api.use(), we define an additional package (or packages) this package depends on. Note that these dependencies won't be accessible to the app itself, which uses this package.Note
Additionally, there exists
api.imply(), which not only makes another package available in the package's files, but also adds it to the Meteor app itself so that it can be accessed by the app's code. - If we use a third-party package, we must specify the minimum package version as follows:
api.use('author:somePackage@1.0.0', 'server');Note
We can also pass in a third parameter,
{weak: true}, to specify that the dependent package will only be used if it is already added to the app by the developer. This can be used to enhance a package when other packages are present. - In the second parameter of the
api.use()function, we can specify whether to load it on the client, server, or both, using an array:api.use('tracker', ['client', 'server']);Tip
We don't really need to import the
Trackerpackage, as it's already a part of Meteor's coremeteor-platformpackage (added by default to any Meteor app); we do this here for the sake of an example. - We then use
api.export('ReactiveTimer')to define which variable of the package should be exposed to the Meteor app using this package. Remember that we created theReactiveTimerobject inside theReactiveTimer.jsfile using the following lines of code:ReactiveTimer = (function () { ... })();Note
Note that we didn't use
varto create the variable. This way, it is accessible in all the other files of the package and can also be exposed to the app itself. - Lastly, we tell the package system which files belong to the package, using
api.addFiles(). We can have multiple calls ofapi.addFiles()one after the other. This order will then specify the loading order of the files.Here, we can again tell Meteor where to load the file—on the client, the server, or both—using
['client', 'server'].In this case, we only provide the
ReactiveTimerobject on the client, as Meteor's reactive functions exist only on the client side.Note
If you want to see a full list of methods on the
apiobject, take a look at Meteor's documentation at http://docs.meteor.com/#packagejs.
Adding the package
Copying a package folder to the my-meteor-blog/packages folder is not enough to tell Meteor to use the package. There are additional steps that we need to follow:
- To add the package, we need to go to our app's folder from the terminal, quit any currently running
meteorinstance, and run the following command:$ meteor add meteor-book:reactive-timer - We then need to instantiate the
ReactiveTimerobject in our app. To do this, we add the following lines of code to ourmy-meteor-blog/main.jsfile:if(Meteor.isClient) { timer = new ReactiveTimer(); timer.start(10); } - Now we can start the Meteor app again using
$ meteorand open our browser athttp://localhost:3000.
We shouldn't see any difference, as we just replaced the ReactiveTimer object that was already there in our app with the ReactiveTimer object from our meteor-book:reactive-timer package.
To see the timer run, we can open our browser's console and run the following code snippet:
Tracker.autorun(function(){
    timer.tick();
    console.log('timer run');
});
This should log timer run every 10 seconds, showing us that the package is actually working.
Releasing our package to the public
It's very easy to release a package to the world, but for people to use our package, we should add a readme file so they can know how to use our package.
Create a file called README.md in the package folder we created earlier and add the following code snippet:
# ReactiveTimer

This package can run reactive functions in a given interval.
## Installation

    $ meteor add meteor-book:reactive-timer

## Usage

To use the timer, instantiate a new interval:

    var myTimer = new ReactiveTimer();

Then you can start an interval of 10 seconds using:

    myTimer.start(10);

To use the timer just call the following in any reactive function:

    myTimer.tick();

To stop the timer use:

    myTimer.stop();
As we can see, this file uses the markdown syntax. This way, it will look good on GitHub and http://atmospherejs.com, which is the website where you can browse all the available Meteor packages.
With this readme file, we will make it easy for other people to use the package and appreciate our work.
Publishing our package online
After we have saved the readme file, we can push the package to GitHub or any other online Git repository, and add the repository's URL to the Package.describe({git: …}) variable of package.js. Keeping the code on GitHub keeps it safe and allows others to fork and improve it. Let's perform the following steps to push our package online:
- To publish our package, we can simply run the following command from inside the
pagesfolder in the terminal:$ meteor publish --createThis will build and bundle the package and upload it to Meteor's package servers.
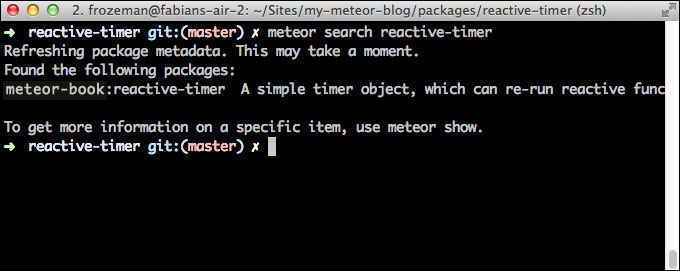
- If everything goes fine, we should be able to find our package by typing the following command:
$ meteor search reactive-timerThis is illustrated in the following screenshot:

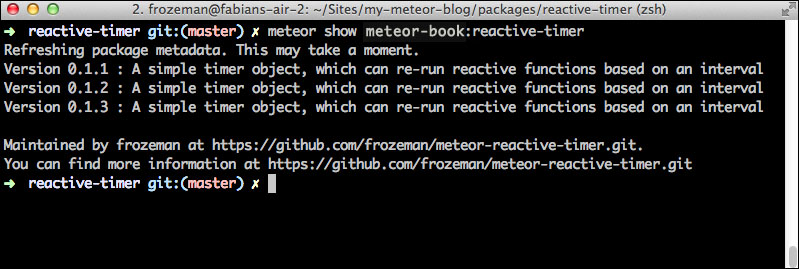
- We can then show all of the information about the found package using the following command:
$ meteor show meteor-book:reactive-timerThis is illustrated in the following screenshot:

- To use the package version from the Meteor server, we can simply move the
packages/reactive-timerfolder somewhere else, remove thepackagefolder, and run$ meteorto start the app.Now Meteor won't find any package with that name in the
packagesfolder and will look online for that package. Since we published it, it will be downloaded and used in our app. - Should we want to use a specific version of our package in the app, we can run the following command from inside our app's folder in the terminal:
$ meteor add meteor-book:reactive-timer@=0.0.1
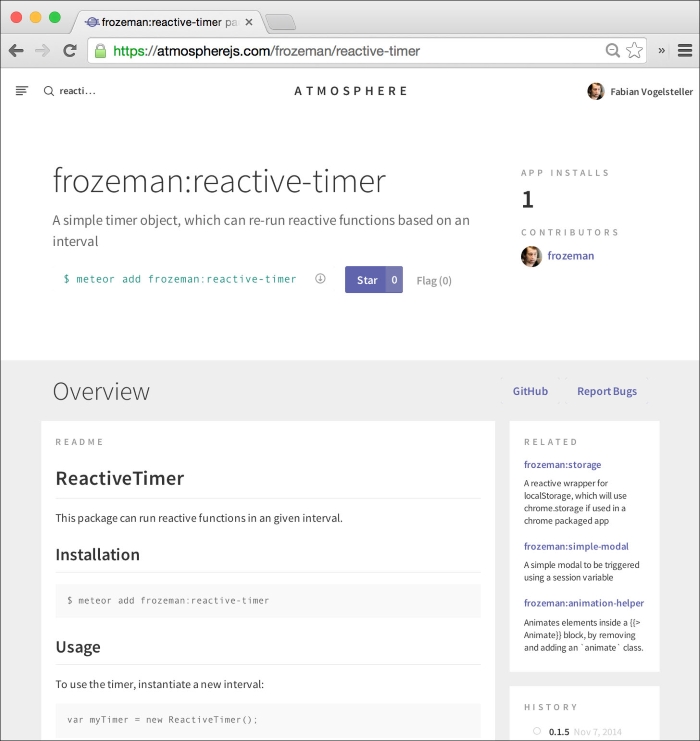
Now our package is released and we can see it on Atmosphere at http://atmospherejs.com/meteor-book/reactive-timer, as shown in the following screenshot:

Note
Note that this is just an example of a package and was never actually released. However, a published version of this package under my name can be found at http://atmospherejs.com/frozeman/reactive-timer.
Updating our package
If we want to release a new version of our package, we can simply increase the version number in the package.js file and publish a new version using the following command from inside the packages folder:
$ meteor publish
To make our app use the latest version of our package (as long as we didn't specify a fixed version), we can simply run the following command from inside our app's folder:
$ meteor update meteor-book:reactive-timer
If we want to update all packages, we can run the following command:
$ meteor update –-packages-only
Publishing our package online
After we have saved the readme file, we can push the package to GitHub or any other online Git repository, and add the repository's URL to the Package.describe({git: …}) variable of package.js. Keeping the code on GitHub keeps it safe and allows others to fork and improve it. Let's perform the following steps to push our package online:
- To publish our package, we can simply run the following command from inside the
pagesfolder in the terminal:$ meteor publish --createThis will build and bundle the package and upload it to Meteor's package servers.
- If everything goes fine, we should be able to find our package by typing the following command:
$ meteor search reactive-timerThis is illustrated in the following screenshot:

- We can then show all of the information about the found package using the following command:
$ meteor show meteor-book:reactive-timerThis is illustrated in the following screenshot:

- To use the package version from the Meteor server, we can simply move the
packages/reactive-timerfolder somewhere else, remove thepackagefolder, and run$ meteorto start the app.Now Meteor won't find any package with that name in the
packagesfolder and will look online for that package. Since we published it, it will be downloaded and used in our app. - Should we want to use a specific version of our package in the app, we can run the following command from inside our app's folder in the terminal:
$ meteor add meteor-book:reactive-timer@=0.0.1
Now our package is released and we can see it on Atmosphere at http://atmospherejs.com/meteor-book/reactive-timer, as shown in the following screenshot:

Note
Note that this is just an example of a package and was never actually released. However, a published version of this package under my name can be found at http://atmospherejs.com/frozeman/reactive-timer.
Updating our package
If we want to release a new version of our package, we can simply increase the version number in the package.js file and publish a new version using the following command from inside the packages folder:
$ meteor publish
To make our app use the latest version of our package (as long as we didn't specify a fixed version), we can simply run the following command from inside our app's folder:
$ meteor update meteor-book:reactive-timer
If we want to update all packages, we can run the following command:
$ meteor update –-packages-only
Summary
In this chapter, we created our own package from our ReactiveTimer object. We also learned how simple it is to publish a package on Meteor's official packaging system.
To dig deeper, read the documentations at the following resources:
You can find this chapter's code examples at https://www.packtpub.com/books/content/support/17713 or on GitHub at https://github.com/frozeman/book-building-single-page-web-apps-with-meteor/tree/chapter11.
This code example contains only the package, so in order to add it to the app, use the code example of the previous chapter.
In the next chapter, we will take a look at testing our app and package.


