Installing Magento 2 on Hypernode
Throughout the following recipes, we will install Magento 2 on a fully managed platform hosted by Hypernode. Hypernode is an advanced platform for successful Magento shops.
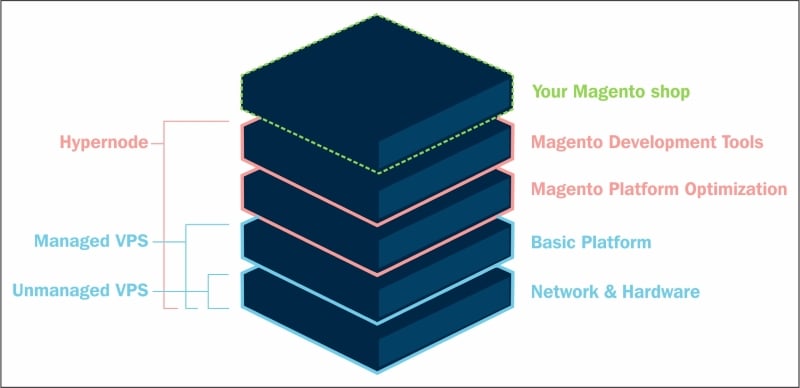
Hypernode is a radically different approach to Magento hosting that actively improves your shop's performance. Its unique Magento platform is developed by Byte Internet, a Dutch hoster with eight years of experience in hosting Magento.
Hypernode has been developed in close consultation with Magento developers, with the objective of having Magento web shops perform to the best advantage and make its development several times easier. This recipe will show you how to do it.
Tip
With Hypernode, you will get your own fully managed isolated cloud server. This server has been fully configured for Magento 2. The best and latest software such as NGINX, HHVM, PHP-FPM, Redis, and MySQL are installed as a standard. In addition, they offer all the tools that you, as a Magento developer, would need in order to work comfortably: New Relic, Git, Vagrant, and Magento-specific tools such as ModMan, N98 Magerun, Sphinx Search, and much more.
The following image illustrates working of Hypernode which can be found at https://www.hypernode.com/:

Getting ready
For this recipe, you will need to create an account at Hypernode https://www.hypernode.com/. No other prerequisites are required.
How to do it...
For the purpose of this recipe, let's assume that we need to create a Magento 2 hosting environment on the Hypernode platform. The following steps will guide you through this:
- First, we start by creating a user account for Hypernode.
There are two options to create a Hypernode.
The first option is a default clean Magento 2 setup using the link, https://auth.byte.nl/account/register/magento2, and committing your name, e-mail, company name, and so on. For the following steps, make sure to submit the correct cell number. You will get a text message to confirm that this account is valid and not spam. Now perform steps 2 through 9 to set up Magento 2 the easy way.
If you want to start using Magento 1 before switching to Magento 2, then follow all of the steps until step 11. To do so, use the link, https://auth.byte.nl/account/register/hypernode/, and commit your name, e-mail, company name, and so on. For the following steps, make sure to submit the correct cell number. You will get a text message to confirm that this account is valid and not spam.
- Now, open up your mail account, and confirm the e-mail that you received from Byte Internet. Next, you will be prompted with a text message on your cell phone; commit the code to continue. Make sure to pick a password for the Hypernode control panel, which we will use later.
- Next, commit your domain name, or any other name that will relate to this setup. The name will be used to create a subdomain on the Hypernode. The name could be called
yourdomain.hypernode.io. - After submitting your domain name, creating the Hypernode will take between 20-30 minutes, or less. All current Hypernodes are created on the same hosting platform that we used before at DigitalOcean. The difference between this setup for Magento 2 is that it is a managed setup. So we don't need to configure PHP, MySQL, NGINX, and so on.
- Now go to the Hypernode control panel to check the current status on the creation of the Hypernode. Go to https://service.byte.nl.
- Click on your domain name and then click on Hypernode settings in the control panel. Here, you will find the current status and health of your setup:

- Next, we need to set up an SSH key to log in via SSH. By default, this is the only way to log in. Go to https://service.byte.nl/sshkeymanager/ and submit your personal key or create a new pair. It will take less than 10 minutes to auto-submit this to your Hypernode.
- Now you can log in to the Hypernode via the shell. The hostname is the same as your domain name, which we had set up in the beginning. The username is always
app. The example should look as follows:ssh app@yourdomain.hypernode.io - If everything worked out fine, you should now have access to the Hypernode on
http://yourdomain.hypernode.io. - By default, the current Hypernode setup has a Magento 1 preinstalled setup. We will now switch to Magento 2 using the following commands via the shell:
n98-magerun --root-dir=/data/web/public uninstall --installationFolder=/data/web/public –force

touch ~/nginx/magento2.flag
mkdir ~/magento2
cd ~/magento2

wget -qO- https://magento.mirror.hypernode.com/releases/magento2-latest.tar.gz | tar xfz –

echo "create database magento2" | mysql
chmod 755 bin/magento
cat ~/.my.cnf

bin/magento setup:install --db-host=[HOSTNAME]   --dbname=[DATABASE] --db-user=app   --db-password=[DATABASE_PASSWORD]   --admin-firstname=[YOURFIRSTNAME]   --admin-lastname=[YOURSURNAME] --admin-user=[ADMINNAME]   --admin-password=[ADMINPASSWORD]   --adminemail=[YOUR@EMAIL.COM]   --base-url=[YOUR.HYPERNODE.IO] --language=[en_US]   --timezone=[Europe/Berlin] --currency=[EUR]   --use-rewrites=1

rm -rf ~/public
mkdir ~/public
cd ~/magento2
ln -fs ../magento2/pub/* ../public
The detailed instructions can also be found on the Hypernode knowledge base, https://support.hypernode.com/knowledgebase/installing-magento-2-on-hypernode/. This also includes a small tutorial regarding a sample data setup.
- Now open your browser and go to your domain name to check whether everything is working correctly.
- Congratulations, you just finished configuring Magento 2 on Hypernode.
How it works…
Let's recap and find out what we did throughout this recipe. In steps 1 through 4, we create a new Hypernode account at https://www.byte.nl/. These steps will create a new Byte customer that stores a reference to the Hypernode. The Hypernode is auto-created in the background on DigitalOcean. During the whole process, you will get multiple mails for validation and additional account information regarding the Hypernode logins.
In steps 5 through 11, we need to switch from the default Magento 1 preinstalled setup to Magento 2. All setups are self-explanatory and result in a clean Magento 2 setup located on a managed hosting platform and ready for production.
There's more…
Hypernode provides you with a large set of tools useful for your Magento setup. Check your service panel for the latest tools and links available. Here is a small section of some useful links:
https://yourdomain.hypernode.io/phpmyadmin/
https://support.hypernode.com/knowledgebase_category/getting-started/
https://support.hypernode.com/knowledgebase/configure-redis/
https://support.hypernode.com/knowledgebase/varnish-on-hypernode/


