Starting from basic shapes
At this stage you know how to create a new canvas area and even create a few basic shapes. Let's expand our skill and start creating flags.
Getting ready
Well, we won't start from the most basic flag as that would just be a green rectangle. If you wanted to learn how to create a green flag you wouldn't need me, so let's move up to a tad more complex flag.
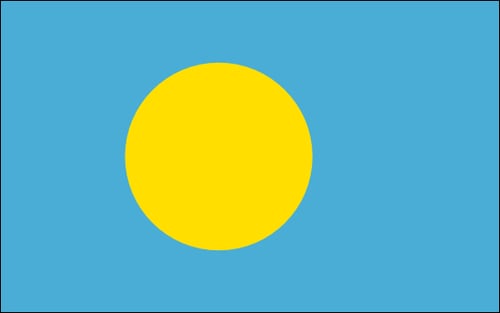
If you followed the Graphics with 2D canvas recipe you already know how to do it. This one is dedicated to our Palauan readers and to the perfect arc (also known as circle).

In this recipe we will ignore the HTML part, so if you need a refresher on how to create a canvas with an ID, please go back to the first recipe in this chapter and set up your HTML document. Don't forget to create the canvas with the right ID. You could also download our sample HTML files.
How to do it...
Add the following code block:
var cnvPalau = document.getElementById("palau");
  var wid = cnvPalau.width;
  var hei = cnvPalau.height;

  var context = cnvPalau.getContext("2d");
      context.fillStyle = "#4AADD6";
      context.fillRect(0,0,wid,hei);

      context.fillStyle = "#FFDE00";
      context.arc(wid/2.3, hei/2, 40, 0, 2 * Math.PI, false);
      context.fill();
That's it, you've just created a perfect arc, and with it your first flag that has a shape within it.
How it works...
A big chunk of this code should look very familiar at this stage. So I'll focus on the new lines compared to the ones used in the first recipe in this chapter.
  var wid = cnvPalau.width;
  var hei = cnvPalau.height;
In these lines, we extract the width and height of our canvas. We have two goals here: to shorten our lines of code and to reduce the number of times we make an API call when not needed. As we are using it more than one time, we first fetch the values and store them in wid and hei.
Now that we know our canvas width and height, it's time for us to draw our circle. Before we start drawing, we will call the fillStyle method to define a background color to be used in the canvas, and then we will create the arc followed by triggering the fill method when complete.
      context.fillStyle = "#FFDE00";
      context.arc(wid/2.3, hei/2, 40, 0, 2 * Math.PI, false);
      context.fill();
We then create our first perfect circle using the arc method. It's important to note that we can change the colors at any point, such as in this case, where we change our color just before we create a new circle.
Let's take a deeper look at how the arc method works. We start by defining the center of our circle with the x and y positions. The canvas tag follows the standard Cartesian coordinates: (0, 0) is at the top-left (x grows to the right and y grows towards the bottom).
context.arc(x, y, radius, startingAngle, endingAngle, ccw);
In our example, we decided to position the circle slightly to the left of the center by dividing the width of the canvas by 2.3, and we positioned the y in the exact center of the canvas. The next parameter is the radius of our circle, It is followed by two parameters that define the starting and ending position of our stroke. As we want to create a full circle we start from 0 and end at two times Math.PI, a complete circle (Math.PI is equivalent to 180 degrees). The last parameter is the direction of our arc. In our case as we are creating a full circle, it doesn't matter what we set here (ccw = counterclockwise).
context.fill();
Last but not least, we call the fill function to fill and color the shape we created earlier. Contrary to the fillRect function that both creates and fills the shape, the arc method doesn't. The arc method only defines the bounds of a shape to be filled. You can use this method (and others) to create more complex shapes before actually drawing them onto the stage. We will explore this more deeply in the following recipes of this chapter.


