Installing ROS Kinetic using repositories
Last year, the ROS web page was updated with a new design and a new organization of contents. The following is a screenshot of the web page:

In the menu, you can find information about ROS and whether ROS is a good choice for your system. You can also find blogs, news, and other features.
Instructions for ROS installation can be found under the Install tab in the Getting Started section.
ROS recommends that you install the system using the repository instead of the source code, unless you are an advanced user and you want to make a customized installation; in that case, you may prefer installing ROS using the source code.
To install ROS using the repositories, we will start by configuring the Ubuntu repository in our system.
Configuring your Ubuntu repositories
In this section, you will learn the steps for installing ROS Kinetic in your computer. This process has been based on the official installation page, which can be found at http://wiki.ros.org/kinetic/Installation/Ubuntu.
We assume that you know what an Ubuntu repository is and how to manage it. If you have any doubts about it, refer to https://help.ubuntu.com/community/Repositories/Ubuntu.
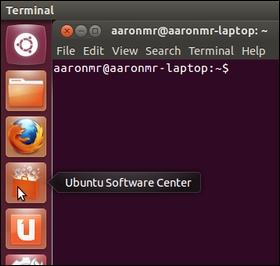
Before we start the installation, we need to configure our repositories. To do that, the repositories need to allow restricted, universe, and multiverse. To check if your Ubuntu accepts these repositories, click on Ubuntu Software Center in the menu on the left-hand side of your desktop, as shown in the following screenshot:

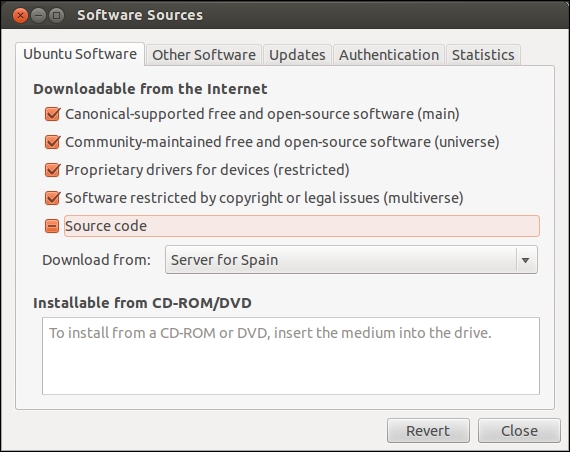
Click on Edit | Software Sources and you will see the following window. Make sure that all the listed options are checked as shown in the following screenshot (choose the appropriate country for the server from which you download the sources):

Normally these options are marked, so you should not have any problem with this step.
Setting up your source.list file
In this step, you have to select your Ubuntu version. It is possible to install ROS Kinetic in various versions of the operating system. You can use any of them, but we recommend version 15.10 to follow the chapters of this book. Keep in mind that Kinetic works in the Wily Werewolf (15.10) and Xenial Xerus (16.04) versions of Ubuntu. Type the following command to add the repositories:
sudo sh -c 'echo "deb http://packages.ros.org/ros/ubuntu $(lsb_release -cs) main" > /etc/apt/sources.list.d/ros-latest.list'
Tip
Downloading the example code
Detailed steps to download the code bundle are mentioned in the Preface of this book. Please have a look.
The code bundle for the book is also hosted on GitHub at https://github.com/rosbook/effective_robotics_programming_with_ros. We also have other code bundles from our rich catalog of books and videos available at https://github.com/PacktPublishing/. Check them out!
Once you've added the correct repository, your operating system will know where to download programs to install them into your system.
Setting up your keys
This step is to confirm that the origin of the code is correct and that no one has modified the code or programs without the knowledge of the owner. Normally, when you add a new repository, you have to add the keys of that repository, so it's added to your system's trusted list.
$ wget http://packages.ros.org/ros.key -O - | sudo apt-key add -
Now we can be sure that the code came from an authorized site and has not been modified.
Installing ROS
We are ready to start the installation now, but before we do that, we'd better make an update to avoid problems with the libraries and versions of software that are not ideal for ROS. This is done with the following command:
$ sudo apt-get update
ROS is huge; sometimes you will install libraries and programs that you will never use. Normally it has four different installations, but this depends on the final use. For example, if you are an advanced user, you might only need the basic installation for a robot without much space on the hard disk. For this book, we recommend you use the full installation because it will install everything necessary to practice the examples and tutorials.
It doesn't matter if you don't know what are you installing right now — rviz, simulators, navigation, and so on. You will learn everything in the upcoming chapters:
- The easiest (and recommended if you have enough hard disk space) installation is known as
desktop-full. It comes with ROS, the rqt tools, the rviz visualizer (for 3D), many generic robot libraries, the simulator in 2D (like a stage plan) and 3D (usually Gazebo), the navigation stack (to move, localize, do mapping, and control arms), and also perception libraries using vision, lasers, or RGBD cameras:$ sudo apt-get install ros-kinetic-desktop-full - If you do not have enough disk space, or if you prefer to install only a few packages, install only the desktop install initially, which only comes with ROS, the rqt tools, rviz, and generic robot libraries. You can install the rest of the packages as and when you need them, for example, by using
aptitudeand looking forros-kinetic-*packages with the following command:$ sudo apt-get install ros-kinetic-desktop - If you only want the bare bones, install ROS-base, which is usually recommended for the robot itself, or for computers without a screen or just a TTY. It will install the ROS package with the build and communication libraries and no GUI tools at all. With BeagleBone Black (BBB), we will install the system with the following option:
$ sudo apt-get install ros-kinetic-ros-base - Finally, whichever of the previous options you choose, you can also install individual/specific ROS packages (for a given package name):
$ sudo apt-get install ros-kinetic-PACKAGE
Initializing rosdep
Before using ROS we need to initialize rosdep. The rosdep command-line tool helps with the installation of system dependencies for the source code that we are going to compile or install. For this reason, it is required by some of the core components in ROS, so it is installed by default with it. To initialize rosdep, you have to run the following commands:
$ sudo rosdep init
$ rosdep update
Setting up the environment
Congratulations! If you are at this step, you have an installed version of ROS on your system! To start using it, the system needs to know the location of the executable or binary files, as well as the other commands. To do this, normally you need to execute the next script; if you also install another ROS distro, you can work with both just by calling the script of the one you need each time, since this script simply sets your environment. Here, we use the one for ROS Kinetic, but just replace kinetic with indigo or jade, for example, if you want to try other distros:
$ source /opt/ros/kinetic/setup.bash
If you type roscore in the shell, you will see something starting up. This is the best test for finding out if you have ROS, and if it is installed correctly.
Note that if you open another terminal you also have to source the setup.bash file to set the environment variables to detect the ROS packages installed on your system. Otherwise, roscore or other ROS commands will not work. This is because the script must be sourced again to configure the environment variables, which include the path where ROS is installed, as well as other packages and additional paths for compiling new code properly.
It is very easy to solve this; you just need to add the script at the end of your .bashrc script file so that when you start a new shell, the script will execute and you will have the environment configured.
The .bashrc file is within the user home (/home/USERNAME/.bashrc). It has the configuration of the shell or terminal, and each time the user opens the terminal, this file is loaded. That way, you can add commands or configuration to make the user's life easy. For this reason, we will add the script at the end of the .bashrc file to avoid keying it in each time we open a terminal. We do this with the following command:
$ echo "source /opt/ros/kinetic/setup.bash" >> ~/.bashrc
To see the results, you have to execute the file using the following command, or close the current terminal and open another:
$ source ~/.bashrc
Some users need more than a single ROS distribution installed in their system, so you'll have several distros living in the same system and may need to switch between them. Your ~/.bashrc file must only source the setup.bash file of the version you are currently using, since the last call will override the environment set by the others.
For example, you might have the following lines in your .bashrc file:
…
source /opt/ros/indigo/setup.bash
source /opt/ros/jade/setup.bash
source /opt/ros/kinetic/setup.bash
…
The ROS Kinetic version will be executed in this case. Make sure that the version you are running is the last one in the file. It's also recommended to source a single setup.bash.
If you want to check the version used in a terminal, you can do so easily running the echo $ROS_DISTRO command.
Getting rosinstall
Now the next step is to install a command tool that will help us install other packages with a single command. This tool is based in Python, but don't worry, you don't need to know Python to use it. You will learn how to use this tool in the upcoming chapters:
To install this tool on Ubuntu, run the following command:
$ sudo apt-get install python-rosinstall
And that's it! You have a complete ROS system installed in your system. When I finish a new installation of ROS, I personally like to test two things: that roscore and turtlesim both work.
If you want to do the same, type the following commands in different shells:
$ roscore
$ rosrun turtlesim turtlesim_node
If everything is okay, you will see the following screenshot:


