Search icon CANCEL
Subscription
0
Cart icon
Your Cart (0 item)
Close icon
You have no products in your basket yet
Save more on your purchases! discount-offer-chevron-icon
Savings automatically calculated. No voucher code required.
Arrow left icon
Explore Products
Best Sellers
New Releases
Books
Videos
Audiobooks
Learning Hub
Newsletter Hub
Free Learning
Arrow right icon
timer SALE ENDS IN
0 Days
:
00 Hours
:
00 Minutes
:
00 Seconds
Arrow up icon
GO TO TOP
ServiceNow Application Development

You're reading from   ServiceNow Application Development Transform the way you build apps for enterprises

Arrow left icon
Product type Paperback
Published in Sep 2017
Publisher Packt
ISBN-13 9781787128712
Length 408 pages
Edition 1st Edition
Languages
Arrow right icon
Author (1):
Arrow left icon
Sagar Gupta Sagar Gupta
Author Profile Icon Sagar Gupta
Sagar Gupta
Arrow right icon
View More author details
Toc

Table of Contents (15) Chapters Close

Preface 1. Introduction to ServiceNow FREE CHAPTER 2. User Administration 3. Data Management 4. Application Scopes 5. Modules, Forms, and Views 6. Introduction to ServiceNow Scripting 7. Client-Side Scripting 8. Server-Side Scripting 9. Jelly Scripting 10. Events and Notifications 11. Workflow Development 12. Debugging in ServiceNow 13. Advanced Database Features 14. Job Scheduling and Data Export-Import

Creating a table

Let us now create a custom table using the Tables & Columns module. There are multiple ways to create a new table. Either open the Tables module and click on the New button on the top, or open the Tables & Columns module and click on the Create Table button in the top section, as shown in the following screenshot:

You will be presented with a New record form for the Table. To be clear, we are inserting a new record, using the following form, into a system-defined (out-of-the-box) table labeled Table (with the system name sys_db_object) to create a new table in our instance:
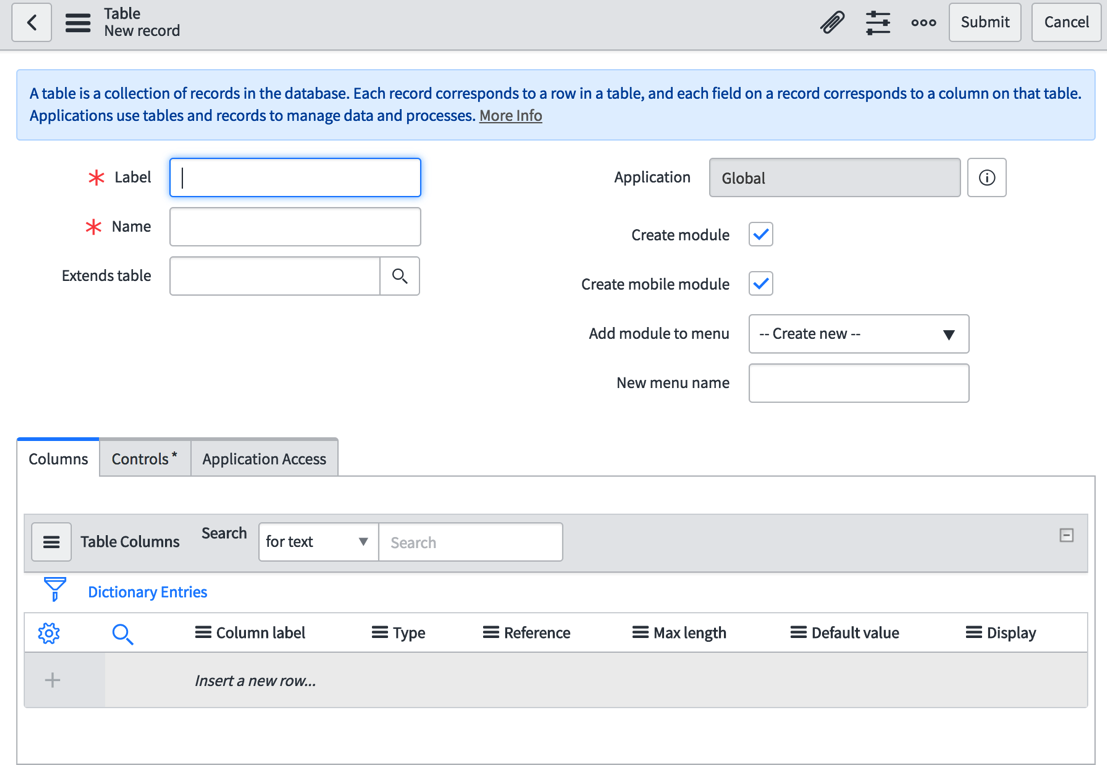
Let us populate the form fields with the following values to create our first custom table:

  1. In the Label field, enter the label we want to give to our new table-that is, POS Location.
  2. The Name field will be automatically populated for you when enter a value in the Label field and...
lock icon The rest of the chapter is locked
Register for a free Packt account to unlock a world of extra content!
A free Packt account unlocks extra newsletters, articles, discounted offers, and much more. Start advancing your knowledge today.
Unlock this book and the full library FREE for 7 days
Get unlimited access to 7000+ expert-authored eBooks and videos courses covering every tech area you can think of
Renews at $19.99/month. Cancel anytime
Banner background image