The game loop
The game loop is the primary mechanism that moves the game forward in time. Before we learn how to create this important component, let's briefly take a look at the structure of most games.
The game structure
There are three phases to most games: the initialization phase, the game loop, and the shutdown phase. The core of any game is the game loop.

The game loop is a sequence of processes that run continuously as long as the game is running. The three main processes that occur in the game loop are input, update, and render.
The input process is how the player controls the game. This could be any combination of keyboard, mouse, or control pad. Newer technologies allow the game to be controlled via a sensing device that detects gestures, while mobile devices detect touch, acceleration, and even GPS.
The update process encompasses all of the tasks required to update the game: calculating where characters and game objects have moved, determining whether items in the game have collided, and applying physics and other forces in the game.
Once the preceding calculations have been completed, then it is time to draw results. This is known as the render process. OpenGL is the library of code that handles the rendering for your game.
Tip
Many people think that OpenGL is a game engine. This is not accurate. OpenGL—the open graphics language—is a rendering library. As you can see, rendering is only one process involved in the execution of a game.
Let's take a closer look at each stage of the game so that we can get a better idea of how OpenGL fits in.
Initialization
There are certain parts of the game that must be set up only once before the game can run. This typically includes initializing variables and loading resources. There are certain parts of OpenGL that must be initialized during this phase as well.
The game loop
Once the initialization is complete, the game loop takes over. The game loop is literally an endless loop that cycles until something tells it to stop. This is often the player telling the game to end.
In order to create the illusion of movement, the render phase must occur several times a second. In general, games strive to render at least 30 frames to the screen every second, and 60 frames per second (fps) is even better.
Tip
It turns out that 24 fps is the threshold at which the human eye begins to see continuous motion instead of individual frames. This is why we want the slowest speed for our game to be 30 fps.
Shutdown
When the game does end, it isn't enough to just exit the program. Resources that are taking up precious computer memory must be properly released to the reclaim that memory. For example, if you have allocated memory for an image, you will want to release that memory by the end of the game. OpenGL has to be properly shut down so that it doesn't continue to control the Graphics Processing Unit (GPU). The final phase of the game is to return control to the device so that it will continue working properly in its normal, nongaming mode.
Creating the game structure
Now that we created our RoboRacer2D project in Visual Studio project, let's learn how to modify this code to create our game structure. Start Visual Studio and open the project we just created.
You should now see a window with code in it. The name of the code file should be RoboRacer2D.cpp. If you don't see this code window, then find Solution Explorer, navigate to RoboRacer2D.cpp, and open it up.
I'll be the first person to admit that the Windows C++ code is both ugly and intimidating! There is a lot of code created from you by Visual Studio when you choose the Windows desktop template to create your project. In fact, you can run this code right now by clicking DEBUG from the menu bar and then choosing Start Debugging. You can also press the F5 key.
Go ahead and do it!

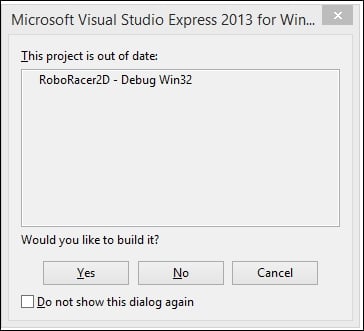
You will see a window telling you that the project is out of date. This simply means that Visual Studio needs to process your code and turn it into an executable—a process called building the project. For the computer science majors out there, this is where your code is compiled, linked, and then executed by the operating system.
Click Yes to continue.

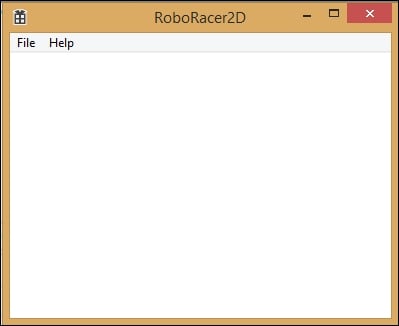
Congratulations! You have now created and run your first program in Visual Studio. It may not look like much, but there is a lot going on here:
- A fully sizeable and moveable window
- A working menu system with File and Help choices
- A title bar with RoboRacer2D
- Working minimize, maximize, and close buttons
Keep in mind that you haven't written a single line of code yet!
Now that you see it, feel free to use the close button to close the window and return to Visual Studio.
But wait, this doesn't look like a game!
If you are thinking the RoboRacer2D program doesn't look much like a game, you are correct! In fact, to make a game we typically strip away about everything that you now see! However, for this demonstration, we are going to keep the window just like it is, and worry more about the code than the appearance.
Port of access
Every program has a starting point, and for a Windows program the entry point is the _tWinMain function. Look for the following line of code:
int APIENTRY wWinMain
The _wWinMain function will start running and will set up everything required to run a Windows desktop program. It is beyond the scope of this book to go into everything that is going on here. We will just take it for granted that the code we are looking at sets things up to run in Windows, and we will focus on the things that we need to modify to make a game.
The Windows message loop
It turns out that _wWinMain already sets up a loop. In a similar manner to games, Windows programs actually run in an endless loop, until they receive some kind of event that tells them to stop. Here's the code:
// Main message loop:
while (GetMessage(&msg, nullptr, 0, 0))
{
  if (!TranslateAccelerator(msg.hwnd, hAccelTable, &msg))
  {
    TranslateMessage(&msg);
    DispatchMessage(&msg);
  }
}
As you can see, these lines of code set up a while loop that will continue to run until the result of the GetMessage call is false.
Again, we won't worry about the exact details, but suffice to say that GetMessage constantly checks for messages, or events, that are sent by Windows. One particular message is the quit event, which will return a result of false, ending the while loop, exiting the _tWinMain function, and ending the program.
Our goal is to modify the Windows message loop and turn this block of code into a game loop:
StartGame();
//Game Loop
bool done = false;
while (!done)
{
  if (PeekMessage(&msg, NULL, 0, 0, PM_REMOVE))
  {
    if (msg.message == WM_QUIT)
    {
      done = true;
    }
    else
    {
      TranslateMessage(&msg);
      DispatchMessage(&msg);
    }
  }
  else
  {
    GameLoop();
  }
}
EndGame();
Study the preceding code. You will see that we have added three new functions: StartGame, GameLoop, and EndGame.
StartGamecomes before the Windows message loop, which means that everything inStartGamewill run once before Windows enters its loop. We will put all of the game initialization code in theStartGamefunction.EndGamecomes after the Windows message loop. This means that the code inEndGamewill only execute one time after the Windows message loop has exited. This is the perfect place for us to release resources and shut the game down.GameLoopis interleaved in the Windows message loop. Basically, the code is saying, "Keep running until you receive a Windows message to quit. While you are running, check to see if Windows has passed any events that need to be handled. If there are no messages to handle, then run our game."
Tip
Order is important. For example, you have to declare these functions before the wWinMain function. This is because they are called by wWinMain, so they have to exist before tWinMain uses them. In general, a function has to be declared before the code that uses it.
In order for these new functions to be valid, go to the line just before the _tWinMain and enter some stubs for these three functions:
void StartGame()
{
}

void GameLoop()
{
}

void EndGame()
{
}
The idea here is to help you see how easy it is to convert the standard Windows message loop into a game loop.


