Search icon CANCEL
Subscription
0
Cart icon
Your Cart (0 item)
Close icon
You have no products in your basket yet
Arrow left icon
Explore Products
Best Sellers
New Releases
Books
Videos
Audiobooks
Learning Hub
Free Learning
Arrow right icon
Arrow up icon
GO TO TOP
Mastering Unity 2017 Game Development with C#

You're reading from   Mastering Unity 2017 Game Development with C# Create professional games with solid gameplay features and professional-grade workflow

Arrow left icon
Product type Paperback
Published in Oct 2017
Publisher
ISBN-13 9781788479837
Length 568 pages
Edition 2nd Edition
Languages
Tools
Arrow right icon
Author (1):
Arrow left icon
Alan Thorn Alan Thorn
Author Profile Icon Alan Thorn
Alan Thorn
Arrow right icon
View More author details
Toc

Table of Contents (9) Chapters Close

Preface 1. Preparation and Asset Configuring 2. Level Design and Structure FREE CHAPTER 3. Player Controls - Movement 4. Player Controls - Typing and Health 5. Enemies and Artificial Intelligence 6. Project Management and Version Control 7. Persistent Data - Load and Save Game States 8. Performance, Optimization, Mobiles, and More

Asset importing for Dead Keys

The last section explored some general tips on preparing assets for Unity, with optimal performance in mind. These tips are general insofar as they apply to almost all asset types in almost all cases, including Dead Keys. Now, let's focus on creating our project, DK, a first-person zombie-typer game. This game relies on many assets, from meshes and textures to animation and sound. Here, we'll import and configure many core assets, considering optimization issues and asset-related subjects. We don't need to import all assets right now; we can, and often will, import later during development, integrating them into our existing asset library. This section assumes that you've already created a new Unity project. From here on, we can begin our work.

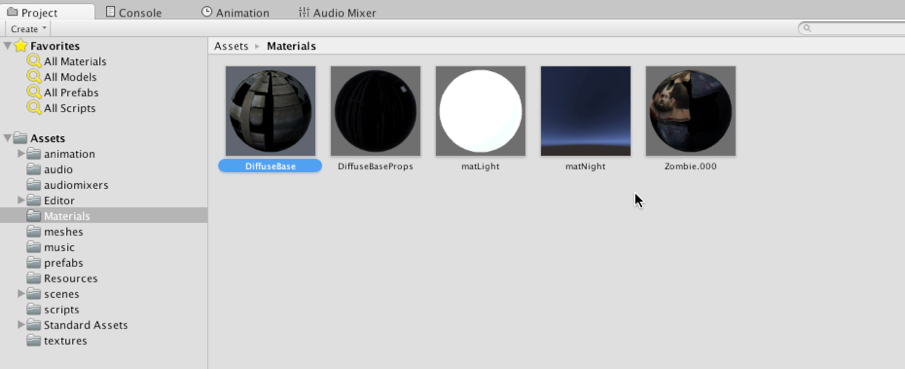
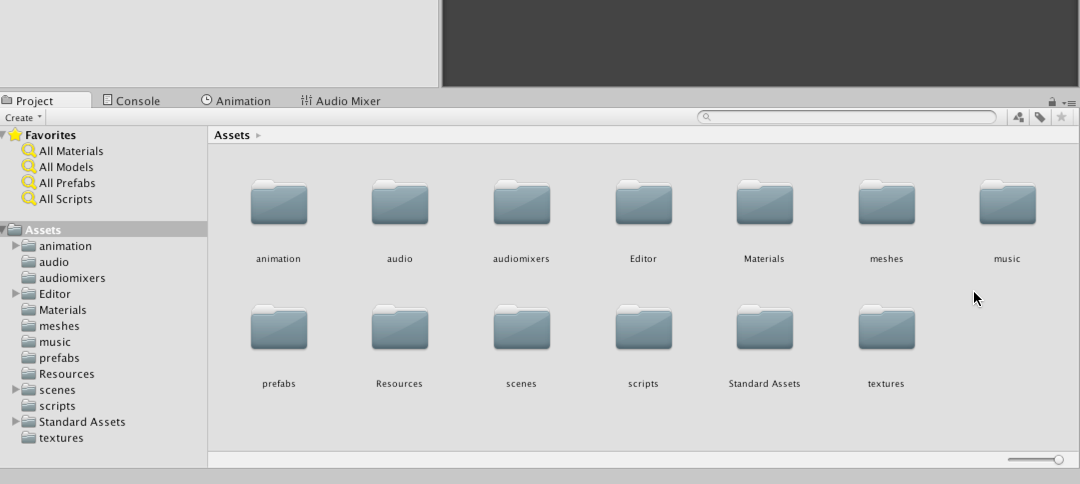
To prepare, let's create a basic folder structure in the Project panel to contain all imported assets in a systematic and organized way. The names I've used are self-descriptive and optional. The named folders are animation, audio, audiomixers, Materials, meshes, music, prefabs, Resources, scenes, scripts, and textures; feel free to add more, or change the names, if it suits your purposes:

Organizing the Project folder

Importing textures

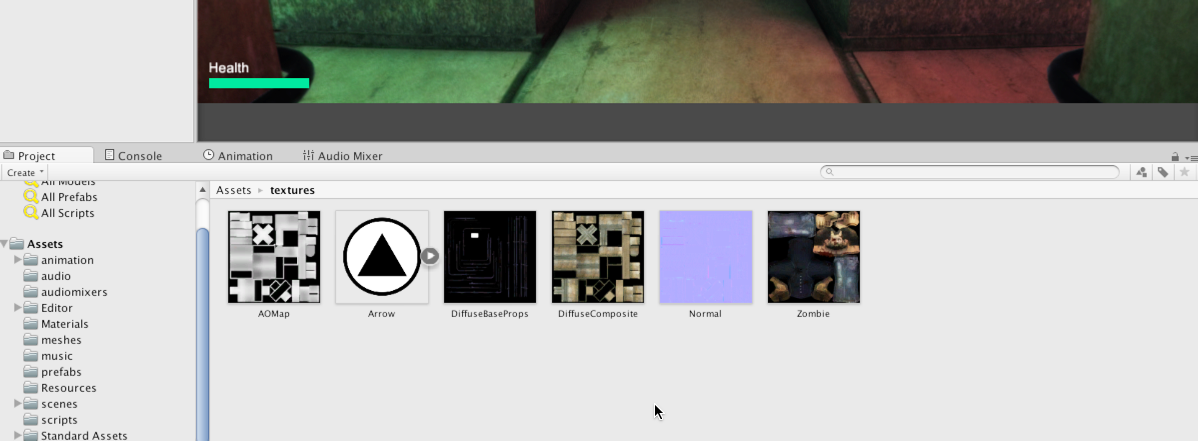
The textures folder will contain all textures to be used by the project. Most importantly, this includes textures for the NPC zombie characters (hands, arms, legs, and so on) and the modular environment set. In Dead Keys, the environment will be a dark industrial interior, full of dark and moody corridors and cross-sections. This environment will really be composed of many smaller, modular pieces (such as corner sections and straight sections) that are fitted together, used and reused, like building blocks, to form larger environment complexes. Each of the pieces in the modular set maps in UV space to the same texture (a Texture Atlas), which means that the entire environment is actually mapped completely by one texture. Let's quickly take a look at that texture:

Environment Atlas Texture

All textures for the project are included in the book companion files, in the ProjectAssets/Textures folder. These should be imported into a Unity project simply by dragging and dropping them together into the Project panel. Using this method, you can import multiple texture files as a single batch, as follows:

Importing textures into the project

By default, Unity incorrectly configures Normal Map textures as regular textures. It doesn't distinguish the texture type based on the image content. Consequently, after importing Normal Maps, you should configure each one properly. Select the Normal map from the Project panel, and choose Normal map from the Texture Type dropdown in the object Inspector; afterward, click on Apply to accept the change:

Importing and configuring Normal maps

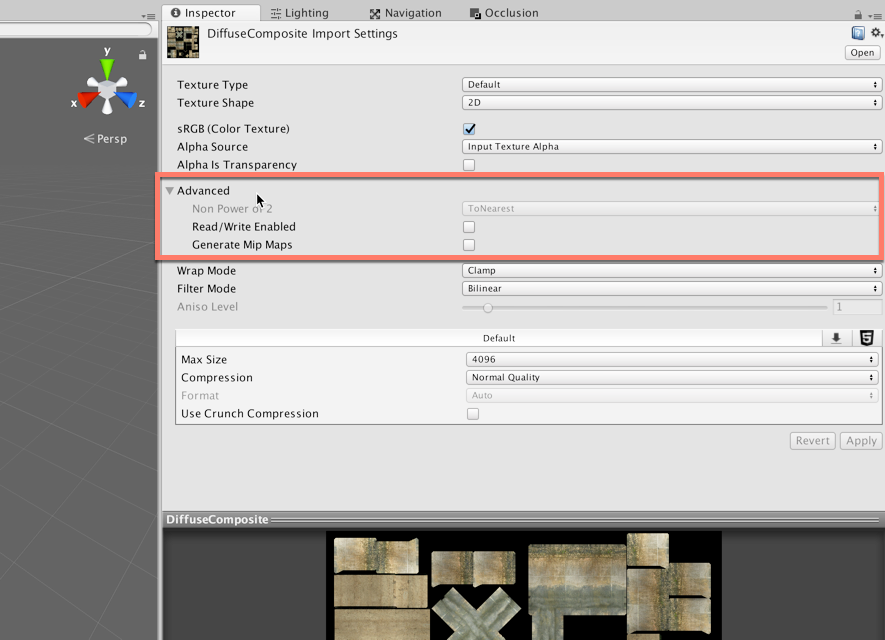
Since every mesh in the modular environment sets maps to the same texture space (corners, straight sections, turns, and so on), we'll need to make some minor tweaks to the Atlas Texture settings for best results. First, select the Atlas Texture in the Project panel (DiffuseComposite.png) and expand the Advanced Group from the Inspector object; this offers us greater control over texture settings:

Accessing advanced texture properties

To minimize any texture seams, breaks, and artifacts in the environment texture wherever two mesh pieces meet in the scene, change the texture Wrap Mode from Repeat to Clamp. Clamp mode ensures that edge pixels of a UV island are stretched continuously across the mesh, as opposed to repeated, if needed. This is a useful technique for reducing any seams or artifacts for meshes that map to a Texture Atlas.

In addition, remove the check mark from the Generate Mip Maps option. When activated, this useful optimization shows progressively lower-quality textures for a mesh as it moves further from the camera. This helps optimize the render performance at runtime. However, for Texture Atlases, this can be problematic, as Unity's texture resizing causes artifacts and seams at the edges of UV islands wherever two mesh modules meet. This produces pixel bleeding and distortions in the textures.

If you want to use Mip Maps with Atlas Textures without the risk of artifacts, you can pregenerate your own Mip Map levels, that is, produce lower-quality textures that are calibrated specifically to work with your modular meshes. This may require manual testing and retesting until you arrive at textures that work for you. You can generate your own Mip Map levels for Unity by exporting a DDS texture from Photoshop. The DDS format lets you specify custom Mip Map levels directly in the image file. You can download the DDS plugin for Photoshop online at: https://developer.nvidia.com/nvidia-texture-tools-adobe-photoshop.
Optimizing Atlas Textures

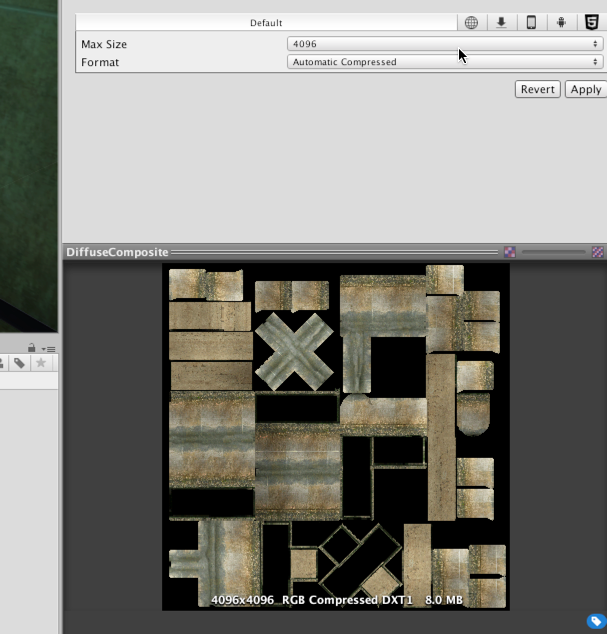
Finally, specify the maximum valid power-2 size for the Atlas Texture, which is 4096. The Format can be Automatic Compressed. This will choose the best available compression method for the desktop platform; then, click on Apply:

Applying changes to the Texture Atlas

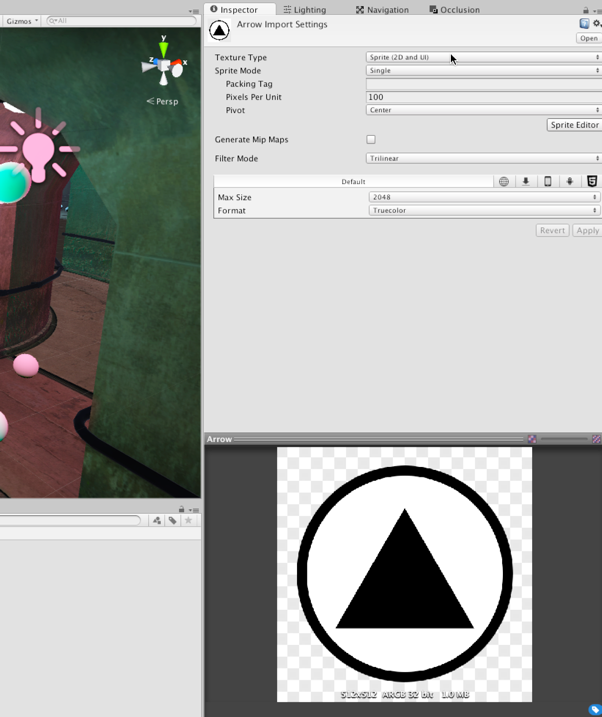
In this chapter, we'll put aside most of the UI concerns. However, all GUI textures should be imported as the Sprite (2D and UI) texture type, with Generate Mip Maps disabled. For UI textures, it's not necessary to follow the power-2 size rule (that is, pixel sizes of 2, 4, 8, 16, 32, 64, 128, 256, 512, 1024, 2048, 4096, and so on):

Importing UI textures

Importing meshes

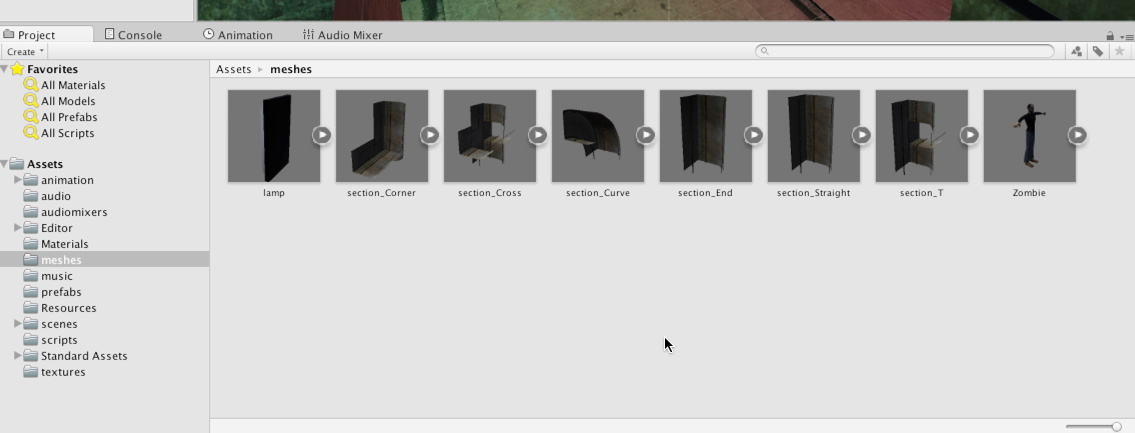
Ideally, you should import textures before meshes, as we've done here. This is because, on mesh import, Unity automatically creates materials and searches the project for all associated textures. On finding suitable textures, it assigns them to the materials before displaying the results on the mesh, even in the Project panel thumbnail previews. This makes for a smoother and easier experience. When you're ready to import meshes, just drag and drop them into the Project panel to the designated meshes folder. By doing this, Unity imports all meshes as a single batch. This project relies heavily on meshes--both animated character meshes for the NPC zombies and static environment meshes for the modular environment--as well as prop meshes and any meshes that you would want to include for your own creative flourish. These files (except your own meshes) are included in the book's companion files:

Importing meshes (both environment and character meshes)

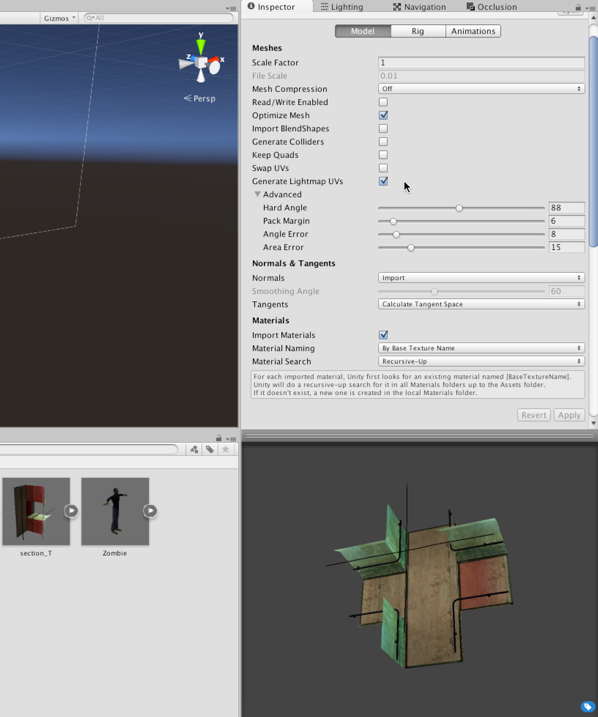
Now, let's configure the modular environment meshes. Select all meshes for the environment, including section_Corner, section_Cross, section_Curve, section_End, section_Straight, and section_T. With the environment meshes selected, adjust the following settings:

  • Set the mesh Scale Factor to 1, creating a 1:1 ratio between the model, as it was made in the modeling software, to how the model appears in Unity.
  • Disable Import BlendShapes; the environment meshes contain no blended shapes to import, and you can streamline to the import and re-import process by disabling the unnecessary options.
  • Disable Generate Colliders; in many cases, we'd have enabled this setting. However, Dead Keys is a first-person shooter with a fixed AI-controlled camera, as opposed to free roam movement. This leaves the player with no possibility of walking through walls or passing through floors.
  • Enable Generate Lightmap UVs, which generates a second UV channel. Unity automatically unwraps your meshes and guarantees no UV island overlap. You can further tweak light map UV generation using the Hard Angle, Pack Margin, Angle Error, and Area Error settings. However, the default settings work well for most purposes. The Pack Margin can, and perhaps should, be increased if your light map resolution is low, as we'll see in the next chapter. The angle and error settings should sometimes be increased or decreased to better accommodate light maps for organic and curved surfaces:
Configuring environment meshes

In addition to configuring the primary mesh properties, as we've seen, let's also switch to the Rig and Animations tab. From the Rig tab, specify None for the Animation Type field, as the meshes don't contain animation data:

Setting the Rig type for environment meshes

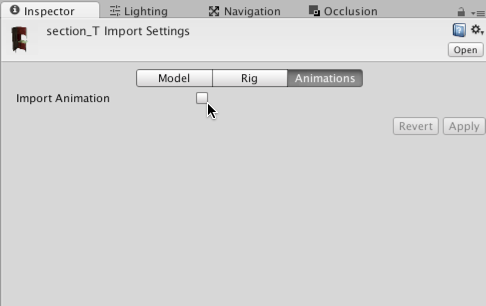
Next, switch to the Animations tab. From here, remove the check mark from Import Animation. The environment meshes have no animations to import; then, click on Apply:

Disabling Import Animation

Of course, Dead Keys is about completing typing exercises to destroy zombies. The zombie character for our project is based on the public domain zombie character, available from Blend Swap at: http://www.blendswap.com/blends/view/76443. This character has been rigged and configured in Blender for easy import to Unity. Let's configure this character now. Select the Zombie mesh in the Project panel and from the object Inspector, adjust the following settings:

  • Set the mesh Scale Factor to 1 to retain its original size.
  • Enable Import BlendShapes to allow custom vertex animation.
  • Disable Generate Colliders, as collision detection is not needed.
  • Enable Swap UVs if the texture doesn't look correct on the zombie model from the preview panel. If an object has two or more UV channels (and they sometimes do), Unity occasionally selects the wrong channel by default:
Configuring a zombie NPC

Switch to the Animations tab and disable the Import Animation checkbox. The character mesh should, and will, be animated--performing actions such as walking and attacking animations. However, the character mesh file itself contains no animation data. All character animations will be applied to the mesh from other files:

Disable Import Animation for the zombie NPC

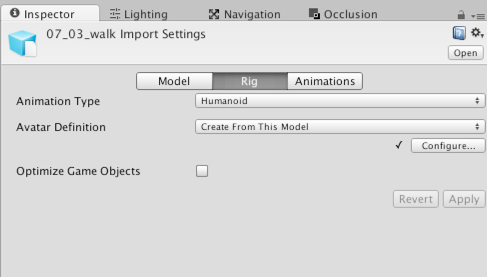
That's great! Now, let's configure the character rig for Mecanim. This is about optimizing the underlying skeleton to allow the model to be animated. To do this, select the Rig tab from the Inspector object. For the Animation Type, choose Humanoid; and for Avatar Definition, choose Create From This Model. The Humanoid animation type instructs Unity to see the mesh as a standard bipedal human--a character with a head, torso, two arms, and two legs. This generic structure (as defined in the avatar) is mapped to the mesh bones and allows Animation Retargeting. Animation Retargeting is the ability to use and reuse character animations from other files and other models on any humanoid:

Configuring the zombie rig

After clicking on the Apply button for the zombie character, a check mark icon appears next to the Configure... button. For some character meshes, an X icon may appear instead. A check mark signifies that Unity has scanned through all bones in the mesh and successfully identified a humanoid rig, which can be mapped easily to the avatar. An X icon signifies a problem, which can be either minor or major. A minor case is where a humanoid character rig is imported, but differs in subtle and important ways from what Unity expects. This scenario is often fixed manually in Unity, using the Rig Configuration Window (available by clicking on Configure...). In contrast, the problem can be major; for example, the imported mesh may not be humanoid at all, or else it differs so dramatically from anything expected that a radical change and overhaul must be made to the character from within the content creation software:

Character rig successfully configured

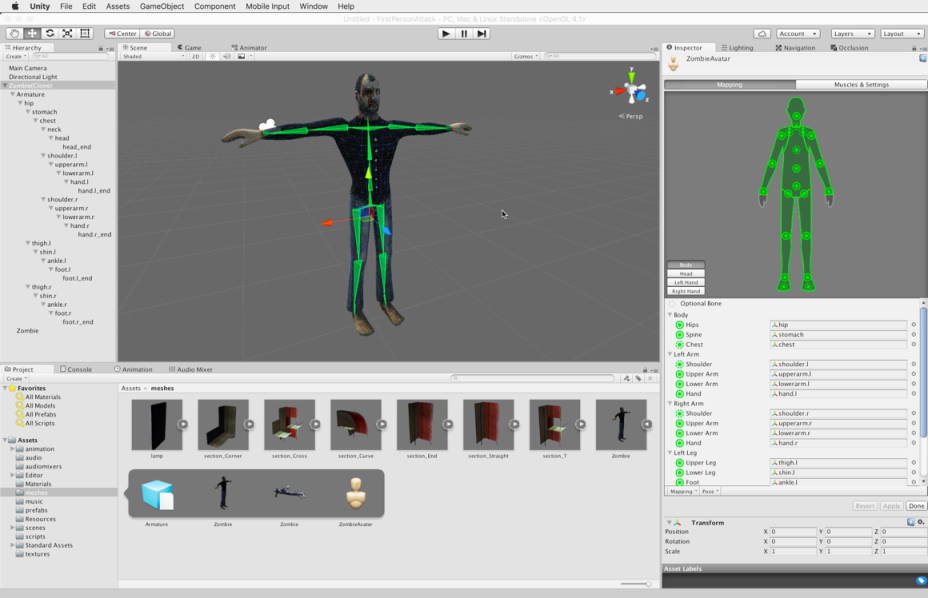
Even when your character rig is imported successfully, you should test it inside the Rig Configuration Editor. This acts as a sanity check and confirms that your rig is working as intended. To do this, click on the Configure... button from the Rig tab in the object Inspector; this displays the Rig Configuration Editor:

Using the Rig Configuration Editor to examine, test, and repair a skeleton avatar mapping

From the Rig Configuration Editor, you can see how imported bones map to the humanoid avatar definition. Bones highlighted in green are already mapped to the Avatar, as shown in the Inspector object, that is, imported bones turn green when Unity, after analysis, finds a match for them in the Avatar. The Avatar is simply a map or chart defined by Unity, namely, a collection of predetermined bones. The aim of the Rig Configuration Editor is to simply map the bones from the mesh to the avatar, allowing the mesh to be animated by any kind of humanoid animation.

For the zombie character, all bones will be successfully automapped to the avatar. You can change this mapping, however, by simply dragging and dropping specific bones from the Hierarchy panel to the bone slots in the Inspector object:

Defining avatar mappings

Now, let's stress test our character mesh, checking its bone and avatar mapping and ensuring that the character deforms as intended. To do this, switch to the Muscles & Settings tab from the Inspector object. When you do this, the character's pose changes immediately inside the viewport, which means it is ready for testing:

Testing bone mappings

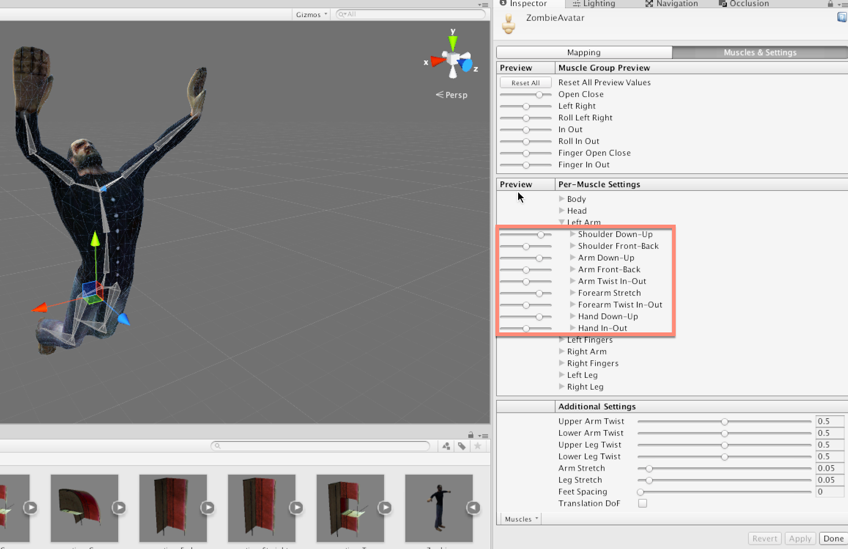
From here, use the character pose sliders in the Inspector object to push the character into extreme poses, previewing its posture in the viewport. The idea is to preview how the character deforms and responds to extremes. The reason such testing is necessary at all is that although bipedal humanoids share a common skeletal structure; they differ widely in body types and heights--some being short and small, and some being large and tall:

Testing extreme poses

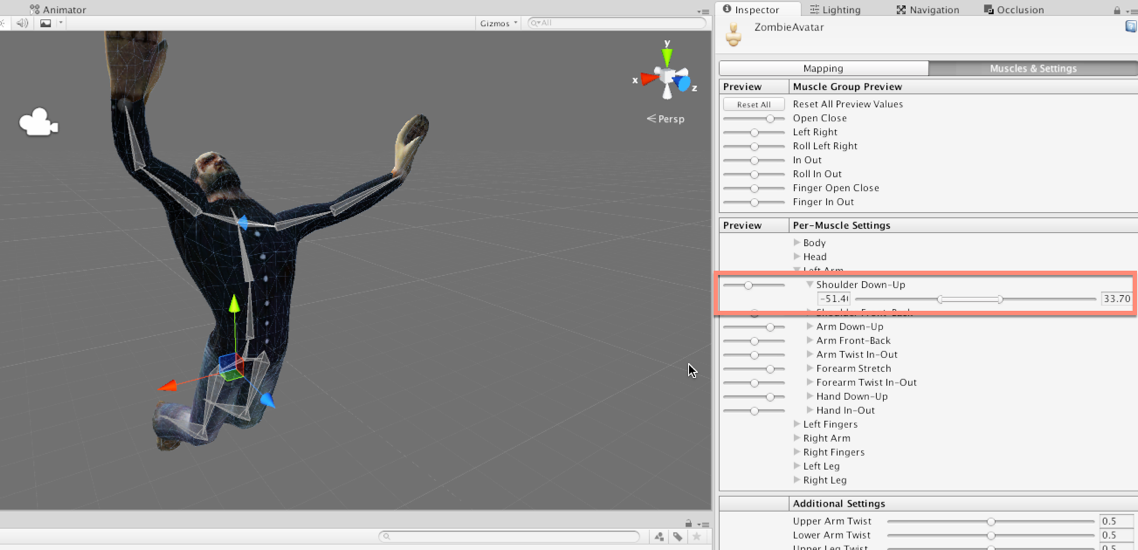
If you feel your character breaks, intersects, or distorts in extreme poses, you can configure the mesh deformation limits, specifying a minimum and maximum range. To do this, first expand the Per-Muscle Settings group for the limbs or bones that are problematic, as shown in the following screenshot:

Defining pose extremes

Then, you can drag and resize the minimum and maximum thumb-sliders to define the minimum and maximum deformation extents for that limb, and for all limbs where needed. These settings constrain the movement and rotation of limbs, preventing them from being pushed beyond their intended limits during animation. The best way to use this tool is to begin with your character in an extreme pose that causes a visible break, and then to refine the Per-Muscle Settings until the mesh is repaired:

Correcting pose breaks

When you're done making changes to the rig and pose, remember to click on the Apply or Done button from the Inspector object. The Done button simply applies the changes and then closes the Rig Configuration Editor:

Applying rig changes
Importing animations

The Dead Keys game features character animations for the zombies, namely walk, fight, and idle. These are included as FBX files. They can be imported into the Animations folder. The animations themselves are not intended for or targeted toward the zombies, but Mecanim's Humanoid Retargeting lets us reuse almost any character animations on any humanoid model. Let's now configure the animations. Select each animation and switch to the Rig tab. Choose Humanoid for the Animation Type, and leave the Avatar Definition at Create From This Model:

Specifying a Humanoid animation type for animations

Now, move to the Animations tab. Enable the Loop Time checkbox to enable animation looping for the clip. Then, click on Apply. We'll have good cause to return to the animation settings in the later chapters, for further refinement, as we'll see:

Enabling animation Loop Time for repeating animation clips

Now, let's explore a common problem with loopable walk animations that have root motion encoded. Root motion refers to the highest-level of transformation applied to an animated model. Most bone-based animation applies to lower-level bones in the bone hierarchy (such as arms, legs, and head), and this animation is always measured as relative to the topmost parent.

However, when the root bone is animated, it affects a character's position and orientation in world space. This is known as root motion. One problem that sometimes occurs with imported, loopable walk animations is a small deviation or offset from the neutral starting point in its root motion. This causes a mesh to drift away from its starting orientation over time, especially when the animation is played on a loop. To see this issue in action, select the walk animation for the zombie character, and from the object Inspector, preview the animation carefully. As you do this, align your camera view in the preview window in front of the humanoid character and see how, gradually, the character's walk deviates slowly from the center line on which he begins. This shows that, over time, the character continually drifts. This problem will not just manifest in the preview window, but in-game too:

Previewing walk cycle issues

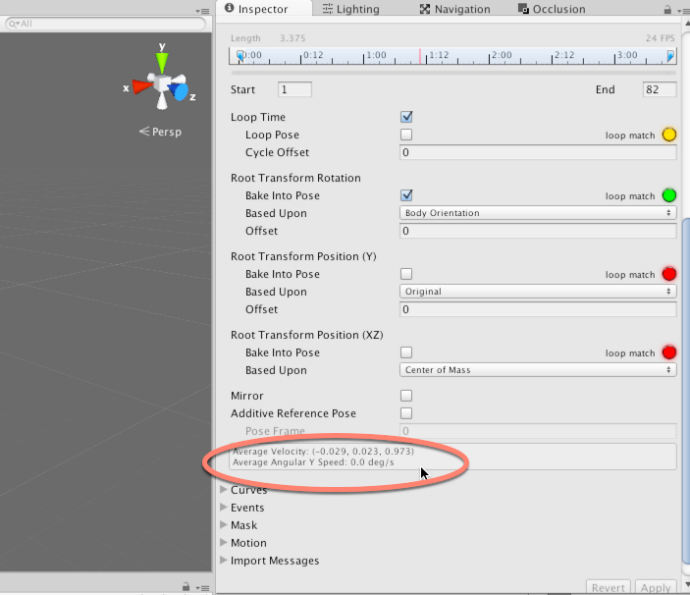
This problem occurs as a result of walk-cycle inaccuracies in root motion. By previewing the Average Velocity field in the object Inspector, you'll see that the X motion field is a non-zero value, meaning that offset occurs to the mesh in X. This explains the cumulative deviation in the walk, as the animation is repeated:

Exploring root motion problems

To fix this problem, enable the Bake Into Pose checkbox for the Root Transform Rotation section. This lets you override the Average Velocity field. Then, adjust the Offset field to compensate for the value of Average Velocity. The idea is to adjust Offset until the value of Average Velocity is reset to 0, indicating no offsetting. Then, click on Apply:

Correcting root motion

Importing audio

Let's import game audio--specifically, the music track. This should be dragged and dropped into the music folder (the music track narrow_corridors_short.ogg is included in the book's companion files). Music is an important audio asset that greatly impacts loading times, especially on mobile devices and legacy hardware. Music tracks often exceed 1 minute in duration, and they encode a lot of data. Consequently, additional configuration is usually needed for music tracks to prevent them from burdening your games:

Importing audio files
Ideally, music should be in a WAV format to prevent lossy compression when ported to other platforms. If WAV is not possible, then OGG is another valuable alternative. For more information on audio import settings, refer to the online Unity documentation at: http://docs.unity3d.com/Manual/AudioFiles.html.

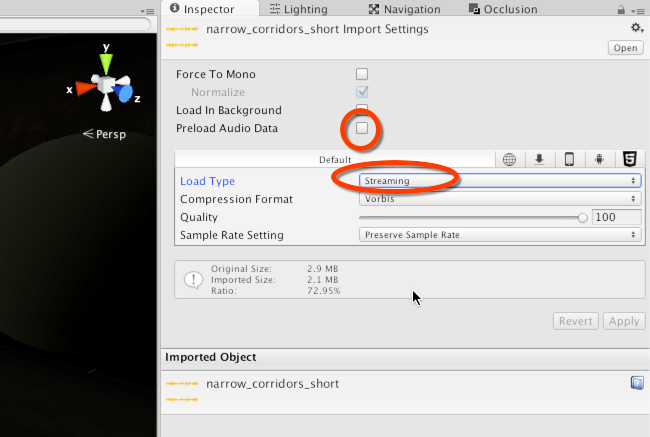
Now, select the imported music track in the Project panel. Disable the Preload Audio Data checkbox, and then change the Load Type to Streaming. This optimizes the music loading process. It means that the music track will be loaded in segments during playback, as opposed to entirely in memory from the start of the level, and it will continually load, segment by segment. This prevents longer initial loading times:

Configuring music for streaming

Configuring materials

As a final step, let's configure mesh materials for the modular environment. By default, these are created and configured automatically by Unity on importing your meshes to the Project panel. They'll usually be added to a materials subfolder alongside your mesh. From here, drag and drop your materials to the higher-level materials folder in the project, organizing your materials together. Don't worry about moving your materials around for organization purposes, Unity will keep track of any references and links to objects:

Configuring materials

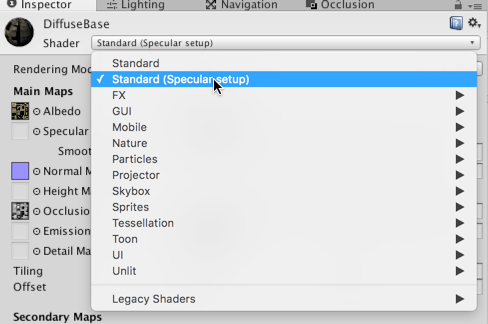
By default, the DiffuseBase material for the modular environment is configured as a standard shader material, with some degree of glossiness. This makes the environment look shinier and smoother than it should be. In addition, the material lacks a Normal Map and Ambient Occlusion map. To configure the material, select the DiffuseBase material, and set the Shader type to Standard (Specular setup):

Changing Shader type

Next, assign the DiffuseBase texture to the Albedo slot (the main diffuse texture), and complete the Normal Map and Ambient Occlusion fields by assigning the appropriate textures, as found in the textures folder:

Completing the environment material
lock icon The rest of the chapter is locked
Register for a free Packt account to unlock a world of extra content!
A free Packt account unlocks extra newsletters, articles, discounted offers, and much more. Start advancing your knowledge today.
Unlock this book and the full library FREE for 7 days
Get unlimited access to 7000+ expert-authored eBooks and videos courses covering every tech area you can think of
Renews at $19.99/month. Cancel anytime
Banner background image