Creating an Android project with Android Studio
In order to be productive in terms of building Android apps, it is essential to become confident with how to use Android Studio. This is the official integrated development environment (IDE) for Android development, built on JetBrains’ IntelliJ IDEA IDE and developed by the Android Studio team at Google. You will use it throughout this course to create apps and progressively add more advanced features.
The development of Android Studio has followed the development of the IntelliJ IDEA IDE. The fundamental features of an IDE are, of course, present, enabling you to optimize your code with suggestions, shortcuts, and standard refactoring. The programming language you will use throughout this course to create Android apps is Kotlin. Previously the standard language to create Android apps was Java.
Since Google I/O 2017 (the annual Google developer conference), this has been Google’s preferred language for Android app development. What really sets Android Studio apart from other Android development environments is that Kotlin was created by JetBrains, the company that created IntelliJ IDEA, the software Android Studio is built on. Therefore, you can benefit from established and evolving first-class support for Kotlin.
Kotlin was created to address some of the shortcomings of Java in terms of verbosity, handling null types, and adding more functional programming techniques, amongst many other issues. As Kotlin has been the preferred language for Android development since 2017, taking over from Java, you will use it in this book.
Getting to grips and familiarizing yourself with Android Studio will enable you to feel confident working on and building Android apps. So, let’s get started creating your first project.
Note
The installation and setup of Android Studio are covered in the Preface. Please ensure you have completed those steps before you continue.
Exercise 1.01 – creating an Android Studio project for your app
This is the starting point for creating a project structure your app will be built upon. The template-driven approach will enable you to create a basic project in a short timeframe while setting up the building blocks you can use to develop your app.
To complete this exercise, perform the following steps:
- Upon opening Android Studio, you will see a window asking whether you want to create a new project or open an existing one. Select Create New Project.
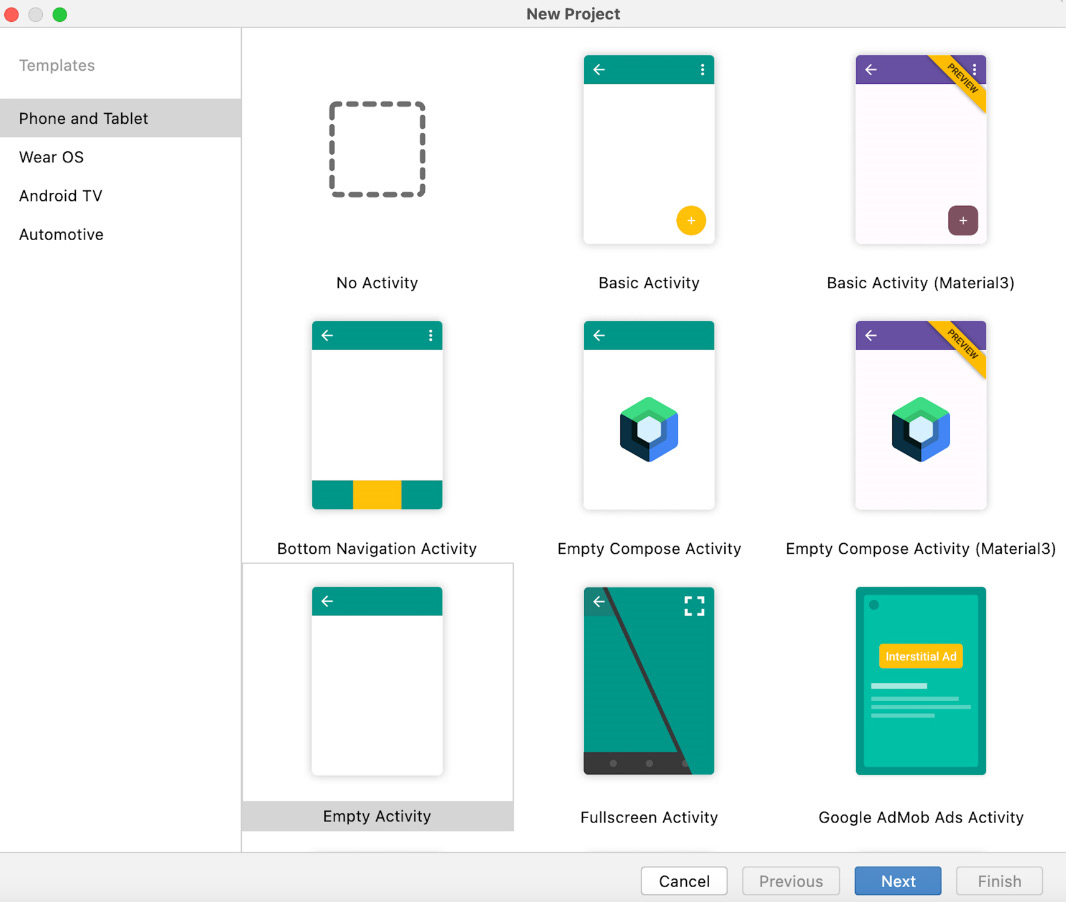
- Now, you’ll enter a simple wizard-driven flow, which greatly simplifies the creation of your first Android project. The next screen you will see has a large number of options for the initial setup you’d like your app to have:

Figure 1.1 – Starting a project template for your app
- Welcome to your first introduction to the Android development ecosystem. The word displayed in most of the project types is Activity. In Android, an Activity is a page or screen. The options you can choose from all create this initial screen differently.
The descriptions describe how the first screen of the app will look. These are templates to build your app with. Select Empty Activity from the template and click on Next.
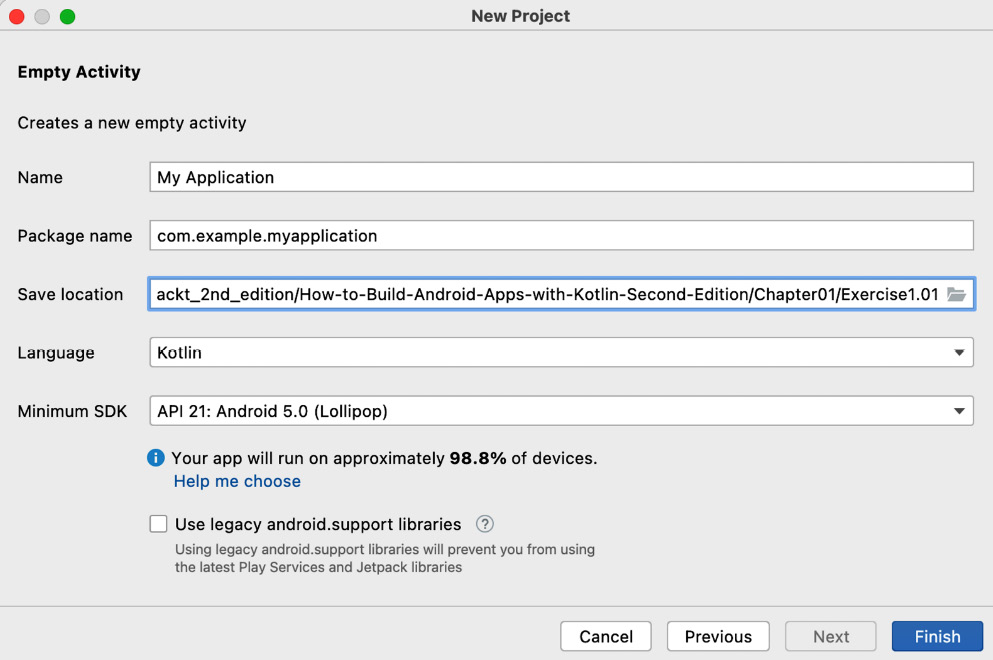
The project configuration screen is as follows:

Figure 1.2 – Project configuration
- The preceding screen configures your app. Let’s go through all the options:
- Name: Similar to the name of your Android project, this name will appear as the default name of your app when it’s installed on a phone and visible on Google Play.
- Package name: This uses the standard reverse domain name pattern to create a name. It will be used as an address identifier for source code and assets in your app. It is best to make this name as clear and descriptive and as closely aligned with the purpose of your app as possible. Therefore, it’s probably best to change this to use one or more sub-domains (such as
com.sample.shop.myshop). As shown in Figure 1.2, the Name value of the app (in lowercase with spaces removed) is appended to the domain. - Save location: This is the local folder on your machine where the app will initially be stored. This can be changed in the future, so you can probably keep the default or edit it to something different (such as
Users/MyUser/android/projects). The default location will vary with the operating system you are using. By default, the project will be saved into a new folder with the name of the application with spaces removed. This results in aMyApplicationproject folder being created. Please change this to theExerciseorActivitythat you are working on, so for this project, name the folderExercise1.01. - Language: Kotlin is Google’s preferred language for Android app development.
- Minimum SDK: Depending on which version of Android Studio you download, the default might be the same as shown in Figure 1.2 or a different version. Keep this the same. Most of Android’s new features are made backward compatible, so your app will run fine on the vast majority of older devices. However, if you do want to target newer devices, you should consider raising the minimum API level. There is a Help Me Choose link to a dialog that explains the feature set that you have access to with a view to development on different versions of Android and the current percentage of devices worldwide running each Android version.
- Use legacy android.support libraries: Leave this unchecked. You will be using AndroidX libraries, which are the replacement for the support libraries that were designed to make features on newer versions of Android backward compatible with older versions, but it provides much more than this. It also contains new Android components called Jetpack, which, as the name suggests, boosts your Android development and provide a host of rich features you will want to use in your app, thereby simplifying common operations.
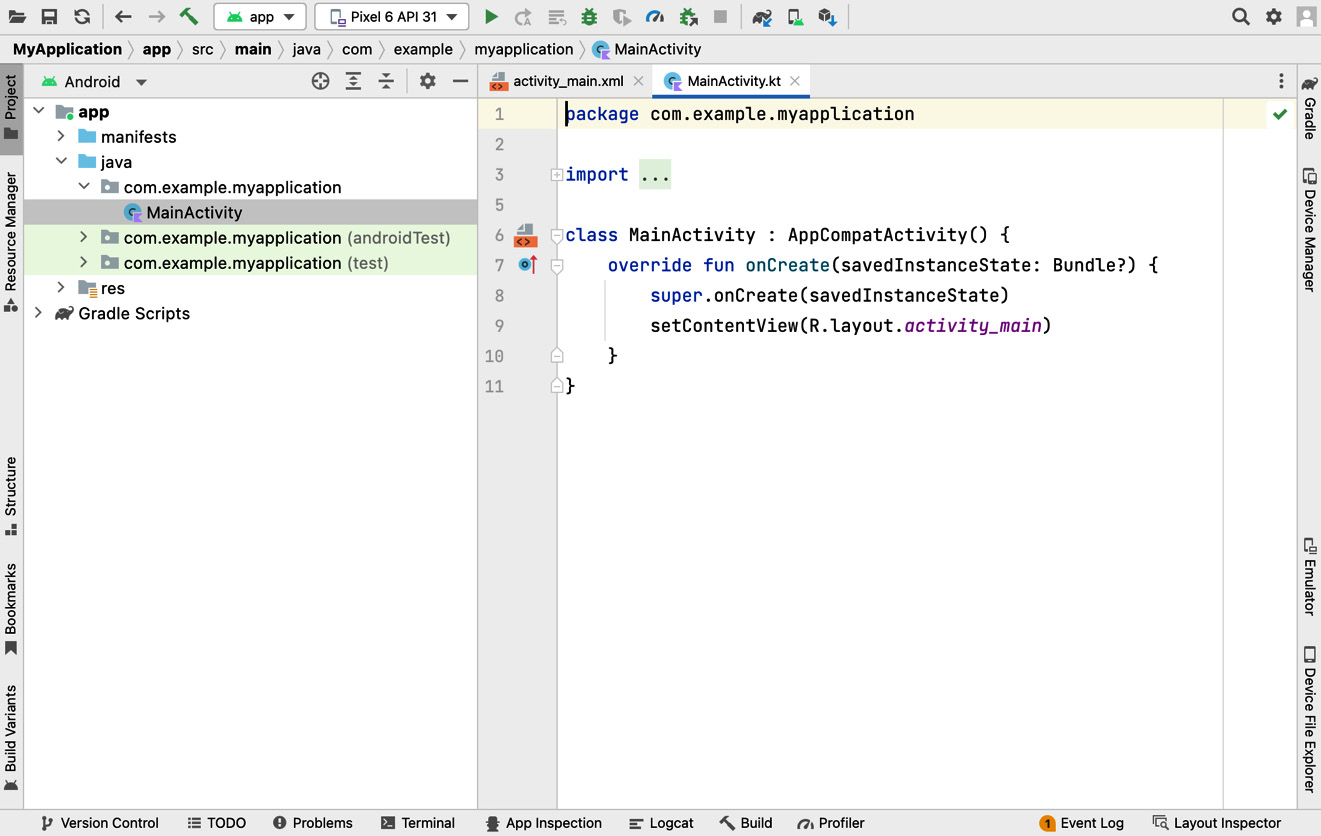
Once you have filled in all these details, select Finish. Your project will be built, and you will then be presented with the following screen or similar. You can immediately see the activity that has been created (MainActivity) in one tab and the layout used for the screen in the other tab (activity_main.xml). The application structure folders are in the left panel:

Figure 1.3 – Android Studio default project
In this exercise, you have gone through the steps to create your first Android app using Android Studio. This template-driven approach has shown you the core options you need to configure for your app.
In the next section, you will set up a virtual device and see your app run for the first time.


