Sliding in Trim Mode
Like Slipping, Sliding is part of the trimming set of features. Sliding allows you to move one or more segments (shots) earlier or later in the Sequence. In other words, Sliding let's you move one or more shots to the left or to the right in the Sequence.
After the list of steps, there is an example to illustrate what Sliding is doing and how it might be used.
There are four methods available to enable Sliding (also known as Slide Mode). Let's take a look at each:
Method 1 is to Lasso while in Trim Mode or Source/Record Mode:
First, if you're unfamiliar Lassoing, it is discussed in more detail in this appendix in the Enabling and configuring the trimming tools recipe.
In this instance, you'll be pressing both the Shift key + option/Alt key at the same time as lassoing a very specific direction: from right to left around a Segments(s). You can lasso around just a video segment, or just the audio segment(s), or you can lasso both the video and the audio that goes with it/them if they need to stay in sync. The next screenshots show Shift + option/Alt + lassoing the SAMMY video segment and then the resulting Slide configuration of the Trim Rollers after lassoing.

Method 2: While already in Trim Mode, here are the steps:
i. Enter Trim Mode at any transition.
ii. For the Segment (shot) you want to Slide, place the cursor at one of its transitions, either the head or the tail (see the next screenshot). For emphasis, place the cursor either where a Trim Roller already exists, or where it would appear if one was there.
iii. Pay close attention to the cursor icon. Make sure that the little piece of film that extends from the roller is facing the Segment you want to Slide. In the next screenshot, the Trim Roller icon is set up for the KATIE shot.

iv. When the cursor's icon is facing the Segment you want to Slide, then double-click. This will initially place you into Slip Mode (also known as Slipping).
v. Without changing the position of your cursor, double-click again. This will place you into Slide Mode (also known as Sliding).
vi. If you need to select an additional segment(s) in order to stay in sync, for example, you've initially entered Slide Mode on the video segment but now want to include the audio segment(s) that belongs with it, you can either Shift + double-click as you did with the first Segment, or you can enable the required Track Selectors.
Method 3 is to perform Shift + click method to configure the Trim Rollers while already in Trim Mode:
The Shift + click method to configure the Trim Rollers is explained earlier in this appendix in the Enabling and configuring the trimming tools recipe
Method 4: While you are in Trim Mode, right-click on a Segment and, from the menu that appears, choose Select Slide Trim.
Now that you know how to enable Sliding, let's take a closer look at the Trim Rollers and the Four Image Display when Sliding.
The Rollers – frequently, people will describe Sliding as when the Trim Rollers are on the outside of the segment (see the next screenshot). Rather than saying that the rollers are on the outside, I prefer to point out that the rollers are touching the adjacent segments. The idea here is that whatever shots the Trim Rollers are touching are the shots that are being made longer or shorter while the shot(s) between the rollers get shifted (Slid) either to the left or to the right. When you Slide, it's as if the shot(s) between the rollers are on a moving conveyor belt. For emphasis, in the next screenshot, we can see that the Trim Rollers are touching the Segments (shots) labeled as MIKE and SAMMY. Therefore, the Segments that we will be Sliding are labe led as LEAH and KATIE.
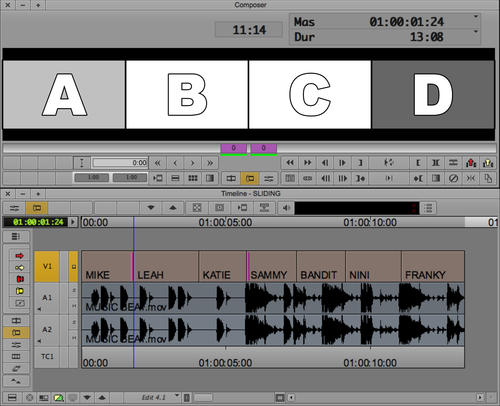
The Four Image Display (see the next screenshot) – when you're Sliding a video segment(s), Media Composer will display four images. In the next screenshot, I've set up to Slide two shots, the LEAH and KATIE shots. The four images in the display are the following:
A is the last frame of the Mike shot
B is the first frame of the Leah shot
C is the last frame of the Katie shot
D is the first frame of the Sammy shot
As you're Sliding, it will be images A and D that will change, since those are the shots that are being trimmed.

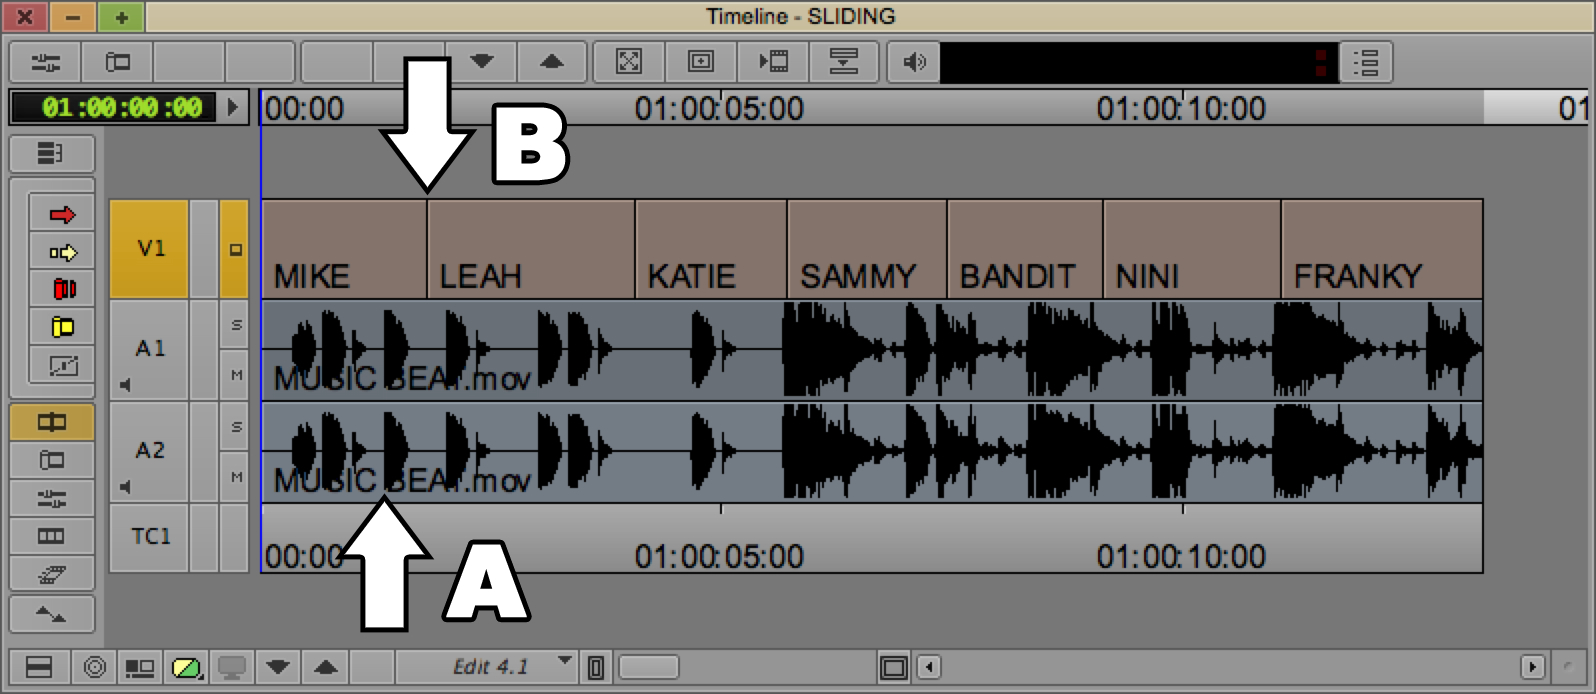
What's happening – First, when you Slide, you are not changing the duration of the shot(s) that you are moving in your Sequence (in this example, LEAH and KATIE). What you are doing, however, is lengthening and shortening the adjacent shots (MIKE and SAMMY). The next screenshot will take you through an example:

The previous screenshot illustrates a situation where there is a distinct drum beat in the music (arrow A). Arrow B points to the transition between shots that we'd like to have occur at the same time as the drum beat. After more closely examining the Sequence, we decide that we want to slide not just the LEAH shot, but also the KATIE shot that comes right after it.
Here are the steps:
Press Shift + option/Alt and lasso from right to left around both the LEAH and KATIE video segments.
Use the Trim Keys (or any trimming method you prefer) to shift (Slide) the LEAH and KATIE segments to the left until the transition syncs with the drum beat.
The next screenshot shows the LEAH and KATIE shots after they have been shifted (Slid) to the left (earlier in the Sequence). The arrows show that the transition and the drum beat now occur at the same time. The results to the shots are as follows:
Shot A (MIKE) is now shorter
Shots B and C (LEAH and KATIE) are the same duration, but now occur earlier in the Sequence
Shot D (SAMMY) is now longer


