Debugging source code using breakpoints
Breakpoints are used to notify the debugger to pause execution of the program at a certain line. The debugger stores the information of the line number and source code file inside the PDB file (known as the program database). The program built in the debug mode will have more information in the PDB file than the one in the release mode. Visual Studio reads the PDB file and pauses/resumes debugging based on the Halt statement it finds during the execution of the program.
How to do it...
Now let's create our first source code and try out debugging for the first time:
- Click on the left-hand sidebar of the code or press F9 on the keyboard being on the line where you want to pause execution of the program. The whole line will be colored in a dark red border (in general) with a red circle on the sidebar.
- Press F5 on the keyboard to start the program in the debug mode.
- As soon as the program gets started, it will break at the point where the breakpoint is hit. Let's suppose we put a breakpoint on the first line of the
Mainmethod where theTestClassis instantiated:
In the preceding screenshot, the red dot on the left-hand sidebar shows the breakpoint. The yellow block indicates the hit of the breakpoint. When you put the breakpoint on a line, the line is turned red by the IDE, and the current line is marked using a yellow block as shown with a small arrow on the left-hand side pane.
- Press F10 to skip the line and move to the next line.
- Press F11 to initiate the
PrintMessagemethod. Press F11 a couple more times to move to the actual calculation. - Inspect each and every line of the code to identify your bug (if any).
- To continue executing the program, press F5 again; the program will continue executing the rest of the code until it either finds another breakpoint on the code during its execution path or the program finishes execution.
How it works...
The debugger is a tool attached with the Visual Studio IDE that works in the background and inspects execution of the program. It holds a database of all the debug-related information and stores it in a program database file. The Visual Studio debugger stores the checksum of the file associated with the debugger, its full path, the line number, and the number of characters of the file. When we create a breakpoint in the file, the information gets stored on the PDB file or sometimes in the memory, and this will get evaluated when the program is running under the debug mode.
The debugger cannot work in certain situations when the debug information related to the file is invalid (when file checksum fails) or does not exist. For instance, say you have compiled the executable in a different source other than the one you are debugging with. In this case, Visual Studio is capable of determining whether the source code and the process running are the same.
There's more...
Now let's look at how to take advantage of breakpoints in the Visual Studio IDE.
Changing the execution step while debugging
The Visual Studio debugger is very smart and capable of doing a lot of things. You can change the execution path directly inside the debugger by not executing a certain line of the code or executing a certain line more than once.
While you are at the breakpoint, you can right-click on any line inside the IDE and select Set Next Statement or use Ctrl + Shift + F10 to move the debugger to that line, as shown in the following screenshot:

You can also drag the cursor of the current line using the mouse to move the cursor to any line in the code.
If you choose Run to Cursor from the right-click menu instead of Set Next Statement, the debugger will execute the lines in between and stop at the line that you select. If the line you select does not belong to the following execution of code, it will finish execution in regular course.
Labeling a breakpoint
When working with a large project, there are situations when you need to label your breakpoints for better management and categorization such that you can enable/disable a certain group of breakpoints depending on your requirements. Let's put some breakpoints on the code and start debugging using F5 from the keyboard. The program will stop at the line where the first breakpoint is set, as shown in the following screenshot. Navigate to Debug | Windows | Breakpoints or press Ctrl + D + B.

A window will appear that will show all the breakpoints you have set in the code. In the preceding screenshot, you can see TestClassLabel. Now, let us right-click either on the breakpoint in the code or in the Tool window and select Edit labels, as shown in the following screenshot:

The command will pop up the Edit breakpoint labels dialog box, which lists all the labels and allows you to create a new label. Initially, it will be blank, but as you create more labels, the list will fill up. Once you have created the labels, you can choose any of the labels associated with the current breakpoint. You can also choose multiple breakpoints to select a label. Once you have selected the label for all the breakpoints individually, you can search in the Search box of the Breakpoints tool window to filter breakpoints from the list.
It is important to note that labels play a very important role in naming a breakpoint. When dealing with large projects, it will be really easy to manage breakpoints with labels to identify exactly which breakpoint it shows. The label is an alias to a breakpoint.
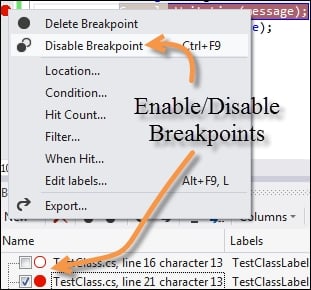
The breakpoint window also allows you to enable/disable an existing breakpoint. For instance, you can uncheck a breakpoint to disable the breakpoint in the actual code. Even though the breakpoint exists in the code, it is marked as disabled, and hence the program will not halt at that point.

The preceding screenshot shows how to disable a breakpoint from the right-click menu. It can also be accessed using Ctrl + F9.
Adding a condition in breakpoints
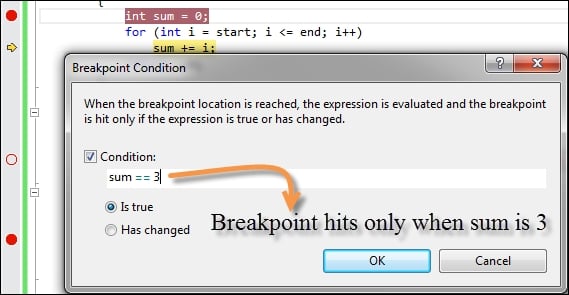
Breakpoints can hold conditions and often come in handy when used in the iteration of a list or numeric value. Putting a halt inside an iteration means redundant breakpoints, and when the problem arises on a certain index of the loop, it is very hard to catch the exact value of the index. Conditions can help in putting a break only when a certain precondition is met. The conditional break allows placing an expression based on the current context and breaks only when the condition is met.
Right-click on the breakpoint either in the tool window or on the sidebar pane where the red breakpoint icon is shown and select a condition, as shown in the following screenshot:

You can declare a local variable using the Watch window and use it in the conditions. The IDE validates the condition and stores it in the PDB file. The textbox that appears is also capable of showing the IntelliSense menu inside it to enhance condition writing.
The two radio buttons indicate what needs to be considered from the condition. If the condition returns a Boolean value, we choose the option Is true; otherwise, we choose Has changed, where the condition can be anything.
Note that after choosing a condition, the red breakpoint icon will show a plus symbol, which indicates that it is conditional.
Exporting breakpoints
Visual Studio allows you to import/export breakpoints. If many developers are working on the same code, you can share the breakpoints that you have created in one project with others or save it. So, if you have breakpoints organized with labels, everything is exported to a file that can be used later, as shown:

The file is actually an XML file, which produces XML content of all the breakpoints. A breakpoint, once exported, can be imported back again by choosing the Import Breakpoint button on the Breakpoint tool window.
Note
Remember, breakpoints are created inside a .suo (Solution User Option) file, but the actual program halts are written inside the PDB file. Thus, while running the program from inside vshost, if PDB is not found, the file cannot hit the breakpoints even though the breakpoints exist on the IDE.
Breakpoint hit counters
A breakpoint hit counter is used to determine how many times a breakpoint has been hit on a particular line. Sometimes, it is needed to halt a program only when a certain number of breakpoints have already been hit. Consider a situation where you are iterating with a large number of loops. In these cases, we can configure the breakpoint to stop only when the number of hits it encounters reaches a threshold, as shown in the following screenshot:

In the preceding screenshot, you can see the breakpoint hit count box, which is opened by right-clicking on the breakpoint and selecting Hit Count. The default setting is Break always but we can configure it to hit on a counter or a multiple of a counter, or even greater than equal to a counter.
Adding tracepoints while debugging
As a default, when a breakpoint is hit, it will halt the execution of the program and pause it until we run the program again. But when the application is pretty large, you may want to continue the program and either run a macro when the breakpoint is hit or invoke a trace method. The breakpoint in such cases is called a tracepoint. To open the tracepoint window, right-click on a breakpoint and select When Hit.

Notice that we print the function name, thread ID, and thread name when the breakpoint is hit. The tracepoints can print items on the output window based on the options listed on the window. Keywords such as $ADDRESS, $CALLER, and so on specified on the window provide macros that evaluate the specific context. After you place a tracepoint, the breakpoint identifier in the left-hand side of the screen will appear as a red diamond instead of a circle.
If you choose Continue execution, it means the macro that we selected will be executed without stopping the code execution.
Filtering breakpoints
Breakpoint filters allow you to specify any additional criteria of the breakpoint. With filters applied, you can specify the breakpoint to hit only for a specific machine, or a specific process or a thread. This is often required if you are executing your program several times with a different process ID each time and want to debug only on a certain process ID.

In the preceding screenshot, we filter the breakpoints based on the name of the computer and the process ID. The search box allows you to type in text and, based on the input, the window will filter all the breakpoints that match the labels of the searched string.
Note
The information about the breakpoint is stored inside the .suo files in the IDE, but the implementation is produced when MSBuild builds the project. While debugging an application, if the source code isn't available but PDB is, the IDE opens the code disassembly to break.


