Unwrapping the mesh
Now that we understand a little bit about what UV maps are, and why getting them right is important, we can learn how to actually unwrap a mesh. To unwrap a mesh, we start by marking the edges we want to split our mesh along. To do this, follow these steps:
- Start by selecting the edge we want to split. Next, press Ctrl + E to open up the Edge menu and select Mark Seam from the dropdown, as shown in Figure 4.31:
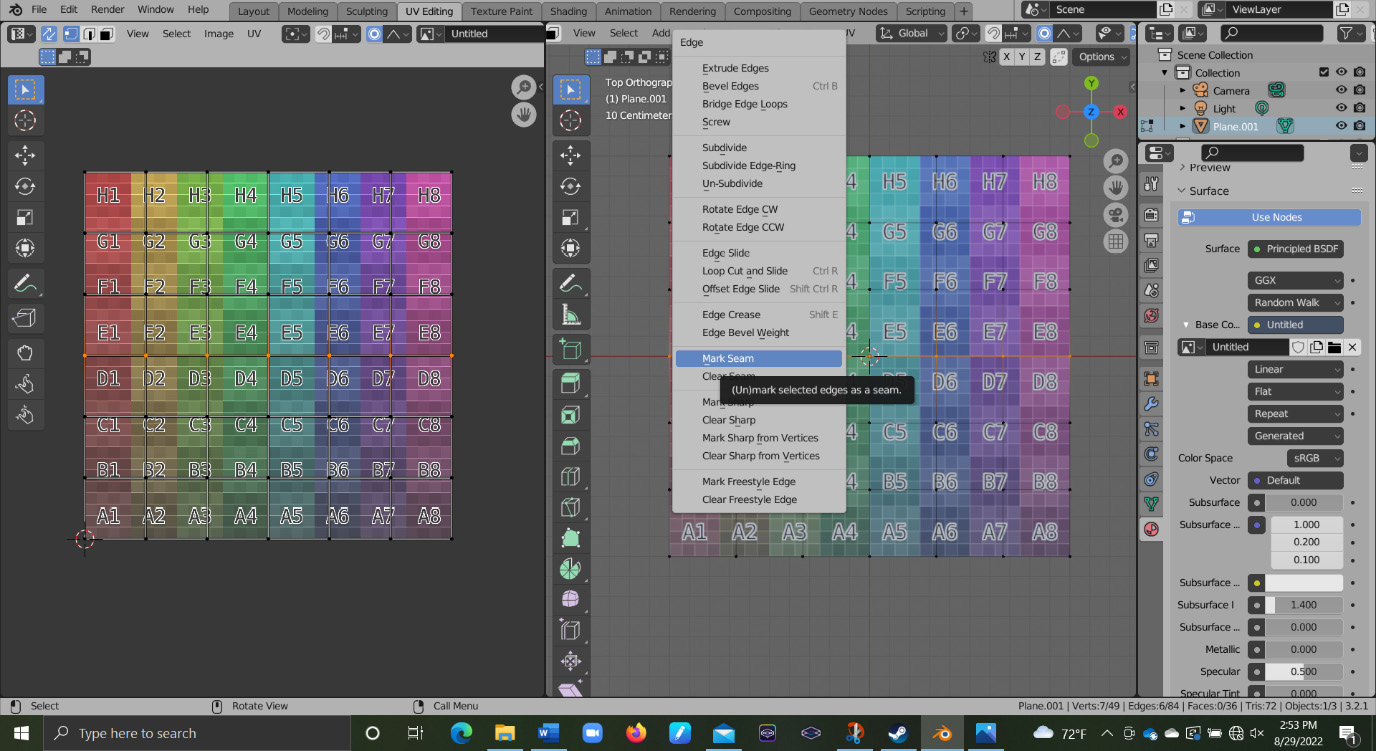
Figure 4.31 – Mark Seam option
After marking the seam, a red line should appear along the selected edge, as in Figure 4.32:
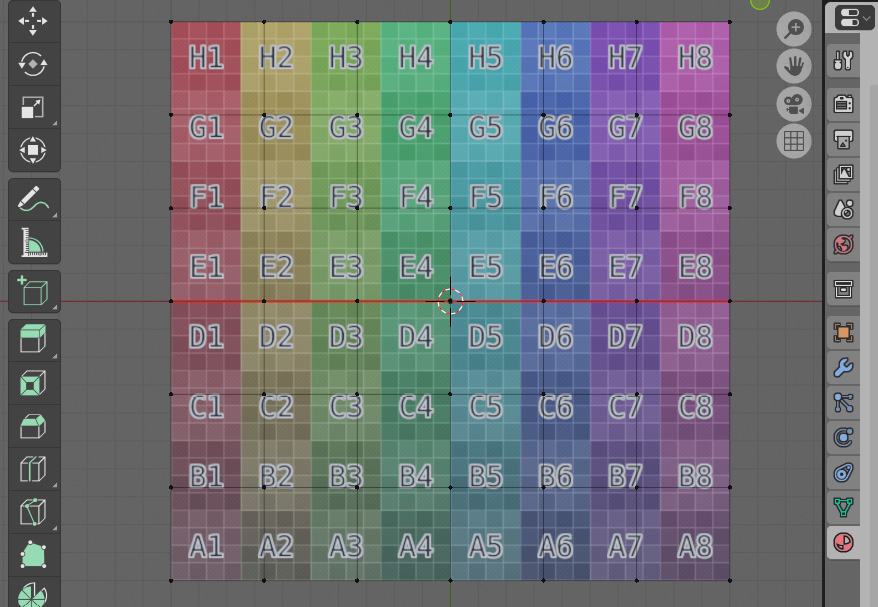
Figure 4.32 – Marked seam for unwrapping
- This seam shows where our model will split when unwrapping. To unwrap, we start by selecting our whole mesh with A. With everything selected, we can press U. This brings up the UV Mapping tab, as shown in Figure 4.33:
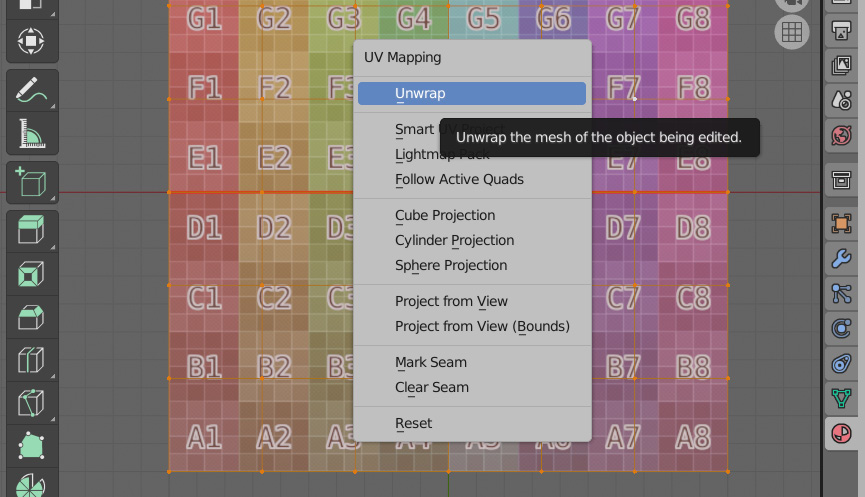
Figure 4.33 – UV Mapping tab
This is the menu that allows us to decide how we want to unwrap our mesh. When manually marking and unwrapping our mesh, just pressing Unwrap at the top of the dropdown is what we want to do. After we unwrap our mesh, we can see it in the UV editor and viewport in Figure 4.34:
Figure 4.34 – Unwrapped mesh
You will notice in our viewport that we still have our red line indicating where we marked our mesh, and in the UV editor, we have two sections indicating the split. Next, we are going to look at a more complex mesh and see how we would approach unwrapping that. A good rule of thumb to start with is to keep our seams on corners, creases, or the intersections of grids.
Our two major objectives when unwrapping are to hide seams and reduce warping when unwrapping to 2D. You will likely recognize the model in Figure 4.35, as we have used this shape a few times now:
Figure 4.35 – A complex model being used for unwrapping
This is going to be the model we will try to unwrap for the first time. To start, we are going to look at that first rule and unwrap where the two grids intersect. If we look at Figure 4.36, we can see where the grid from the T shape and the cylinder of the leg intersect:
Figure 4.36 – Selected edges at the intersection of the leg and hip
While this is where the two grids intersect, we are not actually going to put our seam right on this intersection. That is because there is not a good crease or corner at that intersection to actually put our seam to try and blend it in. So instead, we are going to move our seam to the actual joint of the two shapes. As a recap, to mark the seam, we should go through the following steps:
- Select our seams in Edit Mode.
- Press Ctrl + E to open up the Edge menu.
- Navigate down to the Mark Seam option.
- After selecting that, the Edge menu should close and you should have seams as shown in Figure 4.37:
Figure 4.37 – Seams added to the model
With our seams in place, we can now try to unwrap our mesh for the first time. To UV unwrap the mesh, follow these steps:
- Select the whole mesh in Edit Mode.
- Press U to open up the Unwrap menu.
- Select Unwrap from the top of the list.
With our mesh unwrapped, it should look like Figure 4.38:
Figure 4.38 – Unwrapped mesh for our model
You will notice that the unwrap is severely warping our mesh even though we unwrapped around the intersections of the grids. That is because after separating our grids, we still need to unwrap those individual grids so that they will unwrap as close to a normal flat grid as possible.
To start with, we can use the UV editor to help us mark seams. To do this, make sure you have the UV Sync Selection option enabled, as in Figure 4.39:
Figure 4.39 – Enabling the UV Sync Selection option
This is the option that syncs selections between the viewport and UV editor. This makes it a bit easier to see what edges we are selecting to get marked. In the UV Editing tab, select one of the loops along each of the legs that we separated with our last seams. Make sure that these seams are matching on either side. We are also going to try and hide them as much as possible, so we can tuck them on the inside so that they are harder to see. Figure 4.40 shows what this selection looks like in the viewport and the UV editor.
Figure 4.40 – Selected seams in the UV editor
With our edges selected, we can press Ctrl + E and mark our seams and then unwrap with U. Now, our legs should be nicely unwrapped into normal grids, and our pattern hardly looks warped on the legs. Next, we need to do the T section in the middle. To get this to play flat, we are going to have to mark at least two of the three connections forming the shape. In Figure 4.41, you can see one of these selections.
Figure 4.41 – Marking two connections
Again, we are going to mark our seams with Ctrl + E, then unwrap the mesh with U. With our mesh unwrapped using these new seams, we can see the final unwrap in Figure 4.42.
Figure 4.42 – Final unwrap after using new seams
Now, when we look at our mesh in Object Mode with a texture applied, nothing is terribly warped, and all of our seams are as hidden as they can be if we are going to unwrap like this. Another method to unwrap this shape is along the sewn seams that clothing would have.
This requires our topology to have edges that also follow the clothing seams. For a normal pair of pants, there are usually four major seams that hold the pants together. These seams run up the inside, outside, and crotch of the pants. You can see these seams marked in Figure 4.43.
Figure 4.43 – Seam mapping
When we unwrap the mesh, it should look something like Figure 4.44:
Figure 4.44 – Unwrapped model
This mesh also has minimal warping to the texture on the mesh and displays the grid nicely on the mesh. We can take a closer look at the quality of our unwraps by introducing a new tool in the next section.