Search icon CANCEL
Subscription
0
Cart icon
Your Cart (0 item)
Close icon
You have no products in your basket yet
Save more on your purchases! discount-offer-chevron-icon
Savings automatically calculated. No voucher code required.
Arrow left icon
Explore Products
Best Sellers
New Releases
Books
Videos
Audiobooks
Learning Hub
Free Learning
Arrow right icon
Arrow up icon
GO TO TOP
Real-Time Animation with Adobe Character Animator

You're reading from   Real-Time Animation with Adobe Character Animator Animate characters in real time with webcam, microphone, and custom actions

Arrow left icon
Product type Paperback
Published in Dec 2022
Publisher Packt
ISBN-13 9781803246949
Length 302 pages
Edition 1st Edition
Concepts
Arrow right icon
Author (1):
Arrow left icon
Chad Troftgruben Chad Troftgruben
Author Profile Icon Chad Troftgruben
Chad Troftgruben
Arrow right icon
View More author details
Toc

Table of Contents (19) Chapters Close

Preface 1. Part 1: Preparing Character Art for Rigging
2. Chapter 1: What You Need to Know Before Rigging and Animating FREE CHAPTER 3. Chapter 2: Comparing Adobe Character Animator to Other Animation Apps 4. Chapter 3: Preparing a Character Rig in Photoshop 5. Part 2: Rigging Character Art for Animation
6. Chapter 4: Importing and Tagging Your Character 7. Chapter 5: Creating Control Handles and Behaviors 8. Chapter 6: Physics, Behaviors, and Meshes 9. Chapter 7: Assigning Mouths and Props with Triggers and Swap Sets 10. Chapter 8: Refining Layers and Exploring Optional Rig Features 11. Part 3: Animating and Refining Your Scene
12. Chapter 9: Working with Preset Actions 13. Chapter 10: Animating a Simple Sequence 14. Chapter 11: Rearranging, Polishing, and Enhancing Our Sequence 15. Chapter 12: Exporting, Editing, and Sharing Your Character Animator Sequence 16. Chapter 13: Additional Character Animator Tools and Features 17. Index 18. Other Books You May Enjoy

Refining animation with meshes

As we continue to add handles to create behaviors, we are actually altering a mesh that was automatically created when we imported the .psd file. While we can’t do much to alter this mesh beyond this, it allows us to see how Character Animator is interpreting the bends and flexibility of the layers. To see this, follow these steps:

  1. Go to the Rig tab.
  2. To view the mesh, locate the Mesh buttons under the rig. They are to the right of the Show Rigging Issues button, which is the triangular icon with an exclamation point.
Figure 6.12: The right mesh button will show an outline, while the left will reveal the entire mesh

Figure 6.12: The right mesh button will show an outline, while the left will reveal the entire mesh

  1. Click on the left mesh button (labeled Show Mesh). This will show us every part of the mesh on the rig.
  2. Now click on the Front Arm layer. You should see the mesh being more defined by the handles, especially since we added sticks in the previous chapter.
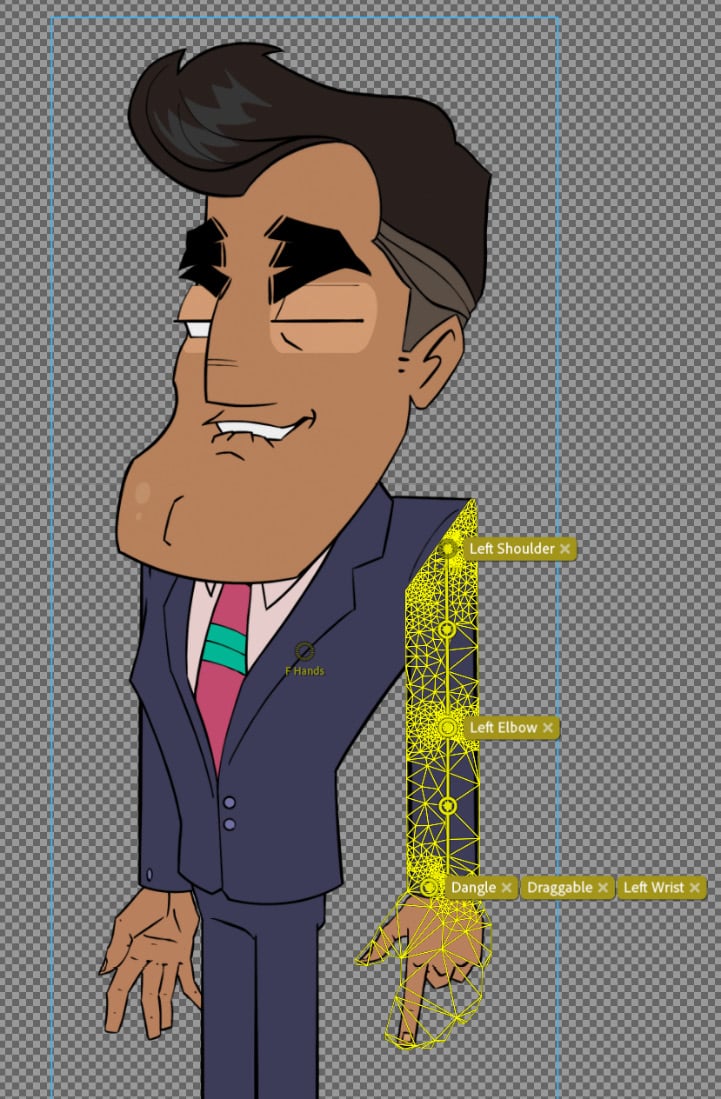
Figure 6.13: The mesh is tighter around the bends due to the sticks we added
...
lock icon The rest of the chapter is locked
Register for a free Packt account to unlock a world of extra content!
A free Packt account unlocks extra newsletters, articles, discounted offers, and much more. Start advancing your knowledge today.
Unlock this book and the full library FREE for 7 days
Get unlimited access to 7000+ expert-authored eBooks and videos courses covering every tech area you can think of
Renews at $19.99/month. Cancel anytime
Banner background image