Let's take a look at the device portal. Each HoloLens has a built-in web server that serves up pages that tell you things about your device and the state it is in. This can be very useful, as the device itself will give almost no information beside the fact that the network it is connected to, the volume of the sound, and the battery level. The portal gives a lot more information that can be very useful. Besides that, the portal also gives a way to see what the user is seeing, through something called Mixed Reality Capture; we will talk more on that later.
The device portal
Overview of the portal
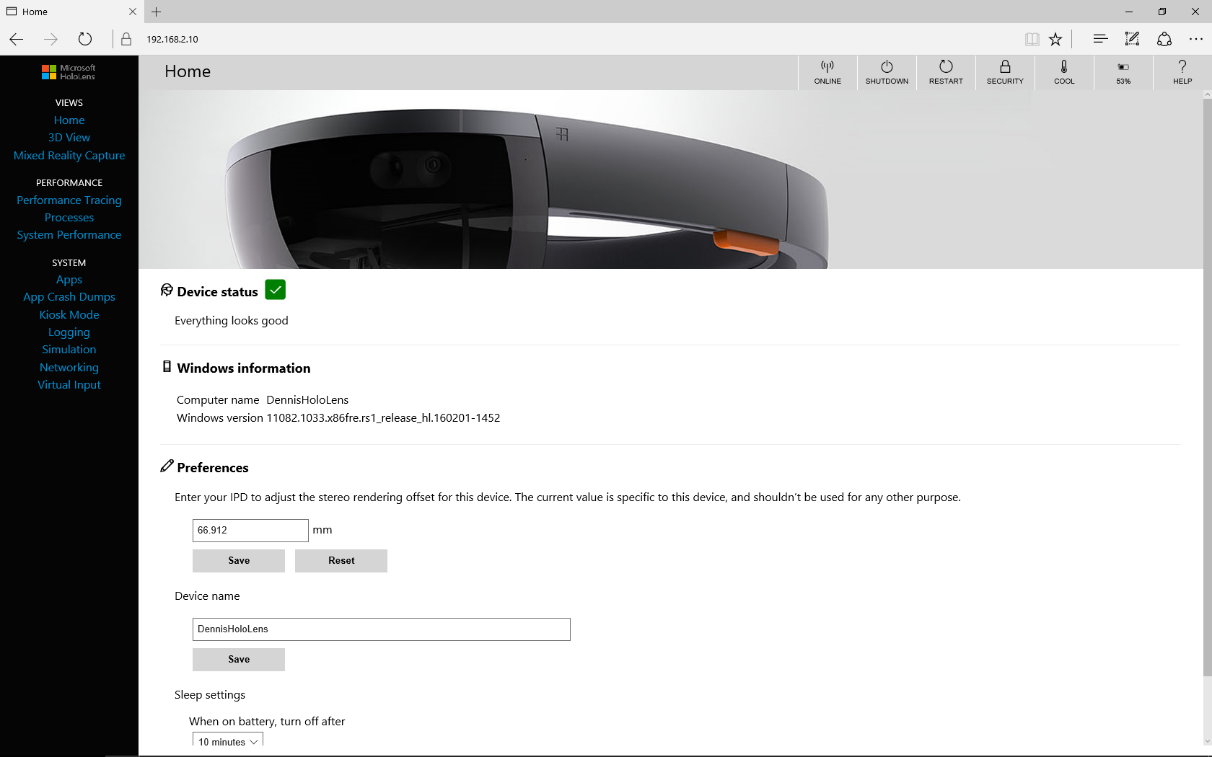
In the HoloLens device portal main screen, you can see the main screen of the device portal. There is quite a lot of information here that will tell you all sorts of things you need to know about the device. However, the first question is, How do we get here?
The device portal is switched off by default. You have to explicitly enable this option by going to the settings screen; once there, select the Update option and you have the option to choose the For Developers page. Here, you can switch the Developer Mode on, which is a necessity if you want to deploy apps from your development environment to the device. You can pair devices; again, you need this to deploy apps and debug them, and you enable or disable the device portal.
If you set up your device correctly and have it hooked up to a network, you can retrieve the IP address of the device by going to the settings screen, selecting Network, and then selecting the Advanced settings option. Here, you will see all network settings, including the IP address the device currently uses.
When you enter that IP address in a browser, you will be greeted with a security warning that the certificate that the device uses is not trusted by default. This is something we will fix later on.
The first time you use the portal, you will need to identify yourself. The device is protected by a username/password combination to prevent other users from messing with your device.
The different menus in the portal
Assuming that you have taken care of all this, you can now see the device portal main screen, just like the one I showed you before. The screen can be divided into three distinct parts.
At the top, you will see a menu bar that tells you things about the device itself, such as the level of the batteries, the temperature the device is running at (in terms of cool, warm, and hot), and the option to shut down or reboot the device.
On the left-hand side, there is a menu where you choose the different options you want to do or control.
The menu is divided into three submenus:
- Views
- Performance
- System
The Views menu in the portal
The Views menu deals with the general information screen and the things your device actually sees. The other two, Performance and System, contain detailed information about the inner workings of the device and the applications running on it. We will have a thorough look at those when we get to debugging applications in later chapters, so for now I will just say that they exist.
The options are as follows:
- Home
- 3D View
- Mixed reality capture
By default, you will get the home screen. At the center of the screen, you will see information about the device. Here, you can see the following items:
- Device status: This is indicated by a green checkmark if everything is okay or a red cross if things are not okay. The next point confirms it.
-
Windows information: This indicates the name of the device and the version of the software it runs.
-
The preferences part: Here, you can see or set the IPD we talked about earlier. If you have written down other people's IPD, you can enter them here and then click on Save to store it on the device. This saves you from running the calibration tool over and over again. You can also change the name of the device here and set its power behavior: for example, when do you want the device to turn itself off?
The 3D view gives you a sense of what the depth sensor and the environment sensors are seeing:
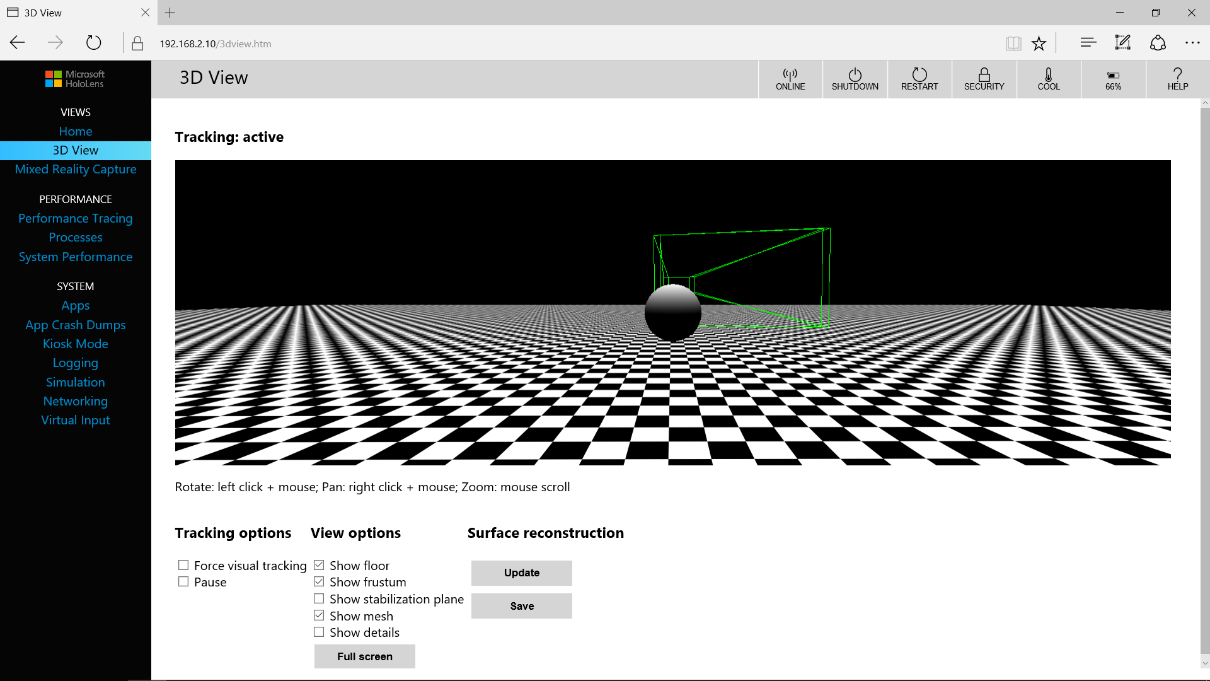
There are several checkboxes you can check and uncheck to determine how much information is shown. In the preceding screenshot, you can see an example in 3D View, with the default options checked.
The sphere you see represents the user's head and the yellow lines are the field of view of the device. In other words, the preceding screenshot is what the user will see projected on the display, minus the real world that the user will see at all times.
You have the following checkboxes available to fine-tune the view:
- Tracking options
- Force visual tracking
- Pause
- View options
- Show floor
- Show frustum
- Show stabilization plane
- Show mesh
- Show details
Next, you have two buttons allowing you to update and save the surface reconstruction.
The first two options are fairly straightforward; Force Visual Tracking will force the screen and the device to continuously update the screens and data. If this is unchecked, the device will optimize its data streams and only update if there is something changing. Pause, of course, completely pauses capturing the data.
The View options are a bit more interesting. The Show floor and Show frustum options enable and disable the checkerboard floor and the yellow lines indicating the views, respectively. The stabilization plane is a lot more interesting. This plane is a stabilized area, which is calculated by averaging the last couple of frames the sensors have received. Using this plane, the device can even out tiny miscalculations by the system. Remember that the device only knows about its environment by looking through the cameras, so there might be some errors. This plane, located two meters from the device in the virtual world, is the best place to put static items, such as menus. Studies have shown that this is the place where people feel the most comfortable looking at items. This is the "Goldilocks zone," not too far, not too close but just right.
If you check the Show mesh checkbox, you can see what the devices see. The device scans the environment in infrared. Thus, it cannot see actual colors. The infrared beam measures distances. The grayscale mesh is simply a way to visualize the infrared information.
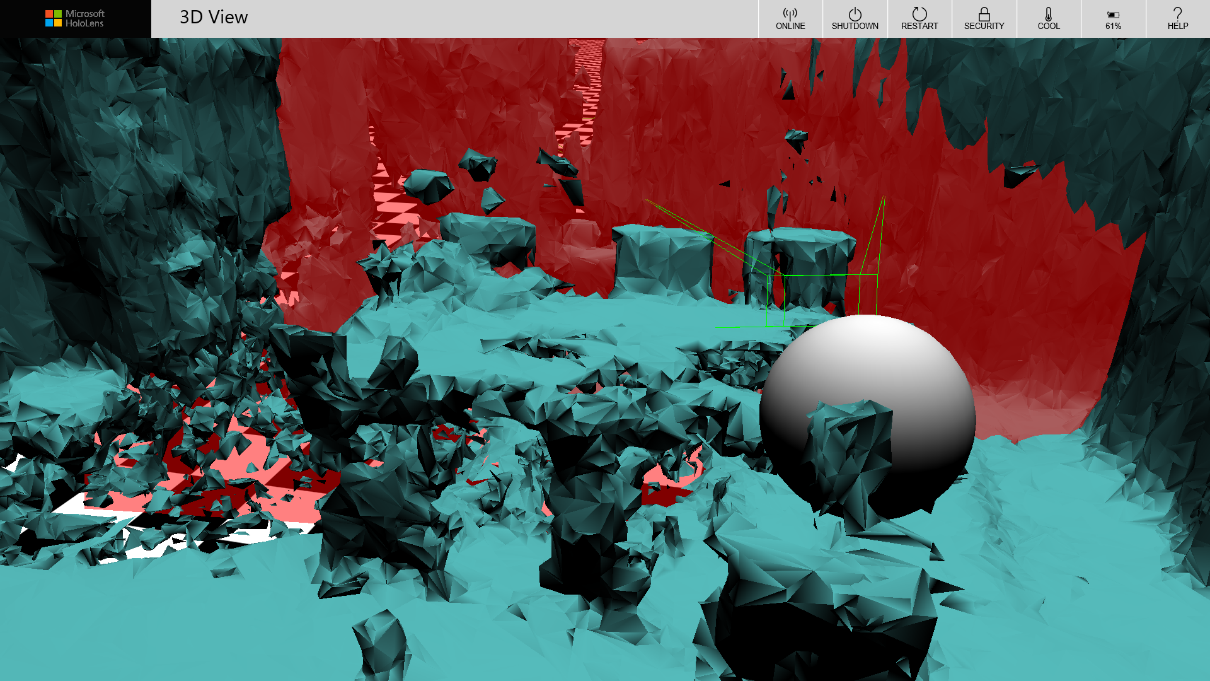
As you can see in the screenshot, I am currently writing this sitting on the right most chair at a table with five more chairs. The red plane you see is the stabilization plane, just in front of the wall I am facing. The funny shape in front of the sphere you see is actually my head--I moved the device in my hands to scan the area instead of putting it on my head, so it mistakenly added me as part of the surroundings.
The picture looks messy, but that is the way the device sees the world. With this information, the HoloLens knows where the table top surface is, where the floor is, and so on.
You can use the Save button to save the current scene and use that in the emulator or in other packages. This is a great way for developers to use an existing environment, such as their office, in the emulator. The Update button is there because, although the device constantly updates its view of the world, the portal page does not. Sometimes, it misses updates because of the high amount of data that is being sent, and thus you might have to manually update the view. Again, this is only for the portal page--the device keeps updating all the time, around five times per second.
The last checkbox is Show details. When this is selected, you will get additional information from the device with regards to the hands it sees, the rotation of the device, and the location of the device in the real world. By location, I am not talking about the GPS location; remember that the device does not have a GPS sensor, but I am talking about the amount of movement in three dimensions since the tracking started.
By turning this option on, we can learn several things. First, it can identify two hands at the same time. It can also locate each hand in the space in front of the device. We can utilize this later when we want to interact with it.
The data we get back looks like this:
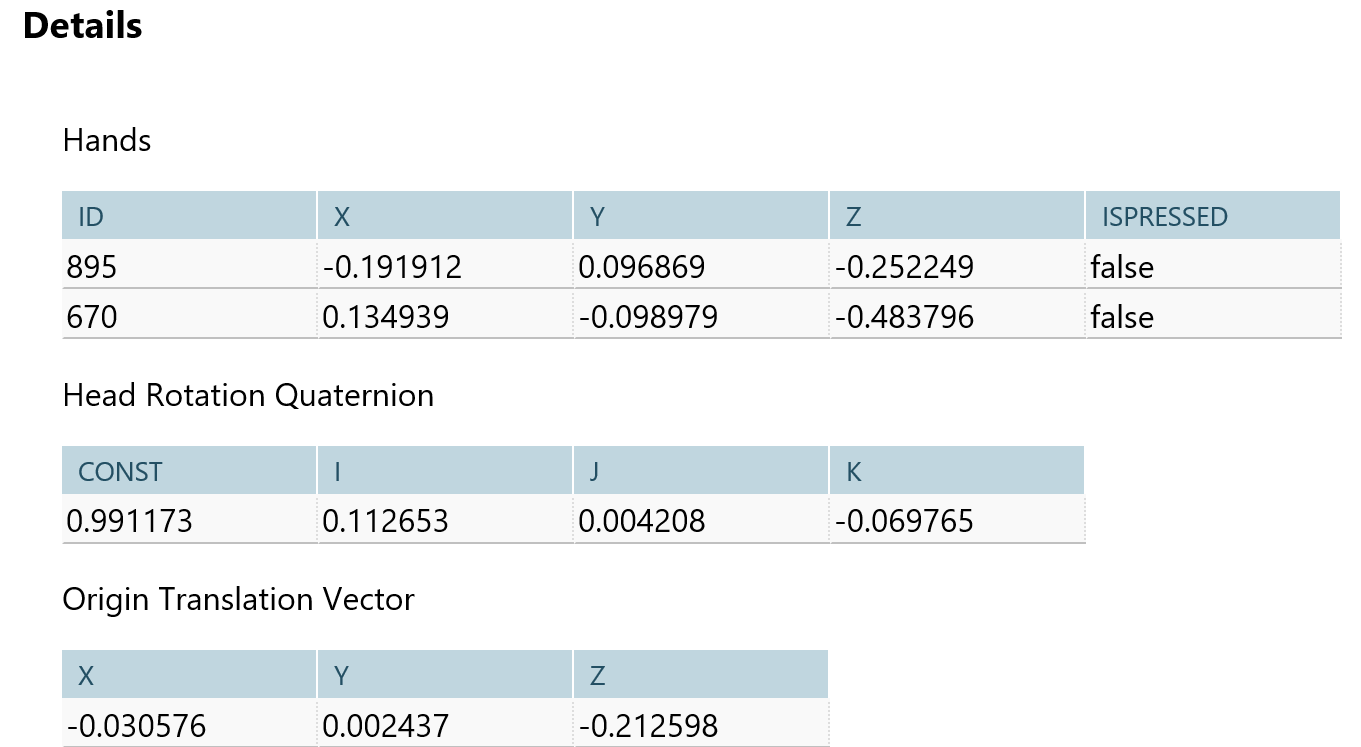
In the preceding table, we have information about the hands, the head rotation, and the origin translation vector.
Each hand that is being tracked gets a unique ID. We can use this to identify when the hand does something, but we have to be careful when using this ID. As soon as the hand is out of view for a second and it returns just a moment later, it will be assigned a new ID. We cannot be sure that this is the same hand--maybe someone else standing beside the user is playing tricks with us and puts their hand in front of the screen.
The coordinates are in meters. The X is the horizontal position of the center of the hand, the Y is the vertical position. The Z indicates how far we have extended our hand in front of us. This number is always negative--the lower is it, the further away the hand is. These numbers are relative to the center of the front of the device.
The head rotation gives us a clue as to how the head is tilted in any direction. This is expressed in a quaternion, a term we will see much more in later chapters. For now, you can think of this as a way to express angles.
Last in this part of the screen is the Origin Translation Vector. This gives us a clue as to where the device is compared to its starting position. Again, this is in meters and X still stands for horizontal movement, Y for vertical, and Z for movement back and forth.
The last screen in the Views part is the Mixed Reality Capture. This is where you can see the combined output from both the RGB camera in front of the device and the generated images displayed on the screens. In other words, this is where we can see what the user sees. Not only can we see but we can also hear what the user is hearing. We have options to turn on the sounds the user gets as well as relay what the microphones are picking up.
This can be done in three different quality levels--high, medium, and low.
The following table shows the different settings for the mixed capture quality:
|
Setting |
Vertical Lines |
Frames per second |
Bits per second |
|
High |
720 |
30 |
5 Mbits |
|
Medium |
480 |
30 |
2.5 MBits |
|
Low |
240 |
15 |
0.6 |
Several users have noticed that the live streaming is not really live--most users have experienced a delay, ranging from two to six seconds. So be prepared when you want to use this in a presentation where you want to show the audience what you, as the wearer, see.
If you want to switch the quality levels, you have to stop the preview. It will not change the quality midstream.
Besides watching, you can also record a video of the stream or take a snapshot picture of it.
Below the live preview, you can see the contents of the video and photo storage on the device itself--any pictures you take with the device and any video you shoot with the device will show up here, so you can see them, download them to your computer, or delete them.
Now that you have your device set up and know how to operate it and see the details of the device as a developer, it is time to have a look at the preinstalled software.
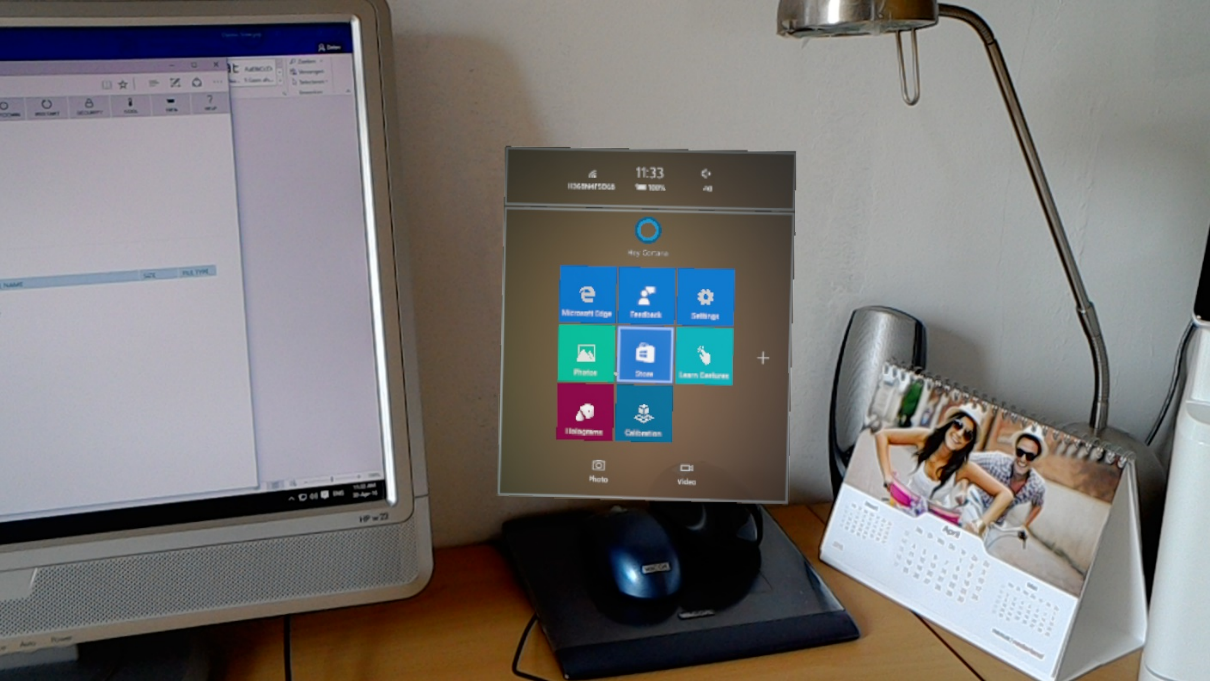
When the device is first used, you will see it comes with a bunch of apps preinstalled. On the device, you will find the following apps:
- Calibration: We have talked about this before; this is the tool that measures the distance between the pupils
- Learn gestures: This is an interactive introduction to using the device that takes you through several steps to learn all the gestures you can use
- Microsoft Edge: The browser you can use to browse the web, see movies, and so on
- Feedback: A tool to send feedback to the team
- Setting: We have seen this one before as well
- Photos: This is a way to see your photos and videos; this uses your OneDrive
- Store: The application store where you can find other applications and where your own applications, when finished, will show up
- Holograms: A demo application that allows you to place holograms anywhere in your room, look at them from different angles, and also scale and rotate them. Some of them are animated and have sounds
- Cortana: Since the HoloLens runs Windows 10, Cortana is available; you can use Cortana from most apps by saying "Hello Cortana"; this is a nice way to avoid using gestures when, for instance, you want to start an app.
I suggest you play around a bit. Start with Learn Gestures after you have set up the device and used the Calibration tool. After that, use the Hologram application to place holograms all around you. Walk around the holograms and see how steady they are. Note the effect of a 3D environment--when you look at things from different sides, they really come to life. Other 3D display technologies, such as 3D monitors and movies, do not allow this kind of freedom, and you will notice how strong this effect is.
Can you imagine what it would be like to write this kind of software yourself? Well, that is just what we are about to do.


