A closer look at the import dialog
When you open Aperture and proceed to import some images, you will get the standard import dialog box. If you've been using Aperture for a while, you've probably seen it hundreds of times by now. If your typical approach is to just import your photos straight to a project then your dialog probably looks a little something like the following screenshot:

Before we get to the less obvious settings, there is one thing that every photographer should do straight away, and that is to set up the metadata for incoming images. On the right-hand panel of the import dialog box you will see a heading called Metadata Presets and a corresponding drop-down menu. If you have already created a metadata preset then you can skip this part. Metadata presets lets you set up a template for inserting metadata into your images. These templates are most useful for information that will be the same in all your photographs. So, for example, things such as copyright information, website links, and so on.
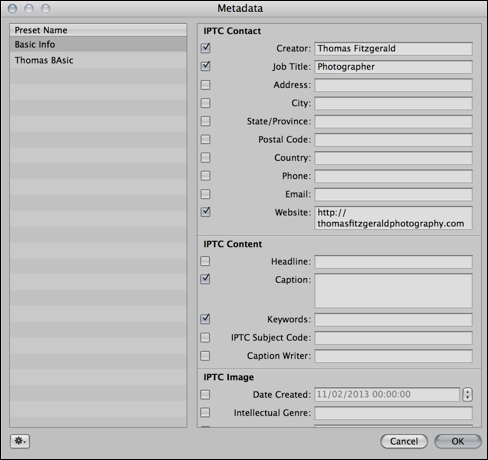
If you click on the Metadata drop-down menu and choose the Edit option, you will see the Metadata dialog box. In this window you can create new presets that will contain the set of metadata you insert. This has another useful function too. It controls the fields you see in the import window. To change the fields that are displayed by default in the import dialog box, choose the Basic Info preset that should already be visible and take a look at the right-hand column. This column contains a list of metadata fields that you can display. If you want you can enter information in here. The most important thing to know is that, if you check one of the boxes, even if you don't enter any data into the corresponding field in the preset dialog, that will show up in the import dialog box.
What fields you choose to display are up to you. If you are a professional you may need certain fields depending on what you do with your images. Your publisher or editor may require certain information to be embedded in your images. We'll discuss metadata fully in one of the following chapters. But for now, just remember that this is how you turn on and off which fields are displayed in the import dialog box.

Once you have set your preset and decided which fields you want to be displayed by default, click on the OK button to save and exit the presets dialog.
Back in the main import window take a look at the little drop-down menu in the top right-hand corner that says Import Settings. This is a menu that allows you to turn on and off options for the import. From here you can toggle the following options:
- File Info: This option lets you see information about image files that are displayed in the main portion of the IMPORT dialog. If you have turned this option on, clicking on an image will show you information about that image, such as the date it was taken, the image dimensions, its file size, and so on.
- Rename Files: This option lets you rename files while importing. It uses the same template mechanism as exporting files does. There are a couple of preset templates that you are probably familiar with from exporting files (I'll cover this in one of the following chapters too). Templates you create for naming files when exporting will show up here as well.
- Time Zone: This option lets you offset the time of the captured images to reflect an alternate time zone. You tell it where you were when the camera took the image, where you are now, and it will adjust the time stamp of the imported files accordingly.
- Metadata Presets: These options are covered in the earlier section named A closer look at the import dialog.
- Effects Presets: It used to be called Adjustment Presets in a previous version of Aperture. They are the preset recipes for your adjustments of which you may already be familiar with. This option lets you choose a preset to apply to all the images while importing. It's a good idea to set up a default preset for each camera you own and this will be discussed in more detail later in this chapter.
- File Types: This option lets you turn on and off which file types are imported. This is extremely useful if you shoot video on your DSLR, for example, but don't want to import the video files into Aperture. Instead of going through the thumbnails of images and manually turning off video files, if you have the File Types option enabled, you can just turn them all off in one go. You can also use this option to exclude audio files, exclude audio attachments (some cameras allow you to record an audio note attached to an image), and exclude photos (which is useful if you had previously imported all the photos from a card and now wanted to find the missing video or audio files that you hadn't previously imported). This section also allows you to only include files that are flagged/locked in the camera.
- RAW + JPEG Pairs: This option controls how Aperture handles images when you shoot RAW + JPEG in your camera. Personally, I always shoot RAW + JPEG. This section allows you to choose whether to import just the RAW or just the JPEG or both, with either format images as the master. Another really useful option here is Matching RAW Files, which allows you to import RAW files that match any JPEG images that you may have previously imported. This can be a very handy workflow if you are on the go and using a low-powered computer or a computer with limited space. What you would do in this situation is import only the JPEG files from your camera. Then you can do your initial culling and edits. Once you have a selection of images you want, you can then import the matching RAW files for just those images. Alternatively, you can transfer the project over to your main workstation and match the RAW files there, keeping all your metadata and editing choices but reapplying them to the RAW versions of your files. I'll show you how to do this in detail, later in this chapter.
- Actions: This option lets you apply an AppleScript while importing.
- Backup Locations: This option lets you automatically back up files to another location as you import. This is a good idea, especially if you are traveling. I always back up to a mobile drive when importing to my laptop while on the go.


