VS Code tooling
VS Code is an open-source code editor backed by Microsoft. It is very popular in the Angular community, primarily because of its robust support for TypeScript. TypeScript has been, to a great extent, a project driven by Microsoft, so it makes sense that one of its popular editors was conceived with built-in support for this language. All the nice features we might want are already baked in, including syntax, error highlighting, and automatic builds. Another reason for its broad popularity is the various extensions available in the marketplace that enrich the Angular development workflow. What makes VS Code so great is not only its design and ease of use but also the access to a ton of plugins, and there are some great ones for Angular development. The most popular are included in the Angular Essentials extension pack from John Papa. To get it, go through the following steps:
- Navigate to the Extensions menu of VS Code.
- Type
Angular Essentialsin the search box. - Click the Install button on the first entry item.
Alternatively, you can install it automatically since it is already included in the repository of this book’s source code. When you download the project from GitHub and open it in VS Code, it will prompt you to view and install the recommended extensions:

Figure 1.3: Recommended extensions prompt
In the following sections, we will look at some of the extensions included in the Angular Essentials pack as well as other useful extensions for Angular development.
Angular Language Service
The Angular Language Service extension is developed and maintained by the Angular team and provides code completion, navigation, and error detection inside Angular templates. It enriches VS Code with the following features:
- Code completion
- Go-to definition
- Quick info
- Diagnostic messages
To get a glimpse of its powerful capabilities, let’s look at the code completion feature. Suppose we want to display a new property called description in the template of the main component. We can set this up by going through the following steps:
- Define the new property in the
app.component.tsfile:export class AppComponent { title = 'Learning Angular'; description = 'Hello World'; } - Open the
app.component.htmlfile and start typing the name of the property in the template. The Angular Language Service will find it and suggest it for you automatically:

Figure 1.4: Angular Language Service
The description property is a public property. In public methods and properties, we can omit the keyword public. Code completion works only for public properties and methods. If the property had been declared private, then the Angular Language Service and the template would not have been able to recognize it.
You may have noticed that a red line appeared instantly underneath the HTML element as you were typing. The Angular Language Service did not recognize the property until you typed it correctly and gave you a proper indication of this lack of recognition. If you hover over the red indication, it displays a complete information message about what went wrong:

Figure 1.5: Error handling in the template
The preceding information message comes from the diagnostic messages feature. The Angular Language Service supports various messages according to the use case. You will encounter more of these messages as you work more with Angular.
Angular Snippets
The Angular Snippets extension contains a collection of TypeScript and HTML code snippets for various Angular artifacts, such as components. To create the TypeScript class of an Angular component using the extension, go through the following steps:
- Open our Angular application in VS Code and click on the New File button next to the workspace name in the EXPLORER pane.
- Enter a proper file name, including the
.tsextension, and press Enter. - Type
a-componentinside the file and press Enter.
The extension builds the TypeScript code for you automatically:
import { Component, OnInit } from '@angular/core';
@Component({
  selector: 'selector-name',
  templateUrl: 'name.component.html'
})
export class NameComponent implements OnInit {
  constructor() { }
  ngOnInit() { }
}
There are also other available snippets for creating various Angular artifacts, such as modules. All snippets start with the a- prefix.
Nx Console
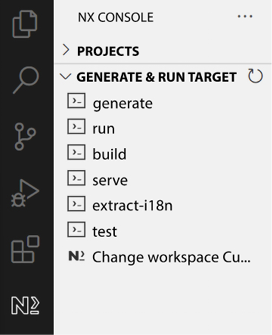
Nx Console is an interactive UI for the Angular CLI that aims to assist developers who are not very comfortable with the command-line interface or do not want to use it. It works as a wrapper over Angular CLI commands, and it helps developers concentrate on delivering outstanding Angular applications instead of trying to remember the syntax of every CLI command they want to use.
The extension is automatically enabled when you open an Angular CLI project. If you click on the Nx Console menu of VS Code, it displays a list of Angular CLI commands that you can execute:

Figure 1.6: Nx Console
Nx Console includes most of the Angular CLI commands. The user interface allows developers to use them without remembering the available options each command supports.
Material icon theme
VS Code has a built-in set of icons that it uses to display different types of files in a project. This extension provides additional icons that conform to the Material Design guidelines by Google; a subset of this collection targets Angular-based artifacts.
Using this extension, you can easily spot the type of Angular files in a project, such as components and modules, and increase developer productivity, especially in large projects with lots of files.
EditorConfig
VS Code editor settings, such as indentation or spacing, can be set at a user or project level. EditorConfig can override these settings using a configuration file called .editorconfig, which can be found in the root folder of an Angular CLI project. You can define unique settings in this file to ensure the consistency of the coding style across your team.
Angular Evergreen
The stability of the Angular platform is heavily based on the regular release cycles according to the following schedule:
- A major version every six months
- Various minor versions between each major one
- A patch version every week
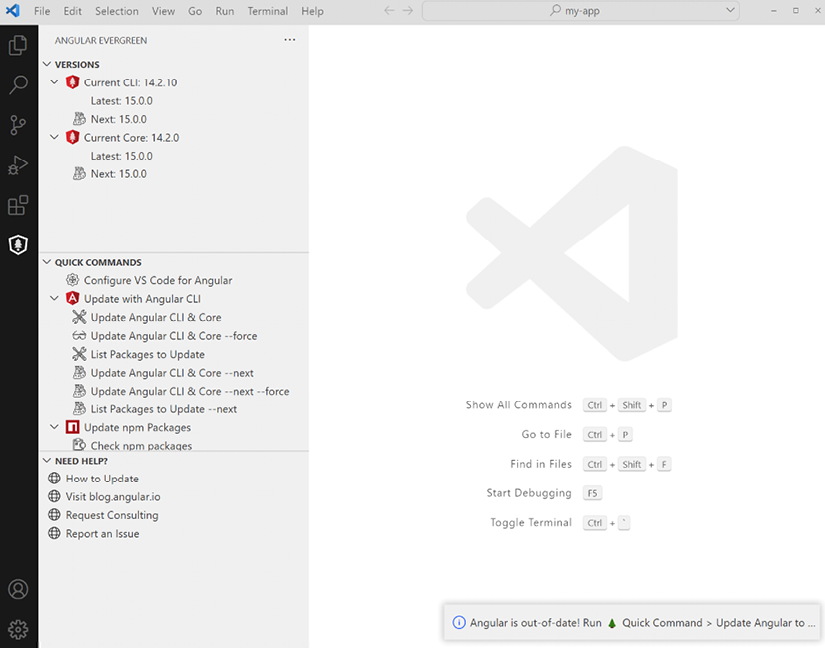
The Angular Evergreen extension helps us follow the previous schedule and keep our Angular projects up to date. It provides us with a unique user interface containing information about the current Angular version of our project and actions we can take to update it. Updating an Angular project can also be accomplished using a custom menu that appears if we right-click on the angular.json file of the workspace.
In a nutshell, Angular Evergreen is loaded in an Angular CLI project and compares the local version of Angular with the latest one. If there is a new version, it will alert the user by displaying a notification message:

Figure 1.7: Angular Evergreen
Additional to the latest version, we can update to the next Angular version, which is the beta version currently under development, or upgrade other npm packages of the project.
Rename Angular Component
Renaming Angular artifacts such as components and modules usually requires visiting different parts of the codebase in a project. Working your way through the project when you are a beginner is a daunting task. Thankfully, there is an extension that can help us with that.
The Rename Angular Component extension provides a user-friendly interface that enables us to rename certain Angular artifacts. We can right-click on any component-related file, select the Rename Angular Component option and enter the new name of the component. The extension will find all template and TypeScript files that use the component and rename them accordingly.
Although the name of the extension refers to components, it can currently be used with other Angular artifacts such as services, directives, and guards. We will learn about these artifacts later in the book.


