Working with bullets and numbering
Using bulleted and numbered lists can be a great way to organize your content and present it in a way that is often easier to interpret and understand. As an added benefit, it often results in a cleaner and less crowded layout that is aesthetically more pleasing.
In this section, we are going to look at how to apply bullet points and numbering to your content. We will look at customizing the formatting of these lists, creating custom bullet points, switching to different numbered list types, fine-tuning the positioning of the bullets and numbers, restarting and continuing numbering, and even converting a numbered list into editable numbers.
Getting ready
In order to complete this recipe, simply open InDesign on your system and create a new document with 12 pages, as shown in the Creating a new document recipe in Chapter 1. During this exercise, you will also need to be able to create text frames and add placeholder text, as shown in the Creating text frames and adding placeholder text recipe.
How to do it…
In order to use bulleted and numbered lists, follow these steps:
- Start by creating a text frame and typing in some content that we can use for our lists. I have typed a list of fruit, as shown in Figure 2.31:
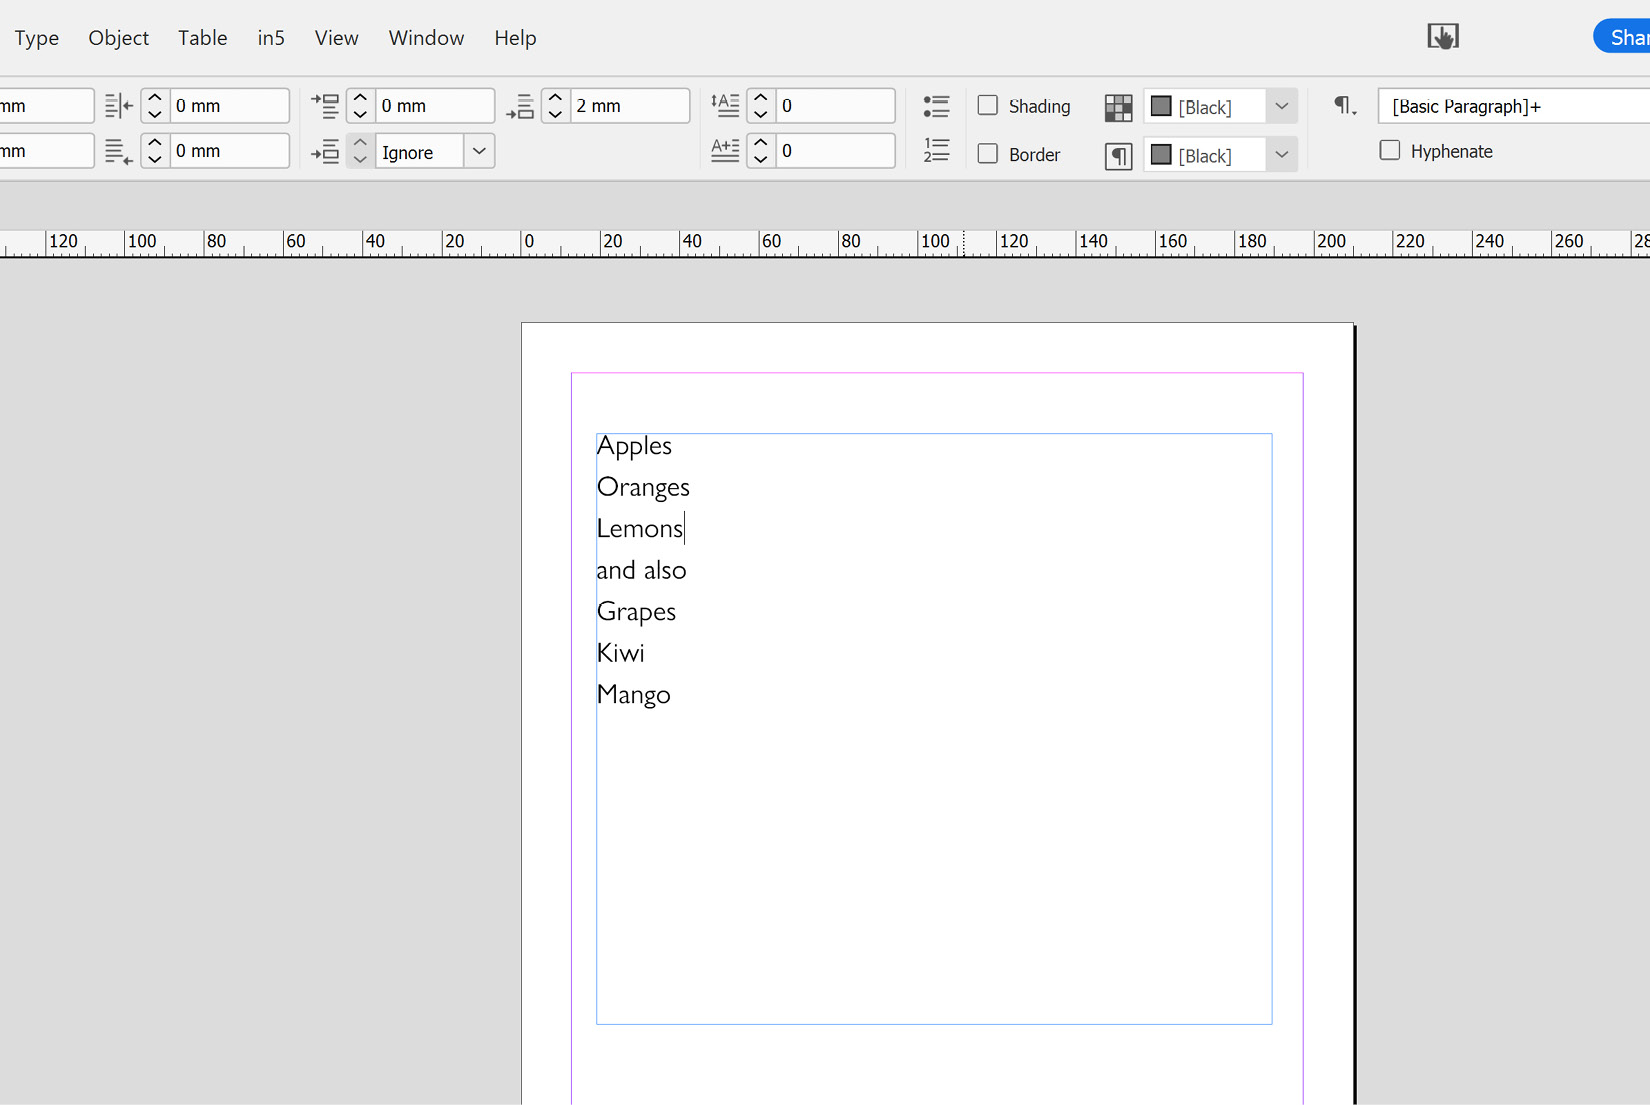
Figure 2.31: Text ready to be converted into lists
- Next, select the first three lines of text and click on the Bulleted list icon, marked as A in Figure 2.32. If you don’t see the list icons, just make sure you are looking at the paragraph formatting options and not the character formatting options (switching between the two is covered in the Adjusting character formatting recipe from the first chapter).
You will see these items are now indented, and a bullet point is added in front of each item (as marked by B in Figure 2.32):
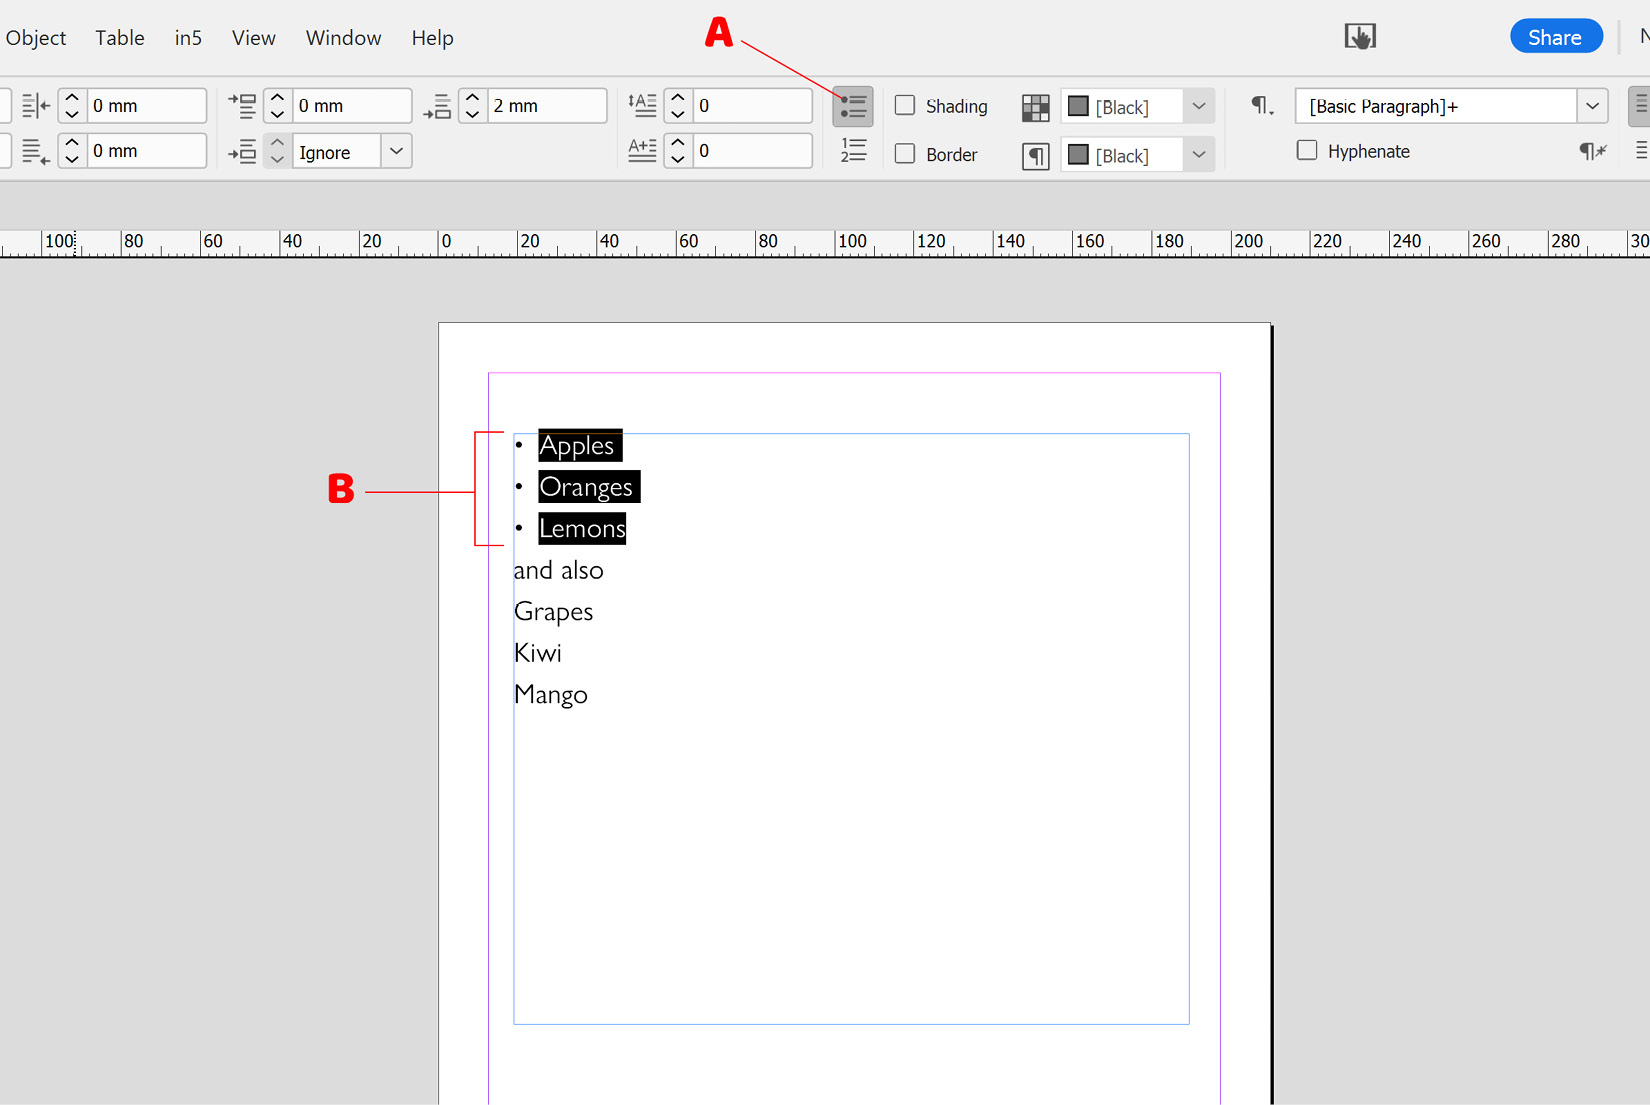
Figure 2.32: Bullets applied in InDesign
- Next, we will select the last three lines of the text (marked as A in Figure 2.33) and click on the Numbered list icon (marked as B in Figure 2.33). These items will now be indented and a number added in front of each of the selected items:
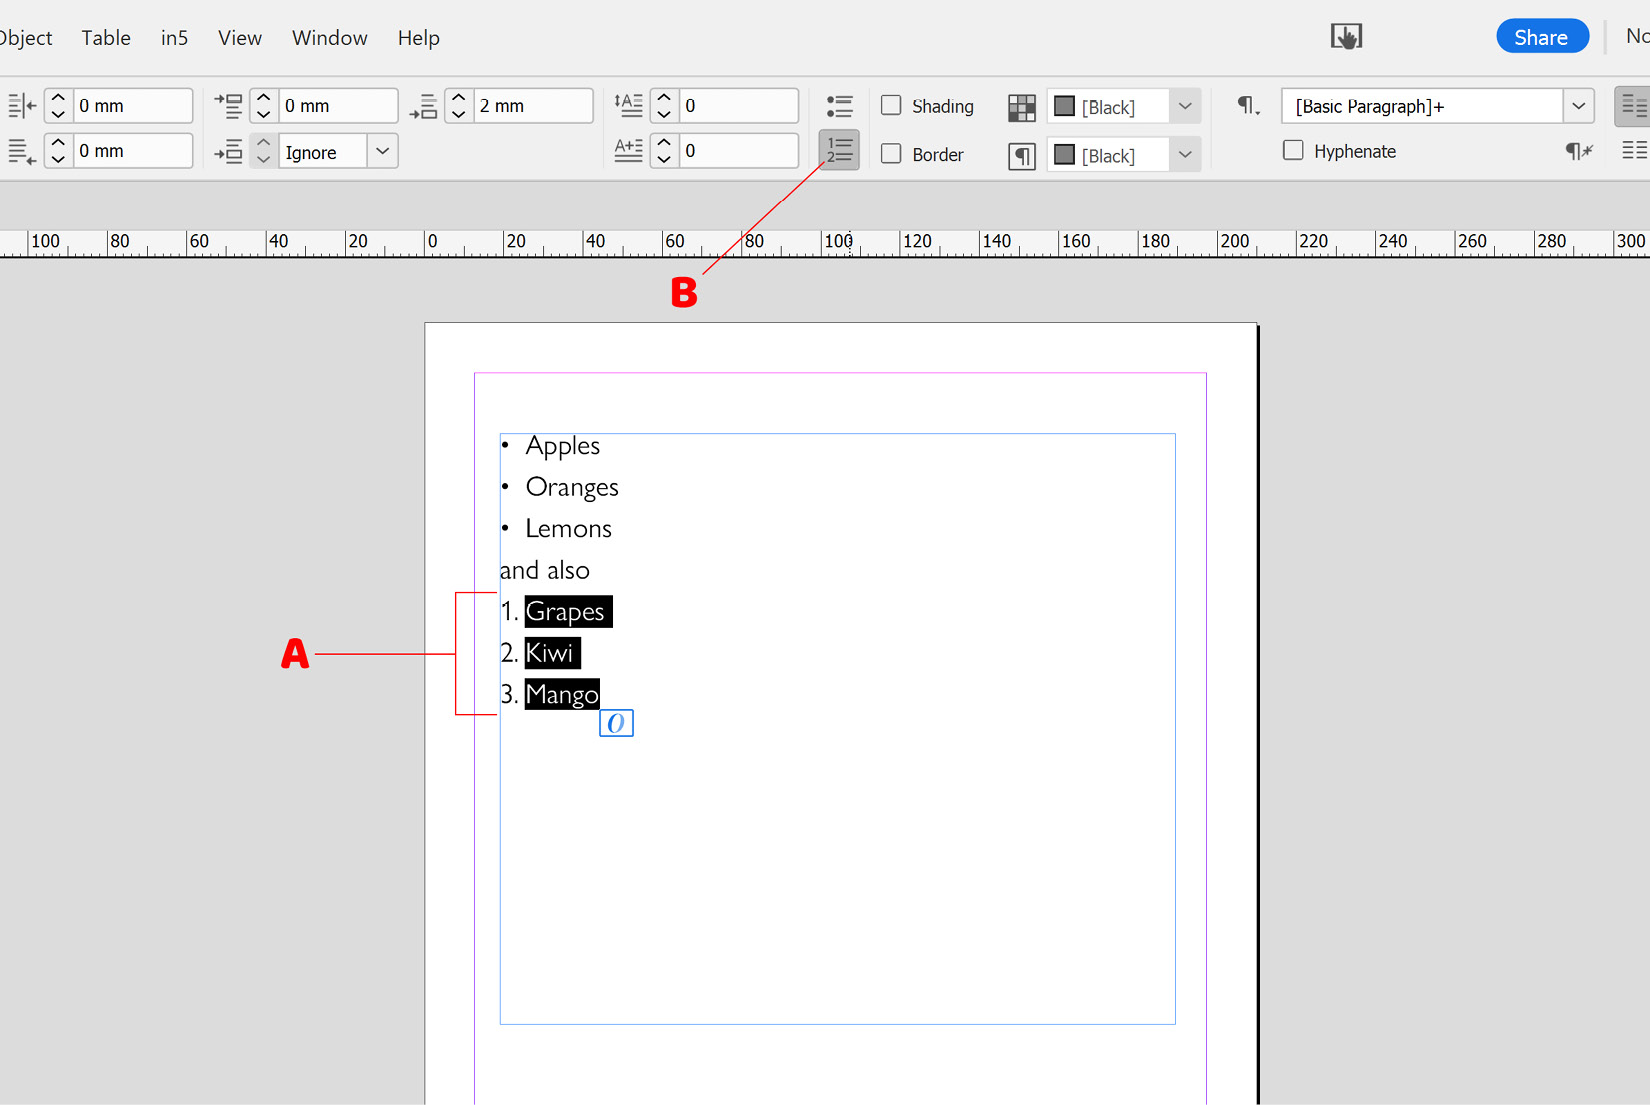
Figure 2.33: Numbered list applied in InDesign
- The bullets and numbers that are generated pick up basic formatting such as font face or size from the first character of the paragraph they are applied to, but this can be customized. To do this, select the text that has the bullets applied (in this case, the first three lines), and while holding down the Alt (PC)/Option (Mac) key, click once again on the Bulleted list icon. This will bring up the Bullets and Numbering dialog box (shown in Figure 2.34), showing the bulleted list formatting options:
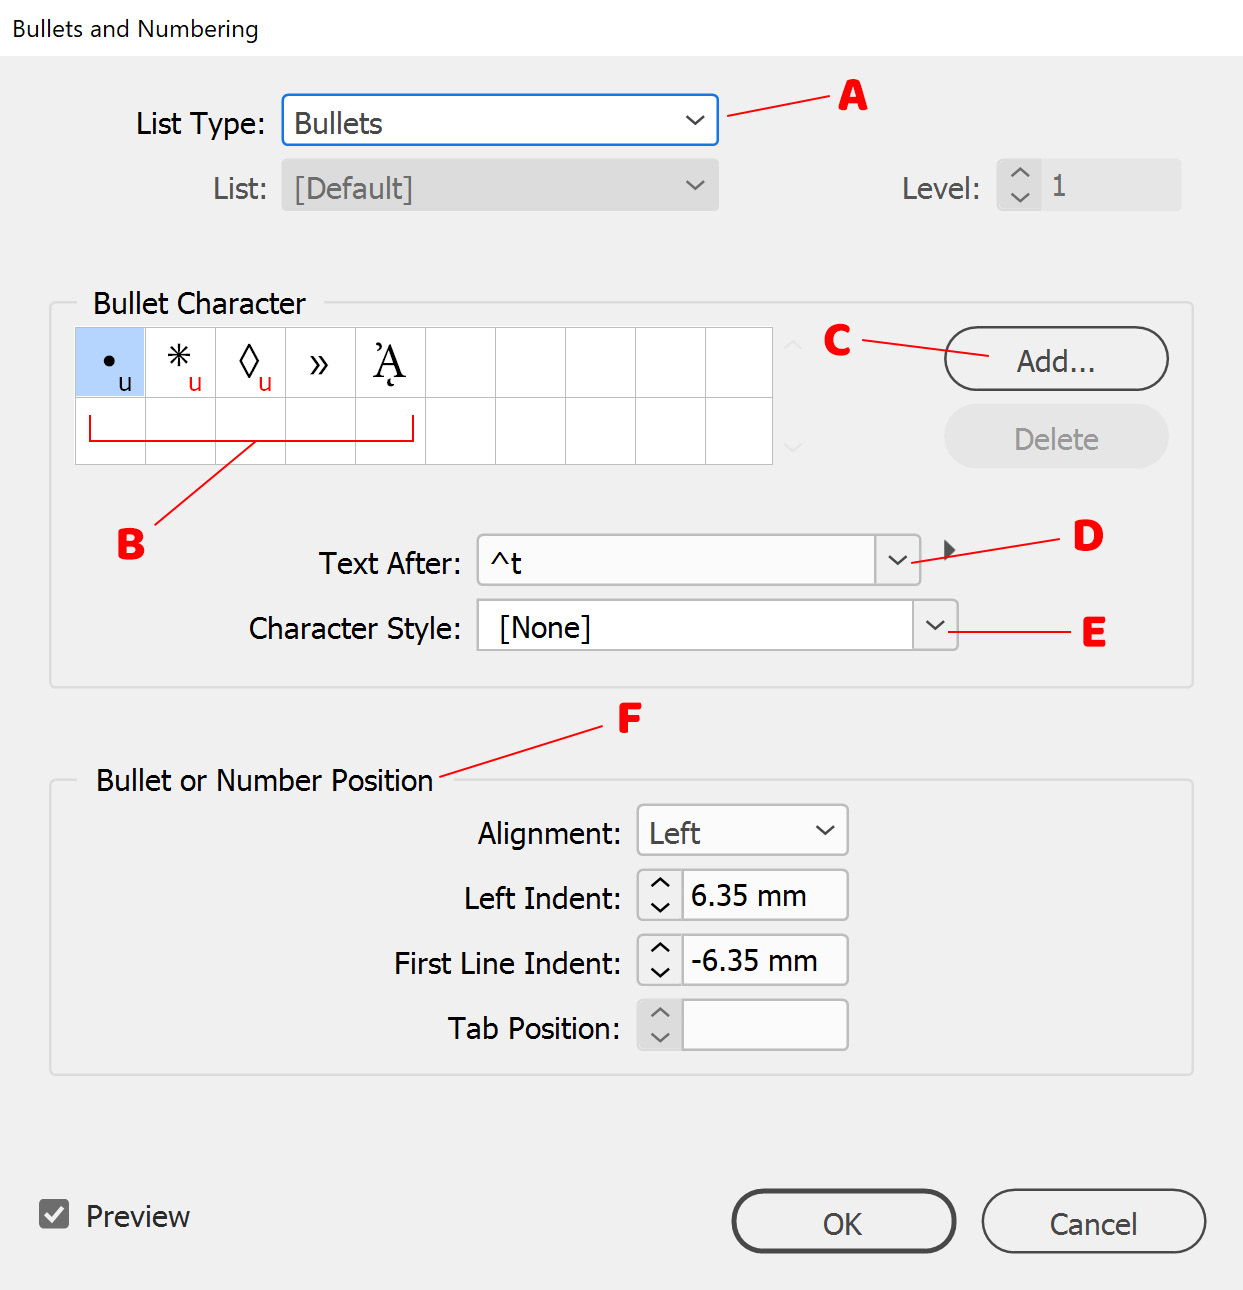
Figure 2.34: Bullets and Numbering dialog box showing bulleted list options
Let’s review the options:
Note
If you wish to see changes live on the page as you make them, remember to check the Preview checkbox at the bottom of the dialog box.
- List Type (A in Figure 2.34): This will default to Bullets as that’s what we have applied here, but it can be changed to either Numbers or None if you wish to change the list type. We will leave it set at Bullets.
- Bullet Character (B in Figure 2.34): Here, you can quickly choose from previously used bullet characters. We will ignore this on this occasion as we haven’t previously used bullets.
- Add (C in Figure 2.34): Click to use characters from your fonts as bullets.
When clicked, an Add Bullets popup appears (shown in Figure 2.35), and you can select characters from any of your fonts. You can change the font family (marked as A in Figure 2.35), and I would recommend checking the Remember Font with Bullet checkbox (marked as B in Figure 2.35) to ensure the bullet character isn’t affected if you change the font face used for the bullet items. When you have chosen a character, click OK (marked as C in Figure 2.35) to add that character and close the box, or click Add (marked as D in Figure 2.35) if you would like to continue selecting additional characters before closing the box:
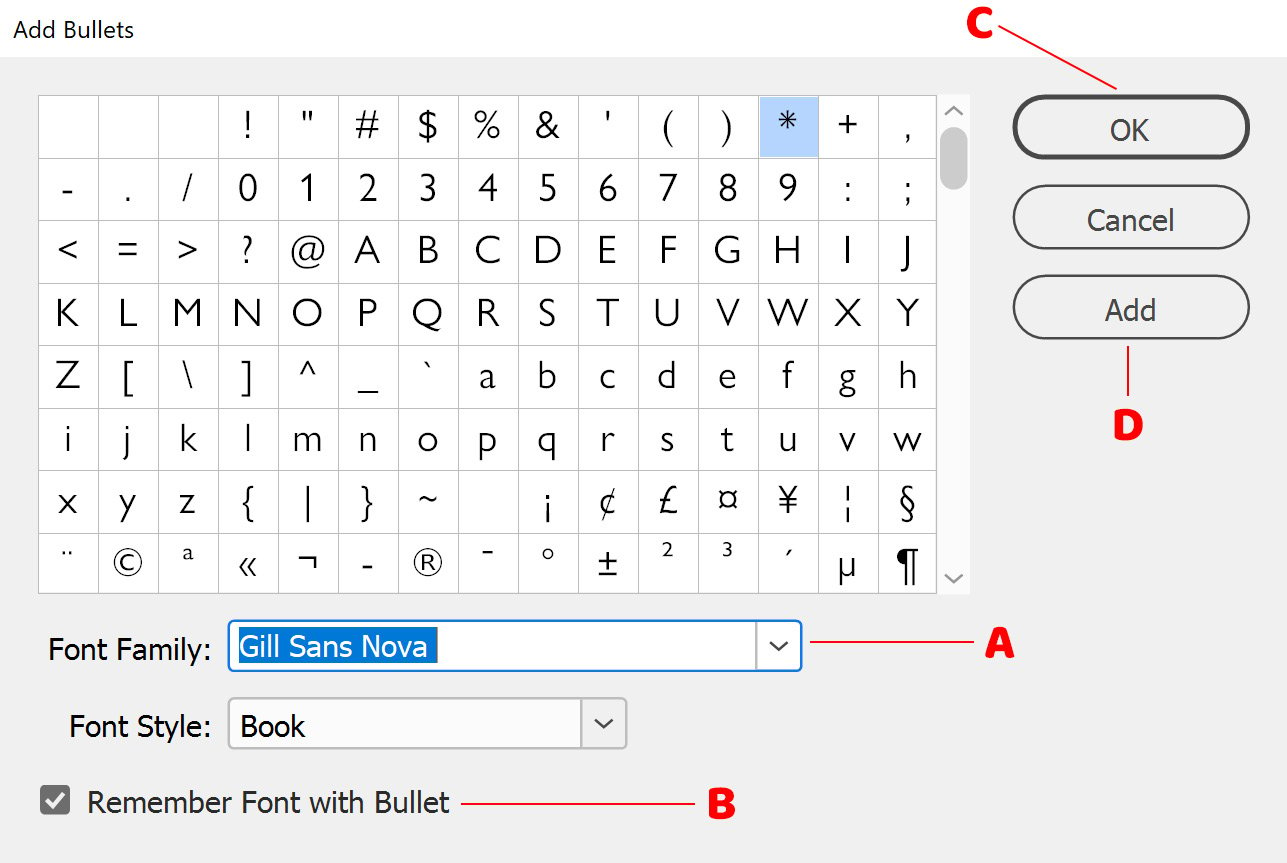
Figure 2.35: Add Bullets dialog box
- Text After (D back in Figure 2.34): Lets you control what comes immediately after the bullet points, which by default is a tab character, but you can change this if you wish. We will leave this unchanged.
- Character Style (E in Figure 2.34): Allows you to apply a character style to your bullets (these are covered in Chapter 8, Formatting with Paragraph and Character Styles). We will leave this unchanged too.
Finally, under the Bullet or Number Position section (F in Figure 2.34), you can fine-tune the bullet position. We won’t adjust these settings in this instance, but they include the following:
- Alignment: Allows you to align the bullets to the left, center, or right of the bullet area.
- Left Indent: Controls how far the bullets are indented from the left.
- First Line Indent: Allows you to adjust the indent on the first line. If you have a single bullet point that contains multiple lines of text, it can be useful to increase the left indent value and also reduce the first line indent value so that the bullet character itself isn’t directly in line with the subsequent lines of text.
- Tab Position: Adjusts the space between the bullets and the content of the list.
- Having formatted the bulleted list, we can now format the numbered list. Select the last three lines that we applied the numbered list to in step 3, and while holding down the Alt (PC)/Option (Mac) key, click once again on the Numbered List Icon (marked as B in Figure 2.33). This will bring up the Bullets and Numbering dialog box seen in Figure 2.36, this time showing the numbered list options:
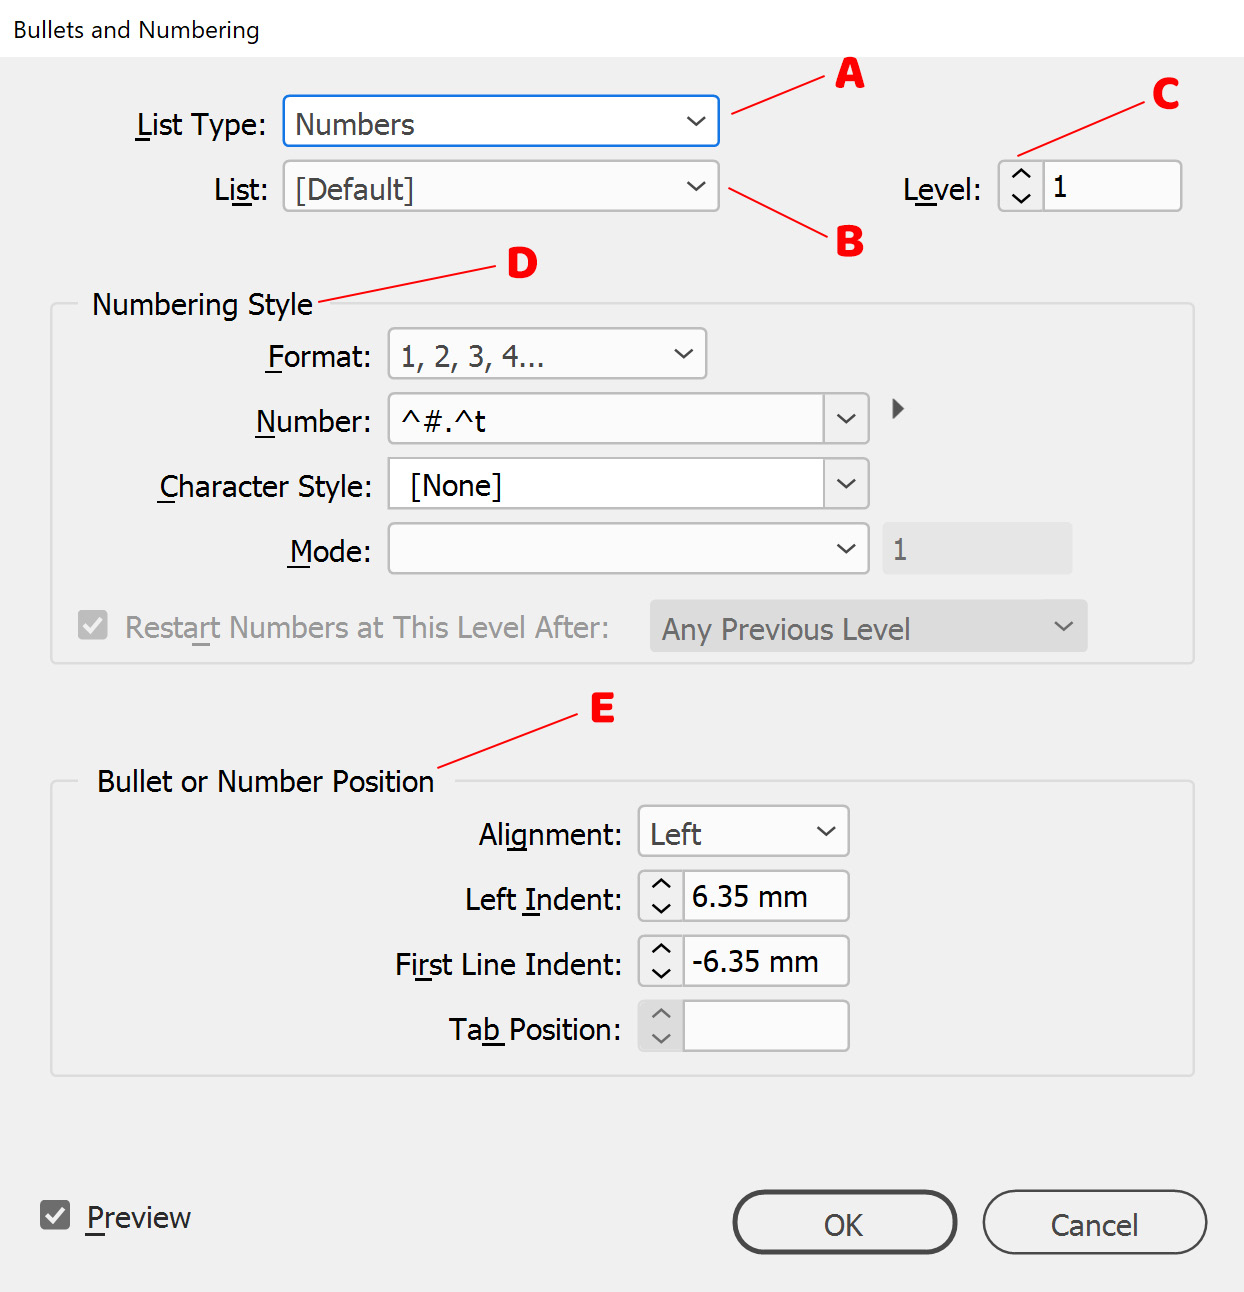
Figure 2.36: Bullets and Numbering dialog box with numbered list options
The dialog box now contains the following options:
- List Type (A in Figure 2.36): As seen in the previous step, except this will now default to Numbers; we will leave this unchanged.
- List (B in Figure 2.36): Allows you to create a defined list that can be identified by name to distinguish it from other lists. This can be useful for continuing numbering across multiple stories or across documents within a book. We will leave this set to [Default].
- Level (C in Figure 2.36): Lists can have multiple levels. Enabling this feature gives you more advanced control over the continuation and restarting of numbering at different levels (see the Note information box at the end of this recipe).
- Under the Numbering Style section (D in Figure 2.36), you will see settings for the following:
- Format: Select from a range of predefined numbering types, including numbers, letters, Roman numerals, and more.
- Number: Here, you can customize the appearance of the number. We will leave this set to the default setting.
- Character Style: Allows you to apply a character style to your list (these are covered in Chapter 8, Formatting with Paragraph and Character Styles). We will leave this set to [None].
- Mode: Allows you to either continue your numbering or restart at a defined number. We won’t change this setting.
- The Bullet or Number Position options (E in Figure 2.36) are all exactly the same as discussed previously in step 4, and there is no need to change these in this instance.
Having created both numbered and bulleted lists, we will next look at how to replace the bulleted list with numbers, which continue across both parts of the list.
- Select the text that was previously formatted with bullets and click the Numbered List icon (marked as B in Figure 2.33). While this changes it into a numbered list, the numbers have reset back to 1 for the second part of the list (as shown in Figure 2.37):
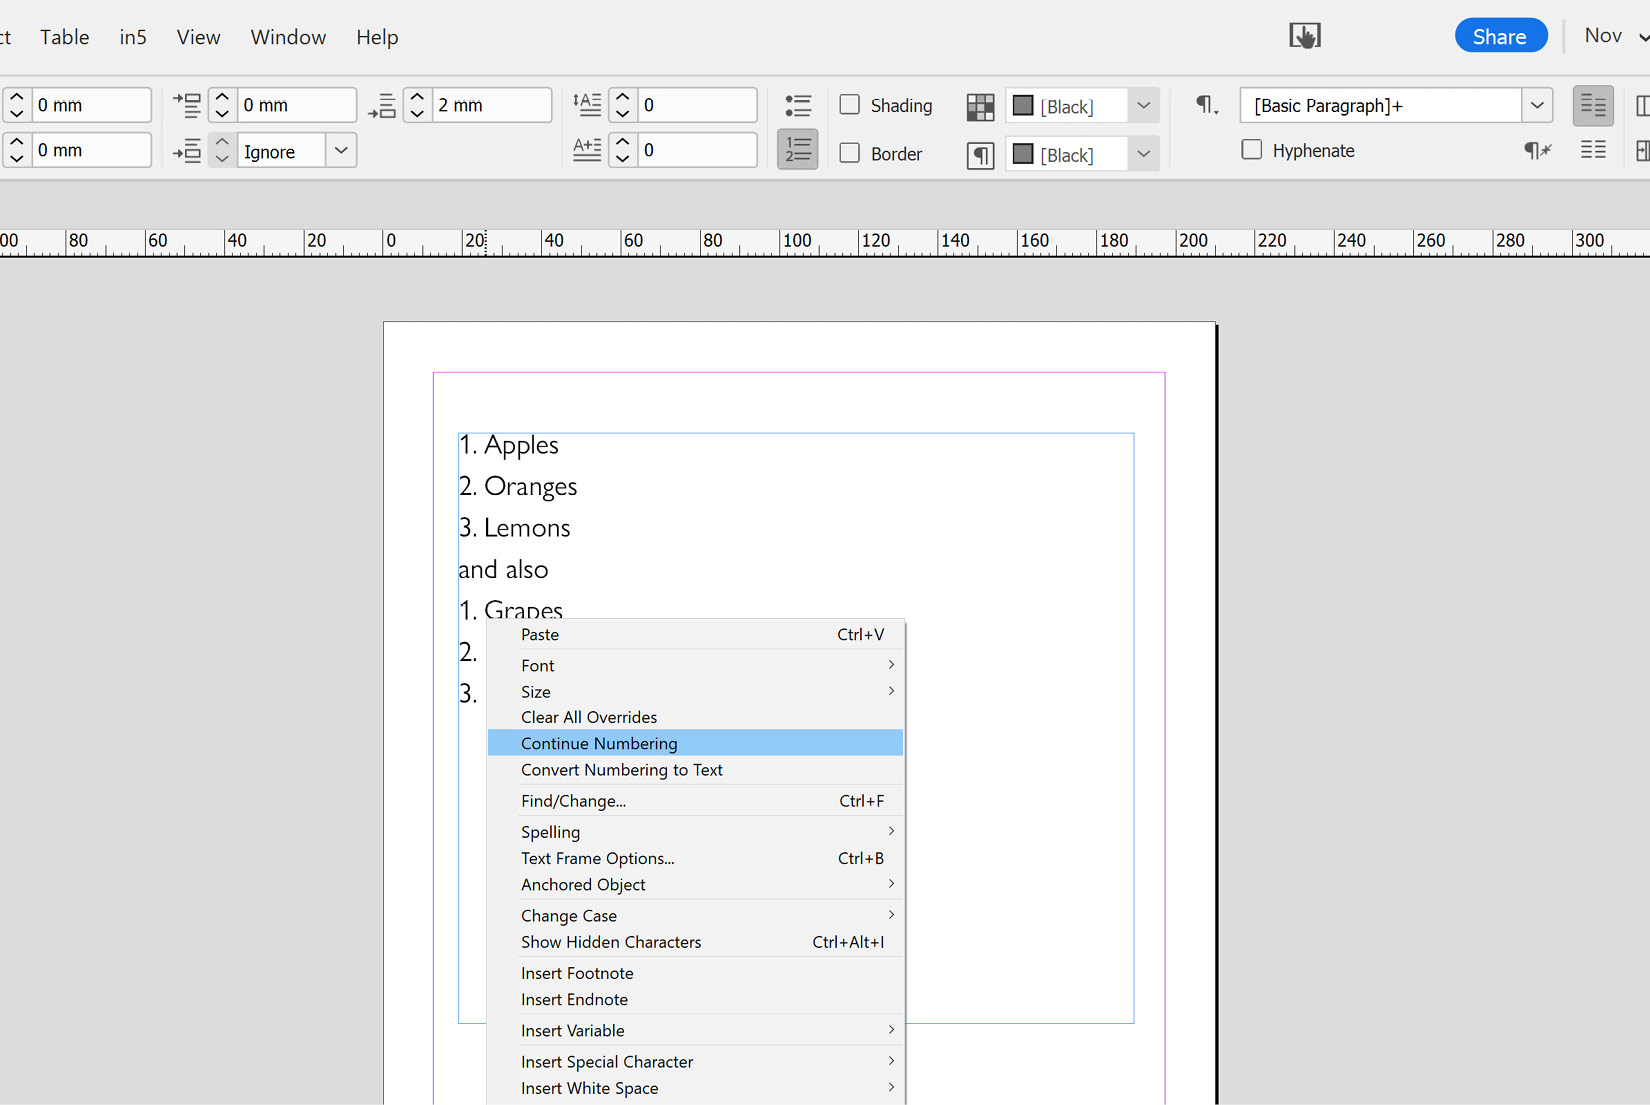
Figure 2.37: Numbered list with numbering restarting
In order to have the numbering continue from the previous part of the list, place the cursor on the first line of the second part of the list then right-click, bringing up the options shown in Figure 2.37. The fifth option listed is Continue Numbering, and you should select this. If you change your mind and wish to have the numbering restart at 1 here, simply repeat this process, and you will find the option that previously said Continue Numbering now says Restart Numbering instead, as the numbering is already being continued.
Note
The Continue Numbering and Restart Numbering options can also be accessed through the Type menu under Bulleted and Numbered Lists.
There’s more…
For more advanced customization of lists, including working with multi-level lists, please see the following article: https://www.highlander.co.uk/blog/advanced-lists-in-indesign.


