Search icon CANCEL
Arrow left icon
Explore Products
Best Sellers
New Releases
Books
Videos
Audiobooks
Learning Hub
Conferences
Free Learning
Arrow right icon
Arrow up icon
GO TO TOP
Workflow Automation with Microsoft Power Automate, Second edition

You're reading from   Workflow Automation with Microsoft Power Automate, Second edition Use business process automation to achieve digital transformation with minimal code

Arrow left icon
Product type Paperback
Published in Aug 2022
Publisher Packt
ISBN-13 9781803237671
Length 424 pages
Edition 2nd Edition
Arrow right icon
Author (1):
Arrow left icon
Aaron Guilmette Aaron Guilmette
Author Profile Icon Aaron Guilmette
Aaron Guilmette
Arrow right icon
View More author details
Toc

Table of Contents (22) Chapters Close

Preface 1. Introducing Microsoft Power Automate 2. Getting Started with Power Automate FREE CHAPTER 3. Working with Email 4. Copying Files 5. Creating Button Flows 6. Generating Push Notifications 7. Working with Shared Flows 8. Working with Conditions 9. Getting Started with Approvals 10. Working with Multiple Approvals 11. Posting Approvals to Teams 12. Using a Database 13. Working with Microsoft Forms 14. Accepting User Input 15. Automating Azure AD 16. Introducing Robotic Process Automation 17. Introducing AI Models 18. Exporting, Importing, and Distributing Flows 19. Monitoring and Troubleshooting Flows 20. Other Books You May Enjoy
21. Index

Creating a sentiment analysis flow

By this point, we’ve configured mechanisms for data capture and storage. Now, we’ll turn to analyzing the data. To start building the flow, follow these steps:

  1. Navigate to the Microsoft Power Automate web portal (https://flow.microsoft.com) and click Create.
  2. Select Automated cloud flow.
  3. Enter a name and choose the When a new response is submitted Microsoft Forms trigger, as shown in Figure 17.10:
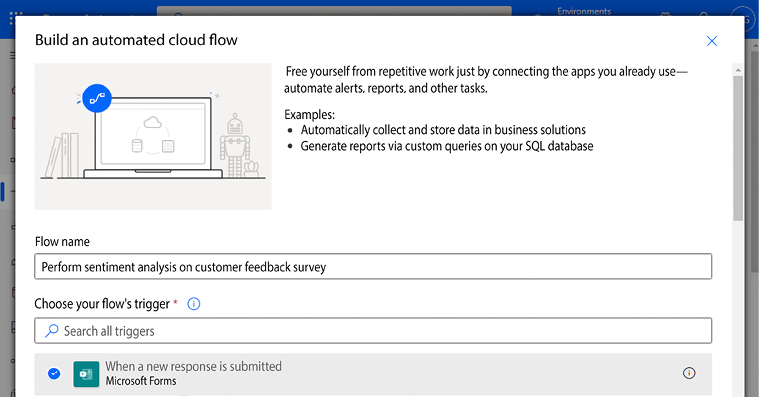
Figure 17.10: Creating a new automated cloud flow

  1. Click Create.
  2. In the When a new response is submitted trigger, select the Customer Feedback Survey form that you created during the prerequisites. If you don’t see your form listed, you can select Enter custom value and use the ID value (the highlighted portion after id=) that you captured at the end of the Creating a Forms survey section:

Figure 17.11: Extracting the form ID value

  1. Click New step.
  2. Select...
lock icon The rest of the chapter is locked
Register for a free Packt account to unlock a world of extra content!
A free Packt account unlocks extra newsletters, articles, discounted offers, and much more. Start advancing your knowledge today.
Unlock this book and the full library FREE for 7 days
Get unlimited access to 7000+ expert-authored eBooks and videos courses covering every tech area you can think of
Renews at $19.99/month. Cancel anytime