Search icon CANCEL
Subscription
0
Cart icon
Your Cart (0 item)
Close icon
You have no products in your basket yet
Save more on your purchases! discount-offer-chevron-icon
Savings automatically calculated. No voucher code required.
Arrow left icon
Explore Products
Best Sellers
New Releases
Books
Videos
Audiobooks
Learning Hub
Newsletter Hub
Free Learning
Arrow right icon
timer SALE ENDS IN
0 Days
:
00 Hours
:
00 Minutes
:
00 Seconds
Arrow up icon
GO TO TOP
Unreal Engine 5 Character Creation, Animation, and Cinematics

You're reading from   Unreal Engine 5 Character Creation, Animation, and Cinematics Create custom 3D assets and bring them to life in Unreal Engine 5 using MetaHuman, Lumen, and Nanite

Arrow left icon
Product type Paperback
Published in Jun 2022
Publisher Packt
ISBN-13 9781801812443
Length 598 pages
Edition 1st Edition
Languages
Tools
Concepts
Arrow right icon
Authors (2):
Arrow left icon
Wilhelm Ogterop Wilhelm Ogterop
Author Profile Icon Wilhelm Ogterop
Wilhelm Ogterop
Henk Venter Henk Venter
Author Profile Icon Henk Venter
Henk Venter
Arrow right icon
View More author details
Toc

Table of Contents (27) Chapters Close

Preface 1. Part 1 Creating 3D Assets
2. Chapter 1: An Introduction to Blender's 3D Modeling and Sculpting Tools FREE CHAPTER 3. Chapter 2: Modeling a Robot Drone Character 4. Chapter 3: Let's Sculpt an Alien Plant! 5. Chapter 4: UV Maps and Texture Baking 6. Chapter 5: Texturing Your Models inside Quixel Mixer 7. Part 2 Building Your Virtual Movie Set in Unreal Engine 5
8. Chapter 6: Exploring Unreal Engine 5 9. Chapter 7: Setting Up Materials in UE 5 10. Chapter 8: Using MetaHuman to Create a Photorealistic Human for UE5 11. Chapter 9: Building a Virtual 3D Movie Set in UE5 12. Chapter 10: Adding Lighting and Atmospheric Visual Effects in UE5 13. Part 3 Character Rigging for Animation in UE5 with Control Rig
14. Chapter 11: Alien Plant Joint Setup in Blender 15. Chapter 12: Alien Plant Skinning in Blender 16. Chapter 13: Robot Joint Setup and Skinning in Blender 17. Chapter 14: Making a Custom Rig for Our Alien Plant with Control Rig 18. Chapter 15: Creating a Control Rig with Basic IK Controls for the Robot in UE5 19. Part 4 Animation in UE5 Using Control Rig and Sequencer
20. Chapter 16: Creating a Simple Swaying Animation Cycle in UE5 Sequencer 21. Chapter 17: Creating Three Simple Animations for the Robot in UE5 Sequencer 22. Chapter 18: Importing Motion Capture onto the MetaHuman Control Rig 23. Chapter 19: Motion Capture Editing and Cleanup Using Control Rig and Sequencer 24. Chapter 20: Using Sequencer to Construct Your Final Scene 25. Index 26. Other Books You May Enjoy

Other sculpting tools

There are two sculpting functions that we will use the most during our tutorial.

These aren't brushes; they act more like functions or modes. We'll start by looking at the Line Project tool.

Line Project tool

This tool is used to flatten an area of your mesh. To use it, you draw a guideline that tells the tool in which direction it should flatten a part of your mesh.

The shadowed side will be flattened toward the clear side, as shown in the following screenshot:

Figure 1.27 – (Left) (A) Drawing the guideline; (B) Observing the flattened mesh area; (C) Another view of the mesh; (Right) The Line Project icon

Figure 1.27 – (Left) (A) Drawing the guideline; (B) Observing the flattened mesh area; (C) Another view of the mesh; (Right) The Line Project icon

You now know how to flatten an area of a mesh if you need to. This function will come in very handy in Chapter 3, Let's Sculpt an Alien Plant!.

Next, let's look at another versatile sculpting tool – the Mesh Filter tool.

Mesh Filter tool

This tool applies an effect of your choice evenly across your entire mesh at the same time.

In the following screenshot, I used the Mesh Filter tool to apply a Noise effect to a mesh's surface. To copy what I have done on my mesh, select the mesh filter icon from the toolbar. In the drop-down menu that opens, select Random, as shown in the following screenshot:
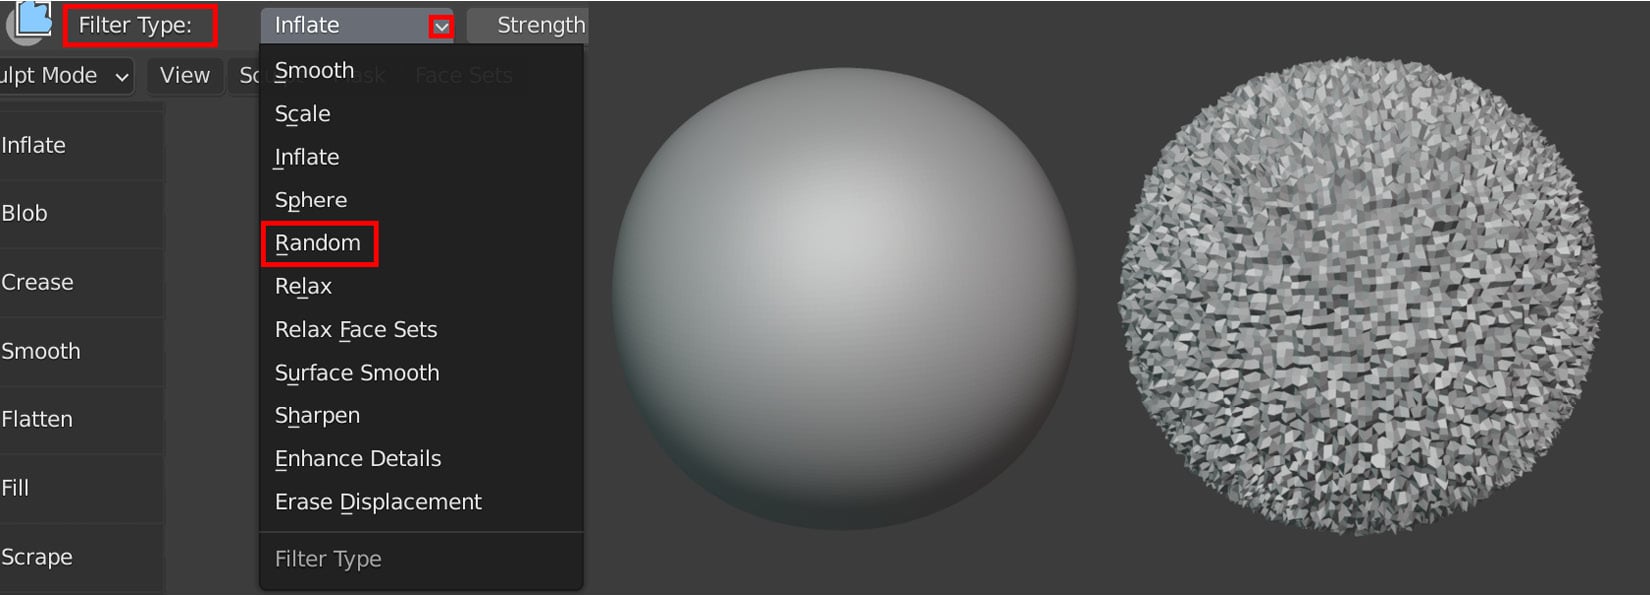
Figure 1.28 – (Left) The mesh filter drop-down menu in the Header bar; (Right) (A) A subdivided sphere on the left; (B) The same sphere with a Noise effect applied

Figure 1.28 – (Left) The mesh filter drop-down menu in the Header bar; (Right) (A) A subdivided sphere on the left; (B) The same sphere with a Noise effect applied

The following screenshot shows the Mesh Filter icon:

Figure 1.29 – The Mesh Filter icon

Figure 1.29 – The Mesh Filter icon

You have just learned how to use the Mesh Filter tool to quickly add an effect (of your choosing from the drop-down menu) to your mesh.

Congratulations! You've completed all the sections in this chapter. With this knowledge, you can start the next chapter.

You have been reading a chapter from
Unreal Engine 5 Character Creation, Animation, and Cinematics
Published in: Jun 2022
Publisher: Packt
ISBN-13: 9781801812443
Register for a free Packt account to unlock a world of extra content!
A free Packt account unlocks extra newsletters, articles, discounted offers, and much more. Start advancing your knowledge today.
Unlock this book and the full library FREE for 7 days
Get unlimited access to 7000+ expert-authored eBooks and videos courses covering every tech area you can think of
Renews at $19.99/month. Cancel anytime
Banner background image