Plugins are packages of code that extend the functionality of the editor in a variety of ways. They can be used for importing file formats the UE is unfamiliar with by default, and add entirely new functionality, such as analytics.
Plugins can be found by going to Edit | Plugins. Once open, we can see a list of available plugins divided into categories:

A lot of plugins are built into the engine and can be enabled or disabled as needed. Speaking of which, if you have Steam VR installed, you may have noticed that it started up automatically when the project launched. Since we're not going to be using any VR functionality in this book, let's disable that plugin now so Steam VR doesn't load every time we start up the editor:
- To disable it, go to the Plugins browser.
- Scroll all the way down on the left side and click on the Virtual Reality category.
- On the right side, scroll down to Steam VR and uncheck it.
- The editor will let you know that you need to restart for the setting to take effect, so click on the Restart Now button to do that.
- Steam VR will not close on its own once you've done this though, so you will need to close that separately.
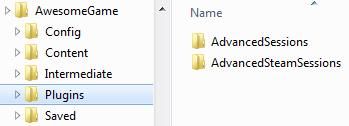
Plugins can also be downloaded and installed from third parties. One of the most useful ones, if you're making a multiplayer game, is the Advanced Sessions plugin by Joshua Statzer. This can be used to make it easier to set up multiplayer server browsers on Steam, for example. Download links can be found on the Epic forums by searching for UE4 Advanced Sessions. Once downloaded, you would need to create a Plugins folder in your project as follows:

After creating the folder, you would place the Plugins folder inside (make sure the editor is shut down), and then start the editor back up, to have the plugin loaded. Most external plugins will provide documentation or example maps that have the relevant Blueprint classes and explanations on how to use them.


