Managed versus Referenced
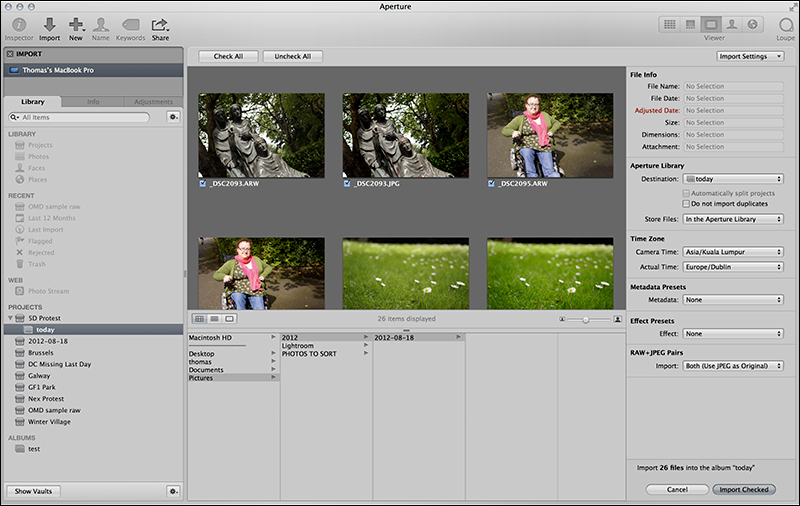
As you may already know, Aperture lets you store your files in two different ways. When you import images into Aperture, you have the option to either have Aperture manage your files in its library (referred to as Managed), or you can have it import your files to a location that you specify on a hard drive (commonly referred to as Referenced). When you choose the latter method, Aperture just imports a reference to your image file rather than the whole file. The merits of both approaches are the cause of much debate among Aperture users. Both options have advantages and disadvantages.
On the one hand, if you store your images within the Aperture library, everything is contained in one handy location. A single file is all you need to worry about when it comes to storing, backing up, or moving a library.
Note
The library file is actually a special kind of folder called a package that behaves like a single file.
When you export a project in Aperture, it exports it as a library file and that file contain, all the image files within the library if you tell it to. This is exactly the same kind of file as the main library file and you can even switch the current library that Aperture is using to an exported library. You can have both managed and referenced files within your library, and you can choose the method on a project-by-project basis.
If you want to be able to access your files in another piece of software, however, then it makes sense to have your images stored in a folder and imported as references. That way you can go to the folder under the Finder and directly access the RAW or JPEG files from there. Otherwise, to access the RAW files you have to Export Originals to another location and you end up with lots of duplicates. Personally, I tend to use referenced when I'm working on my main workstation more often than managed, and I use managed when working on my laptop.
Tip
On my workstation all my photos are stored on a large external hardware RAID (Redundant Array of Inexpensive Drives), which is set up using the RAID 5 protocol, which means that the data is protected from a disk failure. When working on my laptop I prefer to have Aperture manage my images, because it means there are less files filling up my laptop's hard drive, and I can keep everything nice and neat in the Finder.
Which method you choose is up to you. If it's not something you've ever really thought about then you probably should stick with the managed method. However, if you're more comfortable managing files and folders by yourself, then there are some advantages to using referenced files, especially if you work with other software.
Converting between referenced and managed
Switching between managed and referenced files is actually pretty easy. If you have files in the Aperture library, for example, and you would prefer to have them referenced to a location somewhere on your hard drive, you can carry out the following steps:
- Select all the images from the File menu.
- Choose Relocate Originals.
Or control + click, for a contextual menu.
This will give you the option to move the original files to a folder on your drive.
To do the opposite, carry out the following steps:
- Select the images that are referenced.
- Choose Consolidate Originals.
This will give you the option of moving or copying the image files into the Aperture library, where they will then become managed rather than referenced. If you move the files, they will no longer be in their original location, so you need to be careful with this option if you have other software that is also referencing them.
Adding keywords while importing
One of the options in the Metadata section—Keywords (if you have enabled it)—is to set what keywords will be applied to the images while importing. This is something that you should think about carefully. First of all, it's a good idea to add some keywords at this stage, but it's also important to realize that the keywords you add here will be added to all the images. You can't add keywords here for specific images. So here are a few tips for thinking about what to add during import. You generally want to be as generic as possible with the keywords you choose at this stage. You can be more specific when you are sorting and organizing.
- If you are just importing images from a specific shoot, use the details of that shoot. So if it's a fashion shoot, for example, some good options might be
Fashion, Clothes, Clothing. If you have different models in the shoot, you want to avoid adding the models names or descriptions at this point. - If you're on a travel shoot, and you're at a particular location such as a city or a country, you could put that in as a keyword, but if you have multiple locations in the images you are importing, choose something more generic such as
Travel. You could put in the continent as another option, so if you were in Europe, you could putEuropedown as a keyword. - Seasons and weather are often good keywords to add. If it was in winter, put down
Winteras a keyword. You never know when you might need to look for winter images and this will help you find them.
Importing images to an album
Normally, when you import images into Aperture, you import them directly into a project, whether it is a new project or an existing one. However, you can actually import directly to an album too. Here's how to do it in the following:
With the import dialog box open, you will see your library on the left-hand side with all your existing projects and albums. If you want to import into an existing album, simply select the album in this pane. You will notice that the Destination on the right changes to the name of the album. If your album is a project album, the images will be imported into the parent project, and will automatically be added to that album.
If you select a root-level album, then the images will be imported to a new project with the date of the first image as its name, as well as being added to the album. This is because all images must belong to a project.
If you don't have an album but want to import to one, you will notice that the New button on Aperture's toolbar is still accessible when the import dialog is open, even though other options are grayed out. From here you can create a new album, and again, it can be a project album or a root-level album. I recommend you only use this method for project-level albums, because otherwise you end up with a bunch of oddly named projects.

If you're wondering why you would want to do this in the first place, there are plenty of scenarios for why it makes sense. Say, for example, you're doing a travel shoot and you have a project for the city you're in. You might want to break that project down by day or location. Rather than having individual projects, you can store them all in one project and separate them by album, while you could manually sort them into albums after importing this method. This procedure lets you save time and do it during the import session.
Creating presets for your camera
One of the things mentioned earlier is that it is a good idea to create presets for your cameras. You may often find that when you import a RAW file into Aperture it can look quite a bit different from the JPEG or what you saw on the back of the camera when you took the shot. This is because Aperture's interpretation of the RAW file may be different than your camera. Aperture has gotten a lot better at matching the colors of the camera's JPEG images lately though. It used to be that images in RAW could be a lot different from what you expect, but Apple's engineers have become really good at profiling various cameras. Unfortunately though, Aperture doesn't have profiles for individual shooting modes that a camera may support. So, for example, if you have shot using your camera's vivid setting, when you import using RAW, all that nice contrast and vibrancy is lost. If you find yourself making certain adjustments to an image over and over again every time you import, the best thing to do is to create an effect preset. Each camera's RAW files are different, so you should consider creating one for each camera you own and tweak the setting till they are just right. However, you want to be careful when creating effect presets for use during import. They need to be fairly generic and you should avoid using adjustments that need to vary from shot to shot. Here are some do's and don'ts for creating presets to be applied while importing:
|
Do's |
Don'ts |
|---|---|
|
Tweak things such as contrast, black level, definition, and vibrancy |
Use a white balance adjustment for an import preset |
|
Adjust Curves tool |
Adjust the RAW fine-tuning. These options aren't stored with effect presets. |
|
Tweak the tint, Highlight and Shadows if you need to | |
|
Use a color adjustment to get the colors right for your camera |
Real world examples
Let me give you a couple of examples. First, here is an effect for use on import, which was created for a Fuji X100 camera. The reason that this was created is that, while the RAW files in Aperture are pretty close to the camera's JPEG images, the RAW conversion doesn't support some of the camera's options such as its shadow and highlight tone curves, and also its extended dynamic range. As these options are regularly used when shooting with this camera, a preset was created that mimics these options. This is then selected when importing images from the X100.
The following screenshot shows the settings used in creating this preset:

What was done adds a tiny bit of contrast and a little bit of definition because it seemed that the RAW files were a little flat compared to the JPEG files. Some vibrancy was also added to boost the color. To simulate the camera's dynamic range optimization, some Highlight and Shadows adjustments, similar to the ones in the previous screenshot, were added.
For a more complicated example, here is an import effect that was created for the Canon 5D Mark II. In my opinion, Aperture's handling of the RAW files from the Canon is quite a bit off in terms of color. To create a preset, both RAW and JPEG versions of the same images were imported and, using a color adjustment, the settings were manually tweaked until it looked right. It required quite a bit of trial and error and several attempts to get it right. But persistence eventually paid off and the result was a preset that can be applied on import. Some other adjustments were also added, including some slight tint tweaks, very simple curves, and levels adjustment.
You will learn techniques for working with adjustments in a later chapter, but for now, here is a screenshot of the adjustments that were used in this preset:


