Search icon CANCEL
Subscription
0
Cart icon
Your Cart (0 item)
Close icon
You have no products in your basket yet
Save more on your purchases! discount-offer-chevron-icon
Savings automatically calculated. No voucher code required.
Arrow left icon
Explore Products
Best Sellers
New Releases
Books
Videos
Audiobooks
Learning Hub
Newsletter Hub
Free Learning
Arrow right icon
timer SALE ENDS IN
0 Days
:
00 Hours
:
00 Minutes
:
00 Seconds
Arrow up icon
GO TO TOP
Learning GDScript by Developing a Game with Godot 4

You're reading from   Learning GDScript by Developing a Game with Godot 4 A fun introduction to programming in GDScript 2.0 and game development using the Godot Engine

Arrow left icon
Product type Paperback
Published in May 2024
Publisher Packt
ISBN-13 9781804616987
Length 378 pages
Edition 1st Edition
Languages
Tools
Concepts
Arrow right icon
Author (1):
Arrow left icon
Sander Vanhove Sander Vanhove
Author Profile Icon Sander Vanhove
Sander Vanhove
Arrow right icon
View More author details
Toc

Table of Contents (22) Chapters Close

Preface 1. Part 1:Learning How to Program
2. Chapter 1: Setting Up the Environment FREE CHAPTER 3. Chapter 2: Getting Familiar with Variables and Control Flow 4. Chapter 3: Grouping Information in Arrays, Loops, and Dictionaries 5. Chapter 4: Bringing Structure with Methods and Classes 6. Chapter 5: How and Why to Keep Your Code Clean 7. Part 2: Making a Game in Godot Engine
8. Chapter 6: Creating a World of Your Own in Godot 9. Chapter 7: Making the Character Move 10. Chapter 8: Splitting and Reusing Scenes 11. Chapter 9: Cameras, Collisions, and Collectibles 12. Chapter 10: Creating Menus, Making Enemies, and Using Autoloads 13. Chapter 11: Playing Together with Multiplayer 14. Part 3: Deepening Our Knowledge
15. Chapter 12: Exporting to Multiple Platforms 16. Chapter 13: OOP Continued and Advanced Topics 17. Chapter 14: Advanced Programming Patterns 18. Chapter 15: Using the File System 19. Chapter 16: What Next? 20. Index 21. Other Books You May Enjoy

Moving the player character

Cool, after that detour to vector math, let’s continue working on our game. The first thing we’ll start out with is player movement.

Changing the current player node

Godot has a physics engine baked into it. To utilize it, we will have to use the physics nodes provided by Godot itself. The player is currently a Node2D, but we actually want it to be a CharacterBody2D.

Luckily, it is very easy to change the type of a node. To do so, follow these steps:

  1. Right-click on the Player node.
  2. Select Change Type as shown in the following figure:
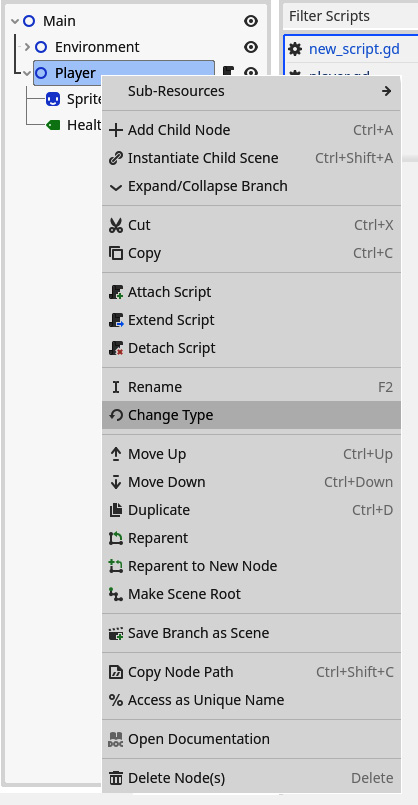
Figure 7.12 – Node type can be changed through the menu that pops up when right-clicking that node

Figure 7.12 – Node type can be changed through the menu that pops up when right-clicking that node

  1. Search for CharacterBody2D as follows:
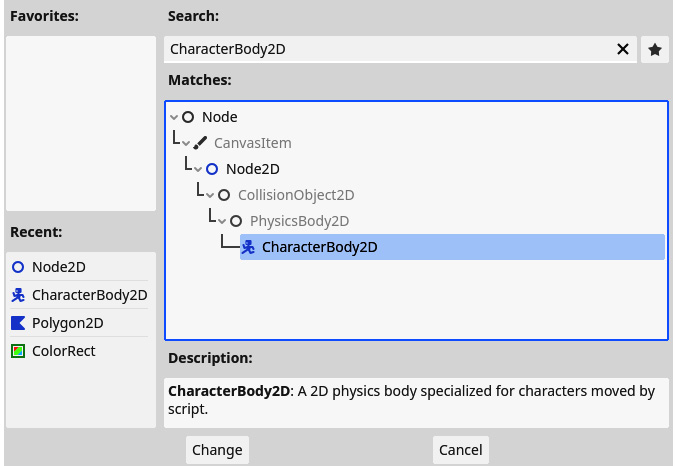
Figure 7.13 – Search for the CharacterBody2D node type

Figure 7.13 – Search for the CharacterBody2D node type

  1. Select the CharacterBody2D node and you will see the icon for the Player node change to reflect our selection:
Figure 7.14 – The player node changes from Node2D to CharacterBody2D

Figure 7.14 – The player node changes from Node2D to CharacterBody2D

  1. You will notice that a yellow warning sign appeared. If you hover over it, you’ll see it tells us that the player needs CollisionShape2D or CollisionPolygon2D.

These shapes help us to do correct collision handling. Let’s ignore that for now. We will deal with collision detection in Chapter 9.

The script of our player will still work as before because the CharacterBody2D node is a child class of the Node2D class and, as we saw in Chapter 4, treating CharacterBody2D as Node2D works because of the principles of polymorphism.

We want to use certain functionalities of the CharacterBody2D node in our script, so we will have to change the class our player script extends from to CharacterBody2D:

extends CharacterBody2D
# Rest of the player script…

The Player node is correctly converted to a physics entity. Let’s learn how to move it in the next section.

Applying forces to the player

Now that the player character is a physics body, we will be able to apply physical forces to it and make it move!

Before we implement the complete movement schema, let’s first make it so the character moves toward the right. Just add this little snippet of code to the player script:

func _physics_process(delta: float):
   velocity = Vector2(500, 0)
   move_and_slide()

Moving a CharacterBody2D node has to be done in two steps:

  1. Calculate and set the velocity variable for the body. This velocity is a member variable of CharacterBody2D and represents the speed and direction the body is moving in. In this example, I set it to a vector of (500, 0), which means a force to the right.
  2. Call the move_and_slide() function. This function will apply the velocity we just set and handle all the collision detection for us. If a collision is detected, this function will also slide along the surface of that collision shape. This results in natural-looking movement that does not snag on things too much. Figure 7.15 demonstrates this function:
Figure 7.15 – move_and_slide() encountering a collision and sliding along the surface

Figure 7.15 – move_and_slide() encountering a collision and sliding along the surface

The velocity sets the force we want to apply to the character. Calling move_and_slide() then truly applies that force and calculates all the repercussions and interactions between other physics bodies. For now, there are no other bodies to interact with; we’ll implement those in Chapter 9.

  1. Run the game and you’ll see the player character slowly scroll off the screen toward the right.

As an experiment, try making the character move upward.

In the preceding code snippet, you can see that we use the _physics_process() function to do our movement calculations. Let’s have a look at why we use this function specifically in the next section.

Process and physics process functions

We already saw the _process() function briefly in Chapter 1 but didn’t use it back then. This function gets executed for every frame the game runs on each node, which means that if the game runs at 120 frames per second, this function gets executed 120 times per second. In reality, the framerate of a game varies a lot, so the _process() function can be run more or fewer times per second.

For physics simulations, varying the frame rate is a problem. Physics calculations can quickly become very inaccurate, miss collisions, and introduce jitter if the framerate at which they get done isn’t stable. This is why physics engines introduce the concept of physics frames. They get executed at a stable interval and try very hard not to fluctuate. So, the _process() function gets executed as many times per second as possible, while the _physics_process() function gets executed at a rate that is as stable as possible.

This is why we use _physics_process() in the previous example. This function gets called every physics frame, every time the physics calculations happen. By default, in Godot, this rate is 60 times per second.

The delta parameter provides us with the elapsed time since the last time the _physics_process() function was called, just like the delta parameter in the regular _process() function. When we have 60 physics frames per second, this time should be stable at 1.0 / 60.0 frames per second = 0.01667 seconds.

Both _process() and _physics_process() work very similarly in that they get called periodically during the execution of the game. But for physics calculations, we want to use _physics_process().

Mapping input

To move the player’s character in the direction the player intended to, we first need input from the player. This input is typically given through a keyboard, mouse, or controller.

The common input methods for moving a video game character are summarized in Table 7.1:

Arrows

Keys

Analog stick

D-pad

Move left

A

Left on x-axis

Move right

D

Right on x-axis

Move up

W

Up on y-axis

Move down

S

Down on y-axis

Table 7.1 – Input methods for moving a video game character

To coordinate all these different inputs and devices into one coherent system, Godot has a built-in input map tool. This will manage the complexity for us, so we can just focus on using the inputs within the game.

The input map basically groups input events (such as the left arrow, the A key, the left joystick movement, and the left button on the D-pad) into one action (moving left). All we have to do is define each action and link all the input operations we want to support.

Let’s set up our input map:

  1. Open up the Project Settings. You’ll find these in the Project menu item at the top of the editor.
  2. Then navigate to the Input Map tab:
Figure 7.16 – The Input Map tab within Project Settings

Figure 7.16 – The Input Map tab within Project Settings

  1. Type move_left in the input field that says Add New Action and press Add. You’ll see a new action appear in the main section of the window now:
Figure 7.17 – Adding a new action called move_left

Figure 7.17 – Adding a new action called move_left

  1. Press the + sign next to the action name to add an event to our action.
  2. Now, with the top input field selected, press the left-arrow key on your keyboard.
  3. Make sure Physical Keycode is selected in the bottom dropdown menu and press OK to add the event to the action:
Figure 7.18 – Configuring the event to be the left arrow key

Figure 7.18 – Configuring the event to be the left arrow key

Notice that the physical keycode is selected at the bottom.

  1. Repeat steps 3 to 5 for the A key if you are on a QWERTY keyboard or use the equivalent key for your keyboard’s layout.
  2. Repeat steps 3 to 5 for the analog stick movement and D-pad button of a controller if you have one lying around. If you don’t have one to connect to your computer, you can just search for the next events in the menu:
    • Joypad Axis 0 (left stick, joystick 0 left)
    • Joypad Button 13 (D-pad left)
  3. Now create the move_right, move_up, and move_down actions and repeat the previous steps to add all the appropriate input events to each.

Your input map should look a bit like this when you are finished:

Figure 7.19 – The complete input mapping to make the player character move

Figure 7.19 – The complete input mapping to make the player character move

Physical keycode

Each key on a keyboard has a unique scancode. This is a simple number that identifies that unique key. This scancode gets interpreted by the operating system into a keycode, that is, a letter, character, or any of the other operations on the keyboard. This interpretation takes the keyboard layout into account (QWERTY, AZERT, etc.). The problem is that keys get put in different places depending on the keyboard layout and operating system you are using.

To simplify this, Godot has physical keycodes that directly use the scancode of a key instead of its underlying character or operation. This way, we make sure that the movement keys (which on a QWERTY keyboard are WASD, but on an AZERTY keyboard are ZQSD) are always in the same spot no matter the keyboard layout.

Using the input

Using the input actions we set up for the directional movement of the player character is quite easy in Godot because it has a built-in function that can take four actions and spit out a vector that represents the direction the player wants to move in.

This function is defined on the global Input object and is called get_vector(). It takes four arguments, which are the names of the action for the negative x direction, positive x direction, negative y direction, and positive y direction.

Singletons

Global objects are objects that are accessible from any part of the code base and are automatically instantiated. They are also called singletons or auto loads.

To make our character move, all we need to do is the following:

func _physics_process(delta: float):
   var input_direction: Vector2 = Input.get_vector("move_left", "move_right", "move_up", "move_down")
   velocity = input_direction * 500.0
   move_and_slide()

You can see that we store the input direction in a variable called input_direction and then multiply this directional vector by 500. This is because the vector that comes back from get_vector() has a length of 1, which is very short and would make our character’s movement almost indistinguishable from standing still.

When running the game, we can finally move our character using all the different input methods we set up. Success!

As an experiment, try not multiplying the input direction by 1000.

Smoothing out the movement

Now, the player movement already works fairly well, but it feels very stiff. From the moment our character starts moving, it moves at the maximum speed and when we let go of all buttons, the character instantly stops. This is not how things move in the real world. There always is a period of acceleration and deceleration before and after moving.

Let’s first start off by defining some export variables so we can play around with all the different parts of the movement. This will make tweaking and polishing way easier.

At the top of the player script, add an export variable for the maximum speed, acceleration, and deceleration:

@export var max_speed: float = 500.0
@export var acceleration: float = 2500.0
@export var deceleration: float = 1500.0

Then, rewrite the _physics_process() function once more, as follows:

func _physics_process(delta: float):
   var input_direction: Vector2 = Input.get_vector("move_left", "move_right", "move_up", "move_down")
   if input_direction != Vector2.ZERO:
      velocity = velocity.move_toward(input_direction * max_speed, acceleration * delta)
   else:
      velocity = velocity.move_toward(Vector2.ZERO, deceleration * delta)
   move_and_slide()

Vector2.ZERO is just a nice replacement for Vector2(0, 0). It’s not shorter, but it is easier to read.

You can see that we put the input vector in a new variable. Then we checked whether it was equal to the zero vector (0, 0). In this case, the player is giving input, so we have to accelerate in the direction of the input_direction. We do this using the move_toward() function. This function will move the vector we call it on, which in this case is the velocity variable, to match up with another vector, which in this case is the input_direction scaled by max_speed; the scaled input_direction is the first parameter for the distance over which we move, which is the second parameter. The great thing about move_toward() is that it doesn’t overshoot the target vector, so we don’t have to do any additional calculations. Figure 7.20 demonstrates this:

Figure 7.20 – move_towards demonstrates that moving from (1, 3) to (6, 3) over 2 units results in (3, 3)

Figure 7.20 – move_towards demonstrates that moving from (1, 3) to (6, 3) over 2 units results in (3, 3)

The vector we want to move toward is input_direction multiplied by max_speed, which is basically the vector we had in the last section, Using the input.

The amount with which we try to move towards the new vector is acceleration times delta that comes into the _physics_process() function. This makes sure that the acceleration and deceleration always get applied at the same rate and are independent of framerate. We don’t need to multiply velocity itself by delta because move_and_slide() already incorporates delta between physics frames by default.

In the case where the input_direction is equal to the zero vector, we want to decelerate. We do this in exactly the same way as accelerating, moving the velocity toward the zero vector using deceleration as the amount of this movement.

When you run the game now, you’ll see that the movement feels way better. You can play around with the exported variables a bit to finetune everything to your liking.

Important note

Remember that you change these variables while the game is running because we exported the variables!

In this section, we have learned how to set up a physics object to move around and how to process directional input and we have done a deeper dive into smooth movement. Next, let’s learn how to debug a game while it is running.

lock icon The rest of the chapter is locked
Register for a free Packt account to unlock a world of extra content!
A free Packt account unlocks extra newsletters, articles, discounted offers, and much more. Start advancing your knowledge today.
Unlock this book and the full library FREE for 7 days
Get unlimited access to 7000+ expert-authored eBooks and videos courses covering every tech area you can think of
Renews at $19.99/month. Cancel anytime
Banner background image