Search icon CANCEL
Subscription
0
Cart icon
Your Cart (0 item)
Close icon
You have no products in your basket yet
Save more on your purchases! discount-offer-chevron-icon
Savings automatically calculated. No voucher code required.
Arrow left icon
Explore Products
Best Sellers
New Releases
Books
Videos
Audiobooks
Learning Hub
Free Learning
Arrow right icon
Arrow up icon
GO TO TOP
gnuplot Cookbook

You're reading from   gnuplot Cookbook Visual guide to every kind of graph you can make with this plotting software with this book and ebook

Arrow left icon
Product type Paperback
Published in Feb 2012
Publisher Packt
ISBN-13 9781849517249
Length 220 pages
Edition 1st Edition
Tools
Arrow right icon
Author (1):
Arrow left icon
Lee Phillips Lee Phillips
Author Profile Icon Lee Phillips
Lee Phillips
Arrow right icon
View More author details
Toc

Table of Contents (18) Chapters Close

gnuplot Cookbook
Credits
About the Author
About the Reviewers
www.PacktPub.com
Preface
1. Plotting Curves, Boxes, Points, and more 2. Annotating with Labels and Legends FREE CHAPTER 3. Applying Colors and Styles 4. Controlling your Tics 5. Combining Multiple Plots 6. Including Plots in Documents 7. Programming gnuplot and Dealing with Data 8. The Third Dimension 9. Using and Making Graphical User Interfaces 10. Surveying Special Topics Finding Help and Information
Index

Plotting with polar coordinates


All the plots in this chapter up to now have implicitly used rectangular coordinates, usually denoted as x and y. For certain types of information, however, polar geometry is the natural coordinate system. In polar coordinates we have a radius, r, measured from the origin, usually at the center of the graph, and an angle, θ, usually measured counter-clockwise from the horizontal. On the gnuplot command line, the angular coordinate is called t by default. The following is an example of a spiral illustration:
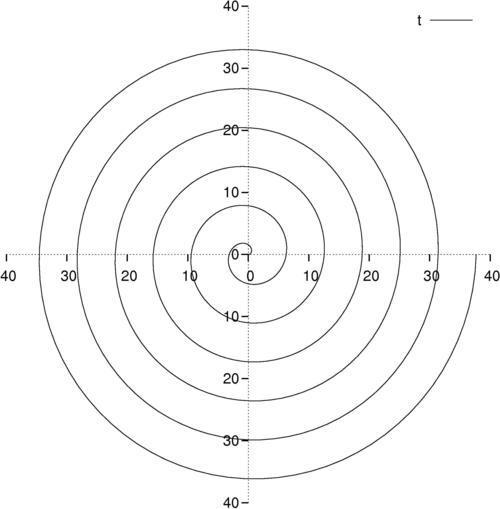
Using polar coordinates we can plot spirals and closed curves that are impossible to define explicitly using rectangular coordinates.

How to do it…

Following is an example of how to use polar coordinates to get the spiral shown in the previous illustration:

set xtics axis nomirror
set ytics axis nomirror
set zeroaxis
unset border
set samples 500
set polar
plot [0:12*pi] t

How it works…

The first three lines create a pair of axes that intersect at the origin in the center of the graph. This works for polar plots too, where we are measuring the radius from the center. The unset border line removes the frame that has served up to now as axes for our rectangular coordinate plots. Next, we increase the number of samples for a smooth plot. The crucial, highlighted line set polar changes to polar (r-θ) coordinates from the default rectangular (x-y). In the plot command, t is now a dummy variable that passes through the given angular range (default [0:2*pi], changed to [0:12*pi] here), and the provided function (r) is a function of t, in this case the identity, that yields a circular spiral.

lock icon The rest of the chapter is locked
Register for a free Packt account to unlock a world of extra content!
A free Packt account unlocks extra newsletters, articles, discounted offers, and much more. Start advancing your knowledge today.
Unlock this book and the full library FREE for 7 days
Get unlimited access to 7000+ expert-authored eBooks and videos courses covering every tech area you can think of
Renews at $19.99/month. Cancel anytime
Banner background image