Search icon CANCEL
Subscription
0
Cart icon
Your Cart (0 item)
Close icon
You have no products in your basket yet
Save more on your purchases! discount-offer-chevron-icon
Savings automatically calculated. No voucher code required.
Arrow left icon
Explore Products
Best Sellers
New Releases
Books
Videos
Audiobooks
Learning Hub
Free Learning
Arrow right icon
Arrow up icon
GO TO TOP
Extending Microsoft Dynamics 365 for Operations Cookbook

You're reading from   Extending Microsoft Dynamics 365 for Operations Cookbook Create and extend real-world solutions using Dynamics 365 Operations

Arrow left icon
Product type Paperback
Published in May 2017
Publisher Packt
ISBN-13 9781786467133
Length 442 pages
Edition 1st Edition
Languages
Arrow right icon
Author (1):
Arrow left icon
Simon Buxton Simon Buxton
Author Profile Icon Simon Buxton
Simon Buxton
Arrow right icon
View More author details
Toc

Table of Contents (16) Chapters Close

Preface 1. Starting a New Project FREE CHAPTER 2. Data Structures 3. Creating the User Interface 4. Application Extensibility, Form Code-Behind, and Frameworks 5. Business Intelligence 6. Security 7. Leveraging Extensibility 8. Data Management, OData, and Office 9. Consuming and Exposing Services 10. Extensibility Through Metadata and Data Date-Effectiveness 11. Unit Testing 12. Automated Build Management 13. Servicing Your Environment 14. Workflow Development 15. State Machines

Creating a new Model and Packages

When creating a new project, it is usually a new Package and a new Model. This keeps things simple, and there is usually no benefit in separating them. You may wish to create a test project in a different Model in the same solution, but you may not wish to deploy the test projects to live.

There are two types of projects: an extension project and an over-layer project. Over-layering means modifying the source code of Operations, and requires a code upgrade for each application hotfix. Extension projects work on delta changes to the standard object, or using delegates to affect code execution. Extension projects shouldn't need a code upgrade when application hotfixes are applied. Avoidance of over-layering cannot be overstated, in the time this book was being written Platform and Foundation have been locked, meaning that the over-layering must be removed. The ability to write good code through extension has been improved with each release, and with clever design the need to over-layer has been significantly reduced.

We will use extension projects exclusively, in order to to avoid conflicts with future upgrades. They make it possible to service the environment without having to deploy a new build of the custom solution. This is very exciting for ISV solutions, but also very important for VAR and end-user customers.

See the There's more... section for information on the relationship between packages, models and projects.

Getting ready

Startup Visual Studio and ensure that we are correctly connected to VSTS. As of the current release, you must start visual studio as an administrator.

How to do it...

To create the project, follow these steps:

  1. Under the Dynamics 365 menu, choose Model Management | Create model....
  2. The Model name is named as we would in AX 2012, and should be named like a new type, such as <prefix><area/module><ShortName>.
  3. Complete the first steps as follows:

Field

Value

Model name

In our case, our company is called Contoso, so our prefix will be Con, the area of change is an existing module (WHS) and it is for general extensions (extending standard objects without customization).

It is therefore named ConWHSGeneralExtensions. You should use your own prefix and prefixes, and the name for explained further in the There's more... section.

Model publisher

Your organization's name.

Layer

As follows:

ISV / vertical solution / add-on: ISV

VAR / Partner solution / add-on: VAR

Customer solution / add-on: CUS or USR

The customer layers were traditionally used to segregate a customer's global solution layer from the requirements of each country implementation.

The layer technology is processed very differently for the extension projects, and has lost some significance in this release.

Version

Leave as 1.0.0.0

You can update this to maintain a version of the model. This does not auto-increment and is usually left as default.

Model description

A full description of the model for other developers to read.

Model display name

Leave as default, which should be the Model name.

  1. Press Next.
  2. In the Select package page, choose Create new package.
If you choose Select existing package, it will mean that your model will be placed under the package and is intended to over-layer the elements in in that package. You cannot over-layer elements in extension projects, but unless we absolutely must over-layer, always choose Create new package.
  1. Press Next.
  2. We are now offered a list of packages that we can reference, these are listed as package's name and the models that the package contains, check ApplicationSuite and press Next.
Most of the elements in Operations are in ApplicationSuite; so, unless our package doesn't need any standard, type this will always be selected. The others we would select based on the elements we know we will use. We can add more package references later, but if we know which elements we will use, it saves some time..
  1. The two check boxes, Create new project and Make this my default model for new projects, should both be checked.
  2. Press Finish.
  3. This opens the New Project dialog. The project name is usually the same as the package and Model name; then, enter the package name in the Name field.
  4. The Location field must be changed; it will create the project in the default project folder, but we linked C:Projects<initials/username> to source control. The project must be created under this folder. So, in my case, Location must be C:ProjectsSB.
  5. The Solution name field should be left as the project name.
  6. Ensure that both Create directory for solution and Add to source control are checked.
  7. Press OK.

How it works...

To see what we just did, we can simply look at the results. Use Windows explorer to navigate to the local packages folder, which is usually, C:AOSServicePackagesLocalDirectory. There, you will see the following structure, for the example package, ConWHSGeneralExtensions:

Folder

Description

ConWHSGeneralExtensions

This is a package folder

+ ConWHSGeneralExtensions

This is a model folder with a subfolder per type

+ Descriptor

This contains a descriptor file for each model

+ XppMetadata

This system managed folder for the Xpp metadata for all models in the package. This holds compiler metadata information about each element, not the actually source code. This includes the methods in a class, the type of method, the parameters, and so on.

We would never normally change anything here, but there are exceptions:

  • If two developers create a different package at the same time, they can both get the same model ID, in which case, bad things start to happen. The solution is to check out the model's descriptor xml file in the Source Control Explorer and manually change the ID to the next number.
  • You may decide that a standard package should be deleted, such as the tutorial or the sample fleet management solution. You can do this by simply deleting the package folder. Should you want to remove a standard model, you can delete the model folder, but you must also delete the relevant model descriptor file from the package's Descriptor folder. Obvious care needs to be taken, as you can't get it back!

The first point about can be solved by nominating a person to create packages and models.

If you look in the Source Control Explorer in Visual Studio, you will only see that the Projects folder has been added. This is correct. The Metadata folder will only appears when we create new elements.

There's more...

When a solution is designed, it will be done by breaking the solution into packages of functionality. This is a normal design paradigm that has now been implemented (and, to an extent, enforced) within Operations. This means that our solution design will now define the various packages, and how they depend on each other. In the case of Operations, the package is a deployable unit that becomes a distinct DLL.

We can make a hotfix to a package and, technically, deploy it separately to other packages in the solution. Although this is possible, we would normally create a release of packages as a Deployable package. A Deployable package is a collection of one or more packages that contains both the built package code of one or more packages, and the routine required to install them. This process is simplified using a build server that performs the build process for us, executes any tests, and creates Deployable packages that we can then apply to our test environment.

There is a further level within Operations, which is a Model. A Model is a subset of elements, such as classes, within a package and can be used to move code from one development system to another, for example. A Model can only belong to one package, and a Package can contain one or more Models. Each package becomes a DLL, that has to have references added in order to 'see' elements in order packages. Because of this we should use a limited number of packages. As a guide we tend to have one package for the main stream, and one for reporting and business intelligence. To simplify management of development tasks, we tend to have a project per specification / Technical Design Document (TDD), all within the main or reporting packages, simplifying multi-developer projects. Just like working on complex C# projects, we can perform code merges, branching, and shelving within VSTS.

Layers has been a core part of prior releases from its first release, but is no longer that significant. As a partner we still use the VAR layer, and recommend the same guidelines as before to customers as before, but since we avoid over-layering this feature will not be covered in this book.

The dependencies are defined against the Package, not the Model. When we create a project, the project is associated with a Model. It is typical, and desirable, to keep this structure simple and only have one Model (or limited to a few Models) for each package and to give both entities the same name.

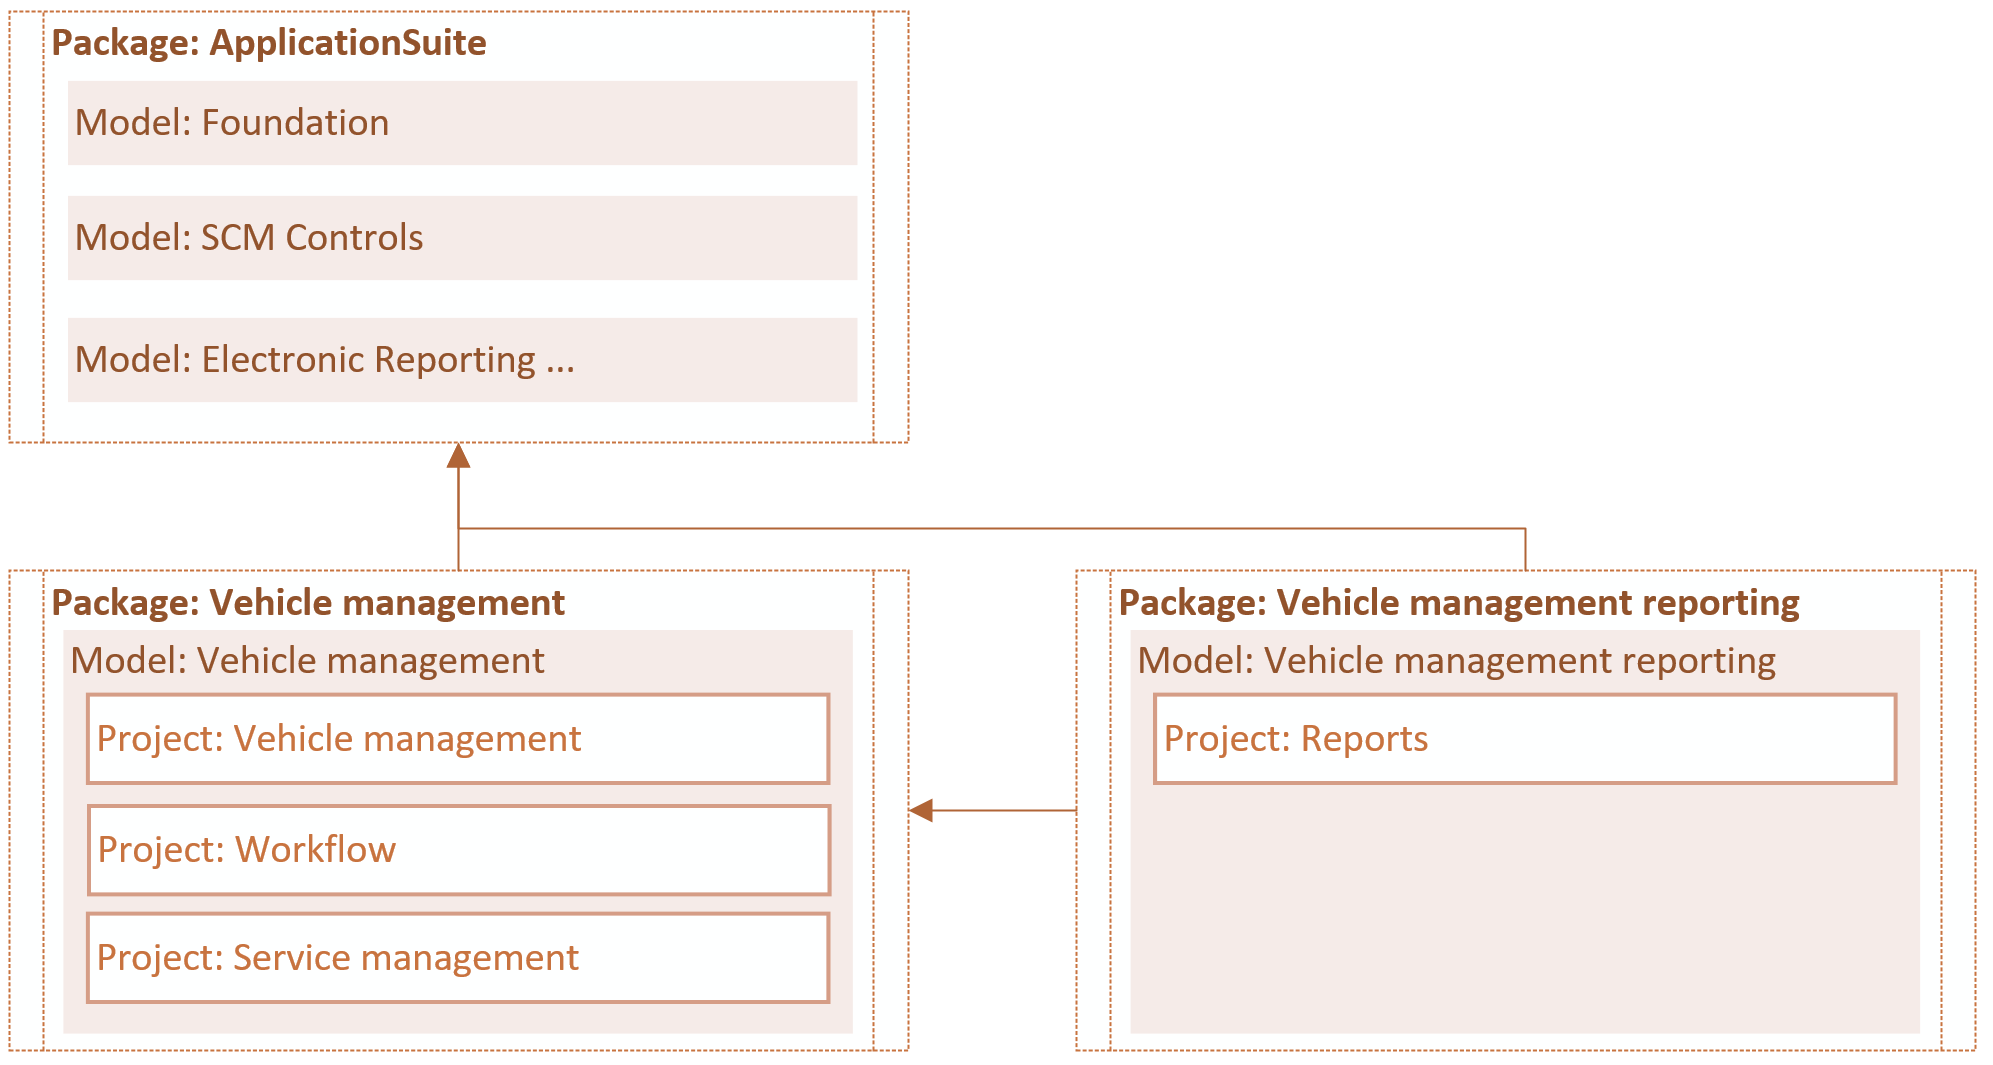
The following diagram shows a typical Package, Model, and Project structure:

The ApplicationSuite package is a standard package that we normally always reference, as it contains the majority of the types that we usually need. The arrows indicate the reference direction, showing that it is not possible for the Vehicle management package to see the elements created in the Vehicle management reporting package.

Prefixes and naming conventions

Operations does not use namespaces. Neither packages nor models equate to a namespace. A model simply implies a scope, but all types must be globally unique; even in different models and packages. A name space would allow a class to have the same name as another class in a different namespace.

Therefore, every element must be globally unique by type; this includes models, packages, and every element in the application metadata. So, we will still need prefixes. Even if we create an extension of an element, such as a form, we must change the name so that it is guaranteed to be globally unique.

For example, if we wanted to create an extension of the WHSLoadTable table, it will call the WHSLoadTable.extension object by default. As our customer might want an add-on that also adds fields to this table, we need a want to ensure that the element is unique.

The best way to do this would be to use our prefix, which is Con in our case. To make it obvious of where the element is used, we use the package name as the suffix, for example, WHSLoadTable.ConWHS. There is no official best practice available for this, but the point to remember is that all elements of a type must be globally unique - and extensions are no exception.

You have been reading a chapter from
Extending Microsoft Dynamics 365 for Operations Cookbook
Published in: May 2017
Publisher: Packt
ISBN-13: 9781786467133
Register for a free Packt account to unlock a world of extra content!
A free Packt account unlocks extra newsletters, articles, discounted offers, and much more. Start advancing your knowledge today.
Unlock this book and the full library FREE for 7 days
Get unlimited access to 7000+ expert-authored eBooks and videos courses covering every tech area you can think of
Renews at $19.99/month. Cancel anytime
Banner background image