Search icon CANCEL
Arrow left icon
Explore Products
Best Sellers
New Releases
Books
Videos
Audiobooks
Learning Hub
Conferences
Free Learning
Arrow right icon
Arrow up icon
GO TO TOP
Building RESTful Web Services with Spring 5

You're reading from   Building RESTful Web Services with Spring 5 Leverage the power of Spring 5.0, Java SE 9, and Spring Boot 2.0

Arrow left icon
Product type Paperback
Published in Jan 2018
Publisher Packt
ISBN-13 9781788475891
Length 228 pages
Edition 2nd Edition
Languages
Tools
Arrow right icon
Authors (2):
Arrow left icon
Ludovic Dewailly Ludovic Dewailly
Author Profile Icon Ludovic Dewailly
Ludovic Dewailly
Raja CSP Raman Raja CSP Raman
Author Profile Icon Raja CSP Raman
Raja CSP Raman
Arrow right icon
View More author details
Toc

Table of Contents (15) Chapters Close

Preface 1. A Few Basics FREE CHAPTER 2. Building RESTful Web Services in Spring 5 with Maven 3. Flux and Mono (Reactor Support) in Spring 4. CRUD Operations in Spring REST 5. CRUD Operations in Plain REST (Without Reactive) and File Upload 6. Spring Security and JWT (JSON Web Token) 7. Testing RESTful Web Services 8. Performance 9. AOP and Logger Controls 10. Building a REST Client and Error Handling 11. Scaling 12. Microservice Basics 13. Ticket Management – Advanced CRUD 14. Other Books You May Enjoy

Postman


We have already used Postman in previous chapters for testing our REST APIs. Postman will be helpful when we need to test the application completely. In Postman, we can write test suites to validate our REST API endpoints.

Getting all the users – Postman

First, we shall start with a simple API for getting all the users:

http://localhost:8080/user

The earlier method will get all the users. The Postman screenshot for getting all the users is as follows:
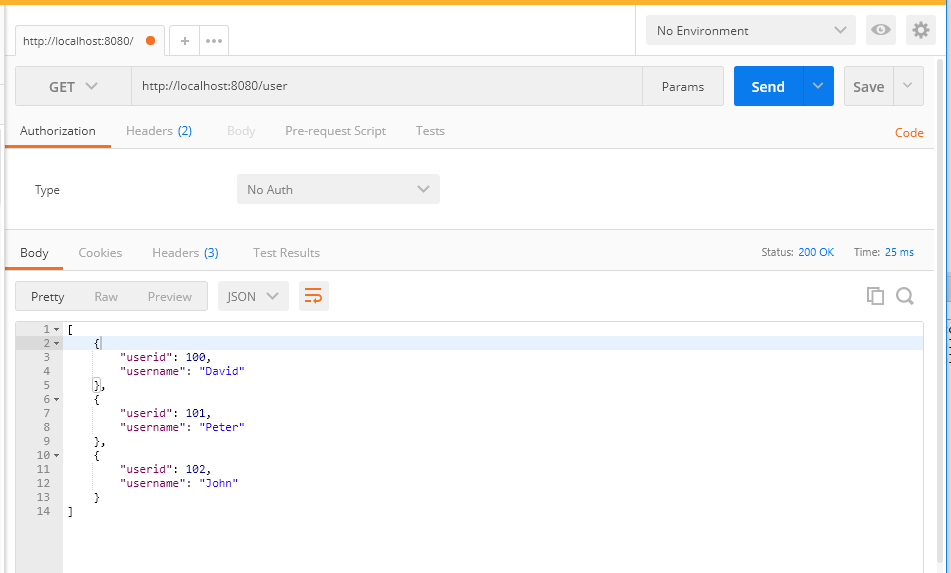
In the preceding screenshot, we can see that we get all the users that we added before. We have used the GET method to call this API.

Adding a user – Postman

Let's try to use the POST method in user to add a new user:

http://localhost:8080/user

Add the user, as shown in the following screenshot:
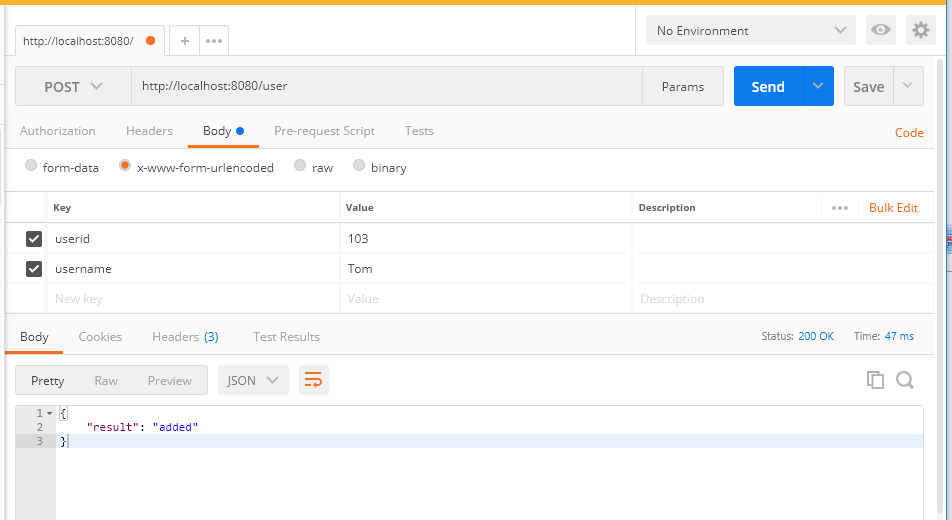
In the preceding result, we can see the JSON output:

{
     "result" : "added"
}

Generating a JWT – Postman

Let's try generating the token (JWT) by calling the generate token API in Postman using the following code:

http://localhost:8080/security/generate...
lock icon The rest of the chapter is locked
Register for a free Packt account to unlock a world of extra content!
A free Packt account unlocks extra newsletters, articles, discounted offers, and much more. Start advancing your knowledge today.
Unlock this book and the full library FREE for 7 days
Get unlimited access to 7000+ expert-authored eBooks and videos courses covering every tech area you can think of
Renews at $19.99/month. Cancel anytime