Learning about the Arduino IDE
By definition, an IDE is a software application that provides facilities for software development; it normally consists of a source code editor and may include a debugger and build automation tools.
The Arduino IDE brings together a collection of tools and interfaces that make it easier to develop your firmware. The IDE is available for various operating systems from the following URL: https://www.arduino.cc/en/software.
A visit to the preceding URL will show you that there is a Cloud IDE and a Desktop IDE. Let’s take a closer look at each one.
Arduino Cloud IDE
The Cloud IDE complements the Arduino IoT Cloud that is available from the company. You can access the Cloud IDE from the following URL: https://create.arduino.cc/editor.
The Cloud IDE has a limit to how often you can compile code and deploy firmware, and is most useful in the following scenarios:
- Your computer or operating system is unable to support an official version of the Arduino Desktop IDE
- You would like to update the firmware on a device that is connected to the Arduino Cloud
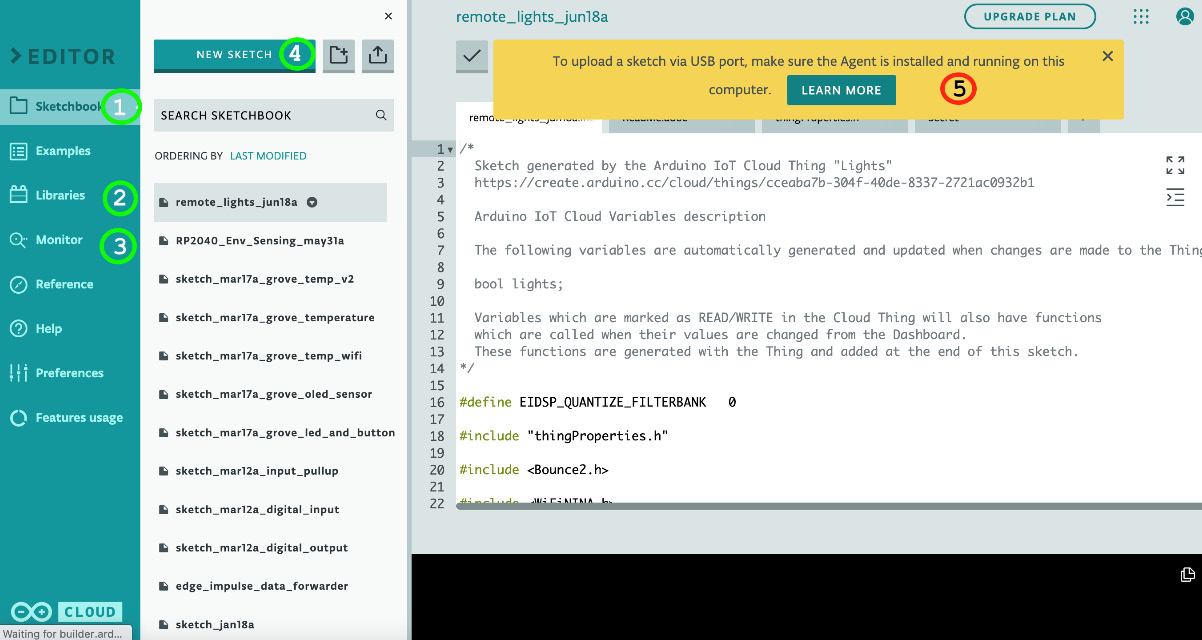
The following screenshot shows a sample of what the IDE looks like. Note the items numbered 1 through 5 in the figure.

Figure 1.2 – The Arduino Cloud IDE
The large white section on the right is your code editor. The black section underneath provides output information when you perform operations such as code compilation and deployment.
The numbered sections provide certain functionality or information as follows:
- Sketchbook: This lets you manage your sketches (Arduino code is called a sketch). You can see a list of sketches in the middle section.
- Libraries: This lets you manage various libraries. These are code packages that let you work with some sensors, displays, or actuators, or that let you simplify complex tasks.
- Monitor: This lets you view output from your serial port, an interface that lets the board communicate with computers and other devices. It is frequently used for debugging purposes.
- SketchBook: This lets you create new sketches, upload sketches from your computer, or manage folders. This is only visible when you choose Sketch from the panel on the left.
- Notice pane: This only pops up to warn you that you need the Arduino Create Agent in order for the browser to communicate with your board. The Cloud IDE requires the Chrome browser.
Arduino Desktop IDE
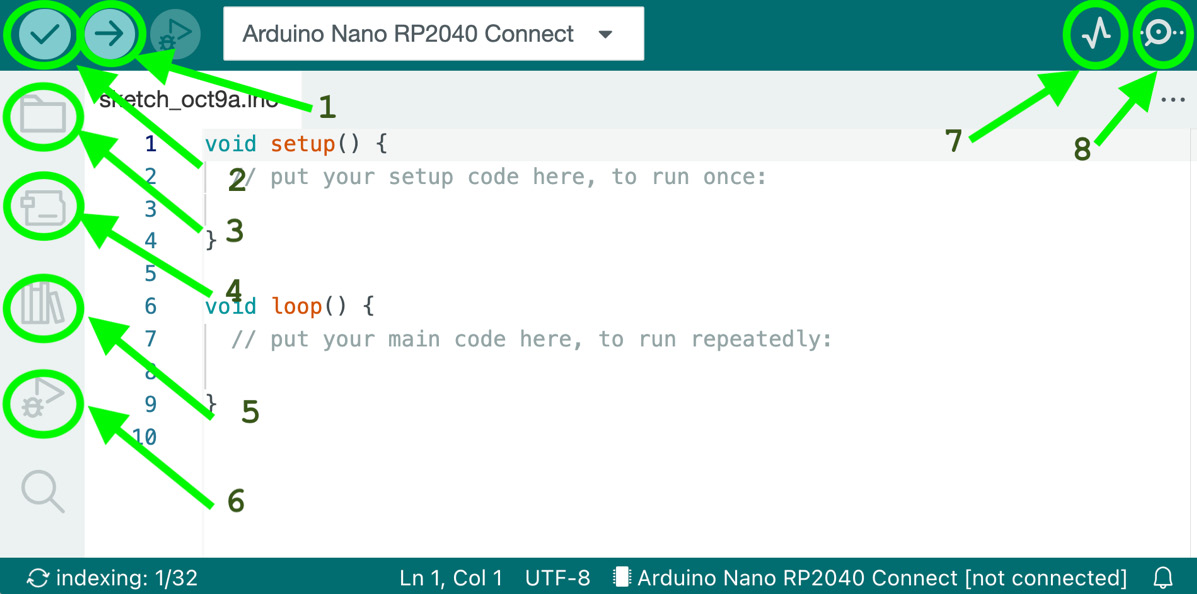
If you haven’t already, you can get a copy of the Arduino Desktop IDE from the following URL: https://www.arduino.cc/en/software. After downloading and installing the appropriate version for your computer, you will be met with an interface similar to the one shown next. Please note the numbered sections.

Figure 1.3 – The Arduino Desktop IDE
The white drop-down component at the top of the IDE lets you choose the board you are working with. Don’t worry if you can’t find your board; you can install it from Boards Manager. Let’s take a closer look at the numbered sections:
- This button deploys firmware to the selected board.
- This button verifies that the code will compile for the selected board. This does a few things, including checking for syntax errors and confirming that all libraries are certified to work for your chosen board/chip.
- Sketch Manager: This lets you view other sketches and open them for editing.
- Boards Manager: This lets you install definitions for additional supported boards.
- Library Manager: This lets you find and install libraries.
- Debug: This lets you step through your code and set breakpoints that make it easier to debug.
- Serial Plotter: This lets you plot numbers that are being written out to the serial console.
- Serial Console: This lets you inspect output being written to the serial console.
Let’s discuss the programming language next.


