In this section, we will be preparing our target. We are using a 32-bit Windows 7 machine as our target. We will begin by installing Python 2.7.14+ version from https://www.python.org/downloads/. After you begin the installation, you'll notice that Python will install other handy tools such as pip and easy_install. We will be using pip to install third-party libraries later on.
Similar to what we have done in Kali, we will create a quick and simple Python script just to make sure that everything is working fine. Create a new file. Type print ('hi'), run the script, and save it to the desktop. After this, we need to add Python to our path, so we can start an interactive mode or interactive shell anywhere from the command line. Open a command line and type python; you will see that Windows does not recognize the python.exe application by default, so we've got to add that manually.
Perform the following steps to achieve this:
- Go to Advanced system settings | Environment Variables.
- In System Variables, scroll down until you reach the variable Path. You will need to append the Python path and the pip path here.
- Copy the path where the Python application is installed and append it to the Variable value.
- Ensure that you insert a semicolon at the end, just to make sure that you append it to our existing Variable value.
- Also, copy the path where pip is installed from the /Scripts folder and append it to the Variable value as shown in the following screenshot:

- Restart the machine so that it recognizes the new values we've just inserted.
- After the restart is complete, open a command line and type python and the interactive shell will appear:

- Now, to get connectivity with our Kali machine, make sure that the network setting is set to Internal Network and the network name matches the name on the Kali side, which is intnet:

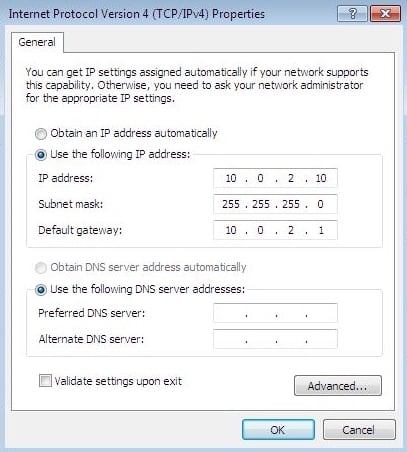
- Lastly, we need to give this machine an IP address on the same subnet as the Kali machine. We can change the network settings by going to Network and Internet/Network and Sharing Center from the control panel. Click on the Local Area Connection and then click on Properties. From there, go to Internet Protocol Version 4 (TCP/IPv4), enter the IP address as 10.0.2.10 and the rest as shown in the following screenshot. Then click on OK:


