Prerequisites for System Center Configuration Manager 2012 R2
Before you start deploying System Center Configuration Manager, you must make sure that your infrastructure meets all of the prerequisites. What follows is a list and a step-by-step guide that shows you how to meet these prerequisites.
Creating the System Management container
When the Active Directory schema is extended, the System Management container in Active Directory is not created by default. The container has to be created in all Active Directory domains that contain a primary site server or a secondary site server that publishes site information to Active Directory. In order to create the System Management container, take a look at the following steps:
- You have to log on to your Domain Controller and open ADSI Edit. You can also do this from any other machine that has ADSI Edit installed on it and connect to the Domain Controller. The account that you use to connect to the Domain Controller must have permissions to modify objects in ADSI Edit. You can open ADSI Edit from Server Manager Console, from the
Control Panel\SystemandSecurity\Administrative Toolslocations or by opening Run under the Start icon and typingadsiedit.msc:
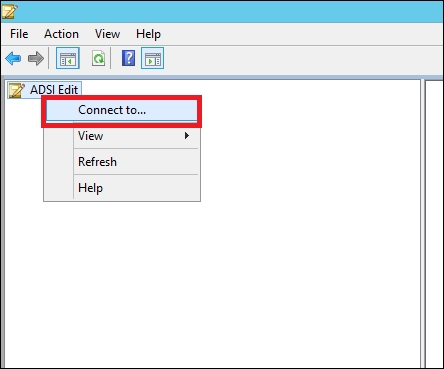
- Right-click on ADSI Edit and click on Connect to…:
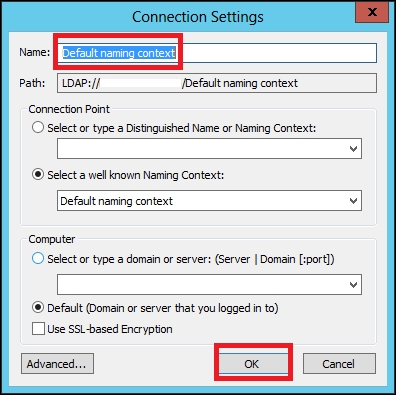
- In the Connection Settings window, make sure that the Name field is set to Default naming context. Leave everything else as it is and click on OK:
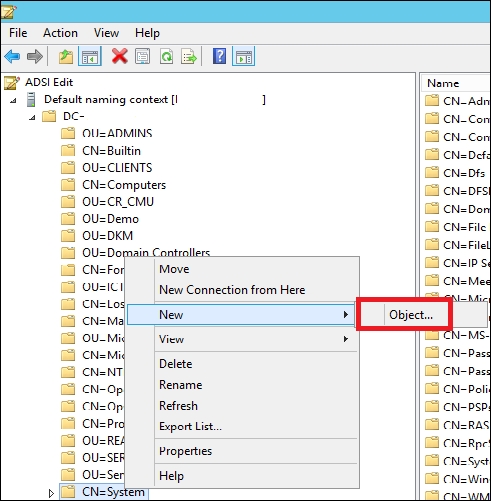
- In the ADSI Edit console, expand Default naming context in the folder pane, right-click on CN=System, click on New, and then click on Object…:
- When the Create Object window appears, select container and click on Next:

- Enter
System Managementin the Value textbox and click on Next to finish: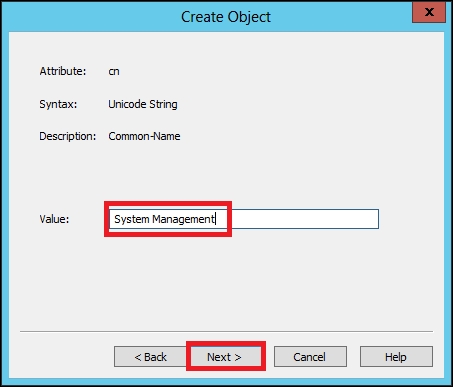
With this, the System Management container is created in Active Directory. Next, we have to join the site server to the Active Directory domain and give computer account permissions to the site server to publish the site information to the container. A primary site server computer account must have full control permissions on the System Management container. To do this, perform the following steps:
- Open the Active Directory Users and Computers console or open Run under the Start icon and type
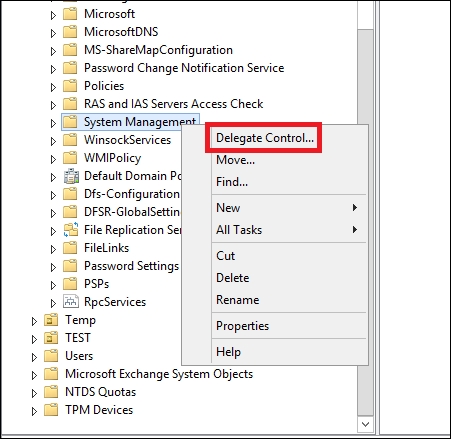
dsa.msc. - Navigate to the System Management container, right-click on it, and select Delegate Control…. When you click on Delegate Control…, a wizard starts, which guides you through the process:
- In the first window, just click on Next.
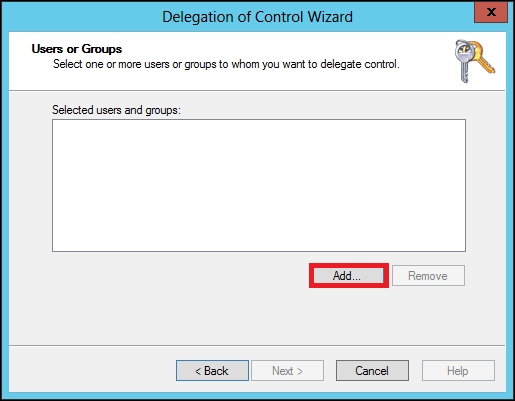
- In the second window, click on Add…:
- When a new window appears, go to Object Types and make sure that Computers is checked:

- Then, add your primary site server's computer account and click on OK:

- In the next window, select Create a custom task to delegate:

- Select This folder, existing objects in this folder, and creation of new objects in this folder and click on Next:

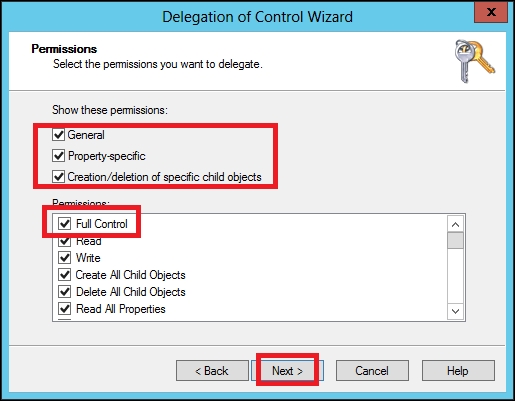
- In the next window, select all the three options under Show these permissions and select Full Control under Permissions. Then, click on Next:
We have now delegated full permissions to the primary site server's computer account on the System Management container. To find out how to create the System Management container in a different way, check this link:
https://gallery.technet.microsoft.com/scriptcenter/Create-SCCM-System-91fee476
Extending the Active Directory schema for SCCM 2012 R2
In order to extend the Active Directory Schema for System Center Configuration Manager 2012 R2, you need to use a tool that is located in the installation media of System Center Configuration Manager 2012 R2. You can also use the ldif file. This file will enable you to import or export information to or from Active Directory.
Open the installation media, go to SMSSETUP, then open BIN, and go to x64; you will find extadsch.exe. You can either click on this or copy the path and run it from the command prompt. To run extadsch.exe, you have to use an account with Schema Admin permissions.
When it finishes, you should see the following message in the command prompt:

Installing Windows Server's roles and features
Before you can install the required Windows Server roles and features for System Center Configuration Manager 2012 R2, you need to make sure you have done the following:
- Created the System Management container
- Assigned permissions to the primary site server or multiple primary, secondary, and a CAS server
- Extended the Active Directory schema
You can use the prerequisites checker tool that is provided with the System Center Configuration Manager 2012 R2 installation media, which is located in \SMSSETUP\BIN\x64\prereqchk.exe. You can also use PowerShell or the tool from the following link to install all the prerequisites:
https://gallery.technet.microsoft.com/ConfigMgr-2012-R2-e52919cd
The following is a list of the Windows Server roles, features, and role services required by System Center Configuration Manager 2012 R2:
- Windows Server role
- Web Server
- Windows Server features
- .NET Framework 3.5 (with all subfeatures)
- .NET Framework 4.5 (with all subfeatures)
- BITS
- Remote Differential Compression
- Windows Server role features
- Common HTTP features (Default Document and Static Content)
- Application development (ASP.NET 3.5, .NET extensibility 3.5, ASP.NET 4.5, and ISAPI extensions)
- Security (Windows authentication)
- IIS 6 Management Compatibility (IIS Management Console, IIS 6 Metabase Compatibility, IIS 6 WMI Compatibility, and IIS Management Scripts and Tools)
Installing ADK 8.1 for SCCM 2012 R2
The Windows Assessment and Deployment Kit (ADK) is a set of tools that allow you to customize, assess, and deploy Windows operating systems to new machines. The installation process is simple and straightforward. You can download the ADK from the following location:
http://www.microsoft.com/en-US/download/details.aspx?id=39982
The only thing that you need to keep in mind is feature selection. Proceed with the following steps:
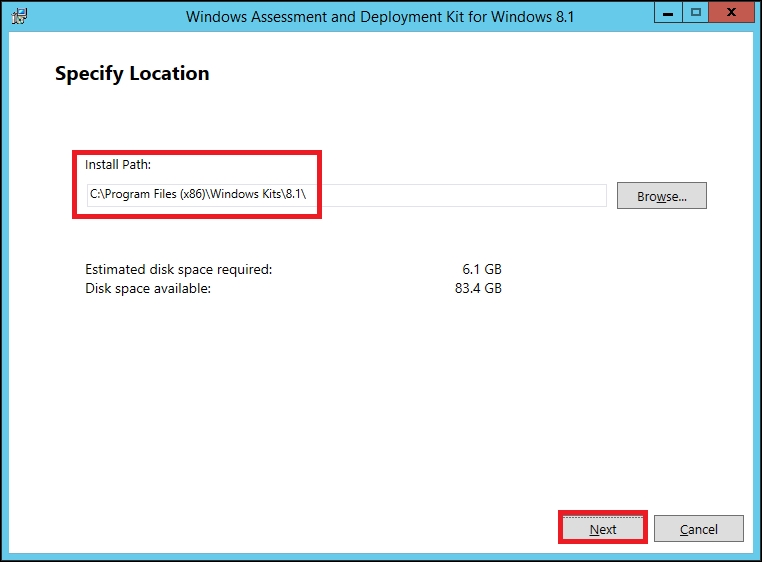
- In the first step, choose the Install Path tab and click on Next:
- Next, select whether you want to join the customer experience improvement program and click on Next:

- Next, you have to accept the license agreement by clicking on Accept:

- Now, you have to choose which of the features should be installed. Only select the ones that are selected in the following screenshot. Click on Install to start the installation process:


